
Just Saying Boo: 3 Clean and Simple Halloween Cards to Make This Season

I’ve always enjoy making clean and simple cards because they prove that you don’t need a complicated layout, lots of layers, or a desk full of supplies to create something that catches the eye. Sometimes a single stamped image, a little color, and a thoughtful background are all it takes.
For these three Halloween cards, I decided to keep things especially simple by making them one layer cards. I used the same focal stamp from the Unity Stamps Purranormal Activities Stamp Set, but changed the way I created the background around each image. That small change made each card feel different while keeping the overall design cohesive.

This is one of my favorite ways to approach cardmaking when I want to use a stamp set in several ways. Instead of searching for three completely different layouts, I can let the stamped image do most of the work and experiment with the space surrounding it.
Clean and Simple Halloween Cards: Three Ways to Build a Focal Point
The biggest design decision for these cards was to keep the focal image in the spotlight. With a detailed Halloween image like the ones in Purranormal Activities, adding too many layers or embellishments could actually compete with the stamped artwork.
Instead, I used color to create a visual area around each image.
On two of the cards, I colored the stamped images with Honolulu Alcohol Markers and then used additional marker color around the outside of the image. This is a simple technique, but it can make a surprisingly big difference. The color essentially creates an invisible frame around the stamped image and helps your eye know exactly where to look.
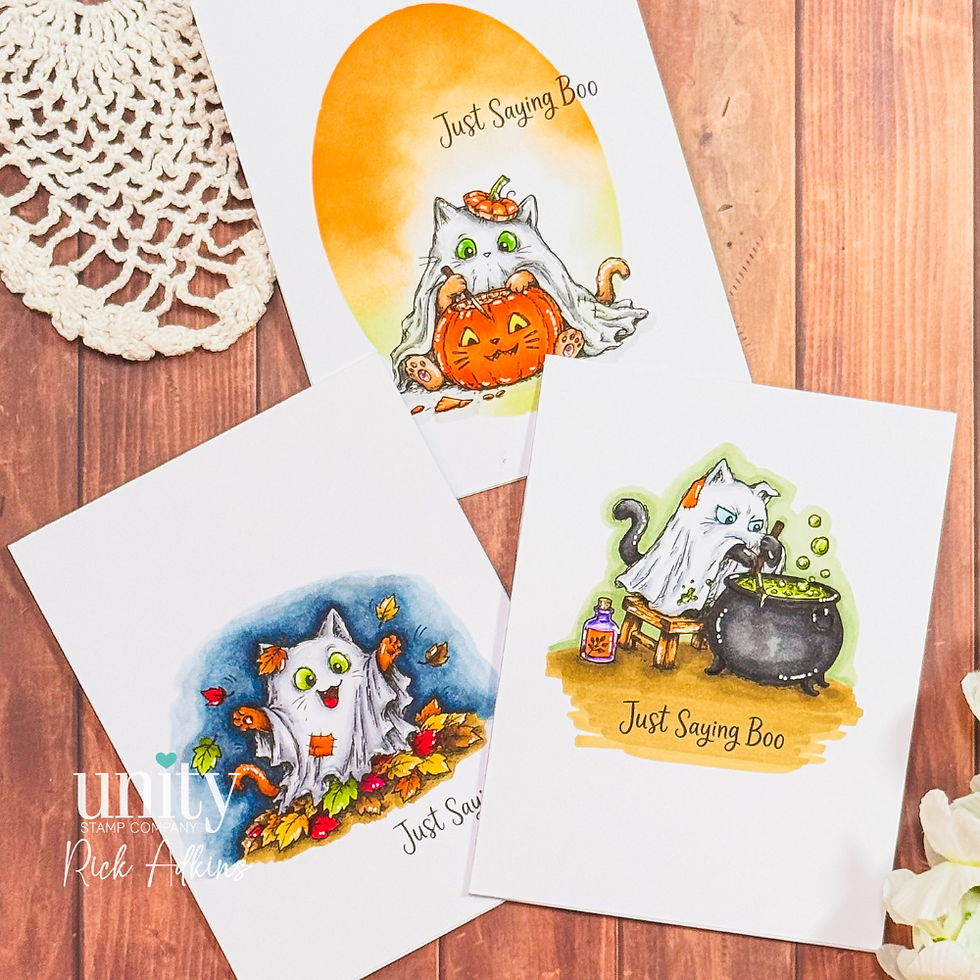
The third card uses a different approach. I brought in the 8-in-1 Essential Masking Stencils to create a soft, blended background behind the stamped image. The stencil allowed me to add a defined area of color while still keeping the card completely one layer.
That contrast is something I really like about clean and simple cardmaking: the basic layout stays the same, but the technique can completely change the personality of the card.
Why One Layer Cards Work So Well
One layer cards can sometimes feel intimidating because there isn't anywhere to hide a mistake or cover an area that didn't turn out quite the way you imagined. But that limitation can actually be helpful.
It encourages us to think about placement, white space, and focal points before we start adding embellishments.

White space is especially important with this style of card. I intentionally left plenty of open cardstock around the colored areas rather than trying to fill the entire card front. That breathing room helps the Halloween images stand out and keeps the designs from feeling busy.
If you're newer to clean and simple cardmaking, here's a tip I use often: don't think of empty space as unfinished space. It is part of your design.
The open area around a stamped image gives the eye somewhere to rest and makes the focal point feel more intentional.

Creating a Focal Point Without Extra Layers
One of the easiest ways to adapt this idea with supplies you already own is to think beyond traditional background techniques.
You don't necessarily need patterned paper, die cuts, mats, or embellishments to create a background.
For example, try coloring around a stamped image with alcohol markers. You can keep the color relatively soft near the image and build it outward, or create a more defined shape that almost looks like a halo or painted background.

The key is to think about the shape you're creating around the image.
For these cards, the colored areas aren't random. They help visually contain each focal image. This is particularly useful when your stamp has a lot of detail because the background color gives all of those details somewhere to live.
If you're not comfortable coloring around an image, you could create a similar effect with ink blending. A small blending brush and a couple of coordinating inks can give you a soft halo behind a stamped image without adding another layer of cardstock.
And if you have masking stencils in your stash, they're another great option. You can use a stencil to define the shape of the background and then blend ink inside that area.

Let One Stamp Set Do More Work
Another lesson from this project is that you don't always need a large collection of images to make multiple cards.
I used the Purranormal Activities Stamp Set as the starting point for all three cards, but the backgrounds changed the overall appearance enough that the cards don't feel like copies of one another.
This is something I encourage cardmakers to try with stamps they already own. Pick one image you really like and challenge yourself to make three cards using that same image.

Change one element each time:
Try a different background color.
Change the shape of the colored area.
Use ink blending instead of marker coloring.
Add a masking stencil to one version.
Move the sentiment.
Change the amount of white space around the focal image.
You may be surprised by how many different looks you can get from one stamp.

A Small Detail I Love: Stamping the Back of the Card
I also carried the focal image around to the back of each card, stamping it alongside my personal stamp.
It's a small detail, but I think it adds a finished touch to a handmade card. It also gives you another opportunity to use an image from your stamp set without adding anything to the card front.
This is a particularly nice idea when you're making one layer cards because the back of the card can become part of the overall design without interfering with the clean front.
You could use the same focal image I did, but you could also choose a small coordinating stamp, a sentiment, or another image from your stash.

Make the Idea Your Own
You certainly don't need the exact products I used to recreate the design concept.
If you have a Halloween stamp that you love, start there. Use whatever coloring medium you already have—alcohol markers, colored pencils, watercolor, or even ink blending. If you don't have masking stencils, try creating a simple background shape with a piece of scrap cardstock as a mask.
And don't feel like your background has to be Halloween orange, green, or purple. One of the easiest ways to make a clean and simple card feel more sophisticated is to choose an unexpected color combination and let the stamped image provide the theme.

The important part isn't recreating these cards exactly. It's understanding why the design works: one strong focal image, intentional color, plenty of white space, and just enough detail to guide the eye.
That's what makes this style of card so useful. Once you understand the basic design principle, you can apply it to birthdays, thank-you cards, friendship cards, Christmas cards, or almost any other occasion.
These clean and simple Halloween cards are a good reminder that simple doesn't have to mean boring. Sometimes giving one stamped image plenty of room to shine is all a card really needs.
So the next time you're looking at a favorite stamp and wondering how to make something different with it, try removing a few elements instead of adding more. Give the image some breathing room, create a focal area with color, and see what happens.
You might just find that less really can be more when it comes to handmade cards.
Thanks for dropping by today I hope that you found a little spark of creative inspiration with my project today. Wondering what I used in this project? Everything is linked to multiple sources in the thumbnails in the Materials Used section, or in the text below. Compensated affiliate links used when possible.
Supplies Used
Here you will find the list of supplies that I used to create today's card. All supplies are linked to supply sources below. Compensated affiliate links may be used at no cost to you.
Happy Crafting,

Rick Adkins
Affiliate Disclaimer:
This post contains affiliate links. If you choose to shop through these links, I may earn a small commission at no extra cost to you. Thank you so much for supporting my business!


Comments