
From Stamped Images to Spooky Scene: A Halloween Card

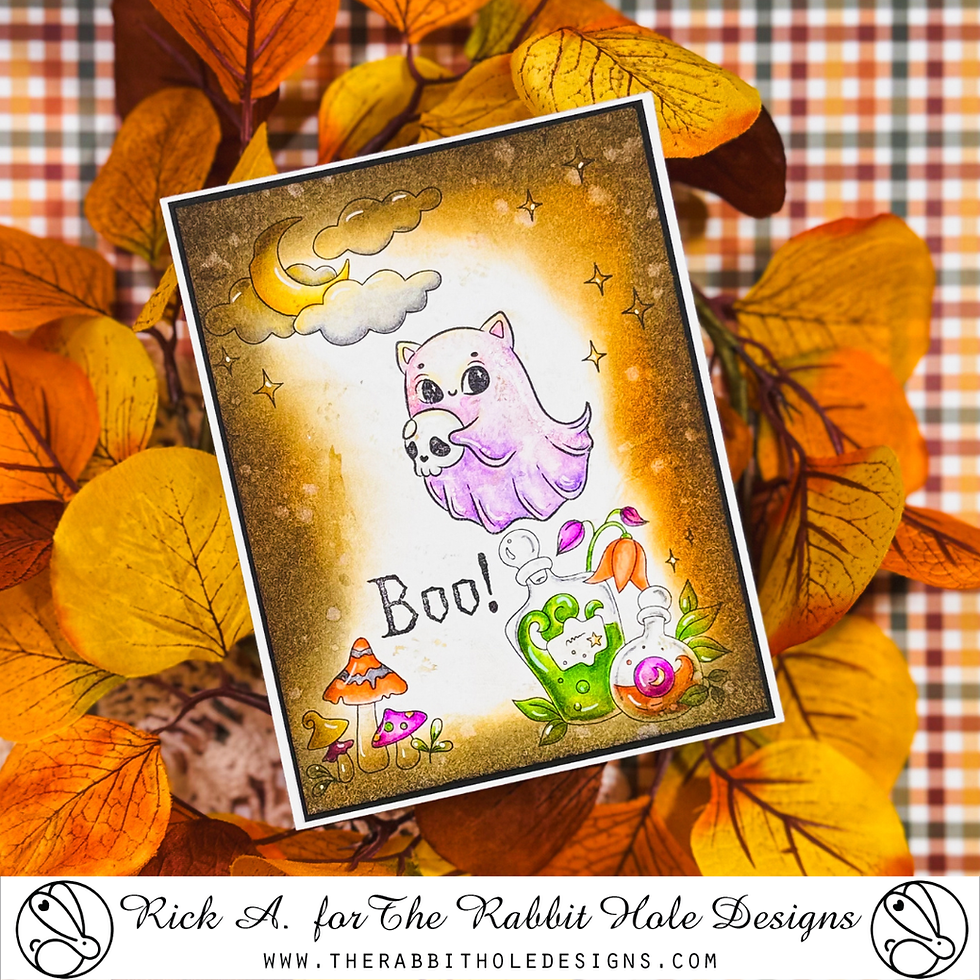
Halloween cards are one of my favorite places to play with atmosphere. You can take a handful of stamped images, add some color and ink, and suddenly you have a little world happening on the front of a card. That was exactly the idea behind this Halloween card featuring the ghostly cat, potion bottles, mushrooms, moon, and stars from The Rabbit Hole Designs. Rather than trying to make every image the star of the show, I wanted to create a scene with a clear focal point and a background that felt a little mysterious without becoming so dark that the details disappeared.

From Stamped Images to Spooky Scene: A Halloween Card
One of the things I enjoy most about scene cards is that the magic often happens after the stamping. The stamped images give me the characters and objects, but the ink blending is what helps establish the setting. For this card, I used Distress Inks around the edges of the panel, gradually working toward the lighter center. Leaving that central area brighter creates a natural spotlight for the ghostly cat while the darker edges frame the entire scene.
This is also a good example of why I don't always reach for a complicated background stamp or patterned paper when making a scene card. A few stamped images can be enough when you give them a little room to breathe. The Cats & Bats Stamp Set with Stencil was used for its stamped images only, along with images from the Spooky Sightings Stamp Set. I chose the images based on how they could work together visually rather than trying to use every image from either set. That is a simple design decision, but it can make a big difference in the finished card.

Let Your Focal Point Do the Heavy Lifting
The ghostly cat is clearly the focal point of this design, so I wanted the surrounding elements to support it rather than compete with it. The moon and clouds help draw the eye toward the upper portion of the card, while the potion bottles and mushrooms anchor the lower right and left areas. Those supporting elements also help create visual movement, giving the eye several places to explore while always bringing it back toward the main character.
For the coloring, I used Tombow Dual Brush Pens. I didn't worry about making every image perfectly shaded or hyper-realistic. Instead, I concentrated on using color to separate the images and give them enough dimension to stand out against the blended background. This is an important lesson for newer cardmakers: coloring doesn't have to be complicated to be effective. A little variation in color and value can make stamped images feel much more dimensional.

A Simple Way to Create More Depth
One of my favorite techniques for creating depth on a handmade card is to think about contrast before adding more supplies. The darker Distress Ink around the perimeter makes the center appear lighter. The brighter colors in the stamped images then stand out against that darker frame. It's a relatively simple stamping and ink blending technique, but it creates the impression of a much more involved background.
You can easily adapt this idea with supplies you already have. Don't have Distress Inks? Try whatever dye inks, pigment inks, or blending mediums are already in your stash. You can also change the color palette completely. A deep blue or purple background would create a moonlit Halloween scene, while green and brown could give the card a more witchy, forest-like feel. And if coloring with Tombow Dual Brush Pens isn't your thing, colored pencils, markers, watercolor, or even paper-piecing would work beautifully with the same basic composition.

Make the Design Your Own
What I especially like about this project is that the basic idea isn't limited to Halloween. The design principle—stamped images + a controlled background + one strong focal point—can be used throughout the year. Swap the ghostly cat for a birthday character, replace the potion bottles with flowers, or create a winter scene with snowflakes and evergreen images. Once you understand why the elements work together, you can recreate the concept with almost any stamp collection.

That's one of the reasons I encourage cardmakers to look at their supplies a little differently. Instead of asking, “What card can I make with this stamp set?” try asking, “Which images from this set can I combine to tell a story?” That small shift can turn a collection of individual stamps into an entire scene—and it gives you so many more possibilities from the supplies you already own.
Halloween is the perfect excuse to experiment with dramatic backgrounds, colorful stamped images, and a little bit of spooky atmosphere. But you don't need a huge collection of supplies or complicated techniques to make it happen. Start with a few images you love, choose one focal point, and use contrast to bring everything together. Sometimes the simplest combination of stamping, Tombow coloring, and Distress Ink blending is all it takes to turn a few stamped images into a card with a whole story to tell.
Thanks for dropping by today I hope that you found a little spark of creative inspiration with my project today. Wondering what I used in this project? Everything is linked to multiple sources in the thumbnails in the Materials Used section, or in the text below. Compensated affiliate links used when possible.
Supplies Used
Here you will find the list of supplies that I used to create today's card. All supplies are linked to supply sources below. Compensated affiliate links may be used at no cost to you.
Happy Crafting,

Rick Adkins
Affiliate Disclaimer:
Just a friendly reminder, as part of my commitment to transparency, please note that some of the links provided maybe affiliate links. This means that if you make a purchase through these links, I may earn a small commission at no extra cost to you. Your support is truly appreciated!
Additionally, I kindly ask that you always accept the tracking cookie for the affiliate websites. Rest assured, this will not in any way expose your computer to viruses or compromise your information. It's simply necessary for the company to attribute the sale to the affiliate, ensuring creators like myself receive their rightful commissions.
Your trust and support enable me to continue sharing creativity through my email lists, blog, and YouTube channel. Thank you for being a valued part of our crafting community!


Comments