
How to Make a Sashed Faux Step Fun Fold Card

I love a card design that looks intricate and dimensional but can be created with a little thoughtful cutting, scoring, and layering. This fall sashed faux step fun fold card is a great example! The stepped card base, diagonal sash, and warm autumn patterned papers work together to create a design with plenty of visual interest without needing lots of extra embellishments. I used the Maplewood Cottage collection from Paper Rose Studio, pairing the rich fall imagery with Christmas Red cardstock to frame the layers and make the colors pop. The little fox, autumn harvest details, and “apple of my eye” sentiment give the finished card a cozy personality that feels just right for fall.

What Makes the Sashed Faux Step Fun Fold Card Work?
When I design a fun fold card, I want the structure to be part of the design rather than simply a way to make the card different. With this sashed faux step fun fold, the scored and folded base creates the stepped profile, while the diagonal sash draws the eye toward the focal point. That combination gives the card movement and dimension, even when it is standing on display. The sash also creates a natural place to showcase a sentiment or decorative element, helping the different sections feel connected instead of competing for attention. If you are new to fun fold cards, this is a wonderful layout to explore because the visual impact comes primarily from the paper placement and folds rather than complicated embellishing.

Choosing Patterned Paper and Layered Details
The Maplewood Cottage 6x6 and 12x12 Paper Packs from Paper Rose Studio gave me coordinating patterns to work with while allowing each section of the card to have its own personality. I used the larger apple print to bring a bold, colorful background to the design and smaller autumn patterns to add detail around the focal image. Christmas Red cardstock provides a consistent border around those patterns, which is an important design choice when several prints appear on one card. These solid mats give the eye a place to rest and keep the patterns from feeling too busy. I also used the Maplewood Cottage Layered Sentiments and Embossed Die Cuts to add dimension without having to stamp, color, and cut every decorative element myself. Ready-made ephemera is especially helpful when you want a polished handmade card but have limited crafting time. The Stitched Squares Die Set adds a finished edge to the focal panel, tying the layers together with a subtle stitched detail.

Cutting, Scoring, and Assembling the Card Base
For the card base, cut Basic White cardstock to 5 1/2" x 8 1/2" and score at 3", 6", and 7 1/4". These score lines create the stepped structure, so take a moment to check the orientation of your folds before adding any patterned paper. I find it helpful to use a bone folder to burnish the creases neatly; crisp folds make a big difference in how well a fun fold card stands and displays. For the sash, cut a separate piece of Christmas Red cardstock to 5 1/2" x 8 1/2" and score it at 4 1/4". Fold and burnish the cardstock, then, while it is folded, mark 1 1/2" in from the upper-right and lower-left corners and cut from each mark to its corresponding corner to create the diagonal shape. This produces a symmetrical sash when opened. Before permanently attaching your layers, test-fit the sash against the card base and make sure it sits where you want it. A little dry fitting now can save you from having to remove adhesive later.

Here are the measurements I used for the remaining layers:
Christmas Red cardstock mat 1: 2 3/4" x 5 1/4"
Patterned Paper 1: 2 5/8" x 5 1/8"
Christmas Red cardstock mat 2: 1" x 5 1/4"
Patterned Paper 2: 7/8" x 5 1/8"
Sash (Christmas Red Cardstock) - Cut at 5 1/2" x 8 1/2" scored at 4 1/4". Fold and Burnish on the scored line. Mark at 1 1/2" in from the upper right and lower left corners and cut from each mark to each corner (while folded) to create the sash.
Patterned Paper 3: 1" x 7", cut from the 12" x 12" paper pack
Christmas Red cardstock focal mat: 2 7/8" x 2 7/8"
Patterned Paper 4: 2 1/2" x 2 1/2"
One small detail worth remembering: if you use a directional pattern for the square focal panel, pay attention to the direction of the design when cutting. Turning a patterned paper on the diagonal can change how its images appear, and you want the finished panel to look intentional. I also recommend keeping your adhesive close to the edges of the sash and checking that the folded sections move freely before securing everything in place.

Make This Fall Fun Fold Your Own
The great thing about this layout is how easily you can adapt it to your own supplies. You do not need the exact Maplewood Cottage collection to make a beautiful version. Try mixing plaid, woodgrain, leaves, pumpkins, or other autumn prints from your stash, and use a coordinating solid cardstock to create the mats. If you prefer a softer look, choose cream, kraft, or muted green cardstock instead of red. For a more modern fall card, use just two patterned papers and let a single focal image carry the design. You can also change the occasion by replacing the autumn imagery with florals, birthday motifs, or winter patterns. The same construction can work for many different themes, making it a useful design to revisit throughout the year. If you are still building confidence with fun folds, start by practicing the scoring and sash on inexpensive cardstock before cutting into your favorite patterned papers.
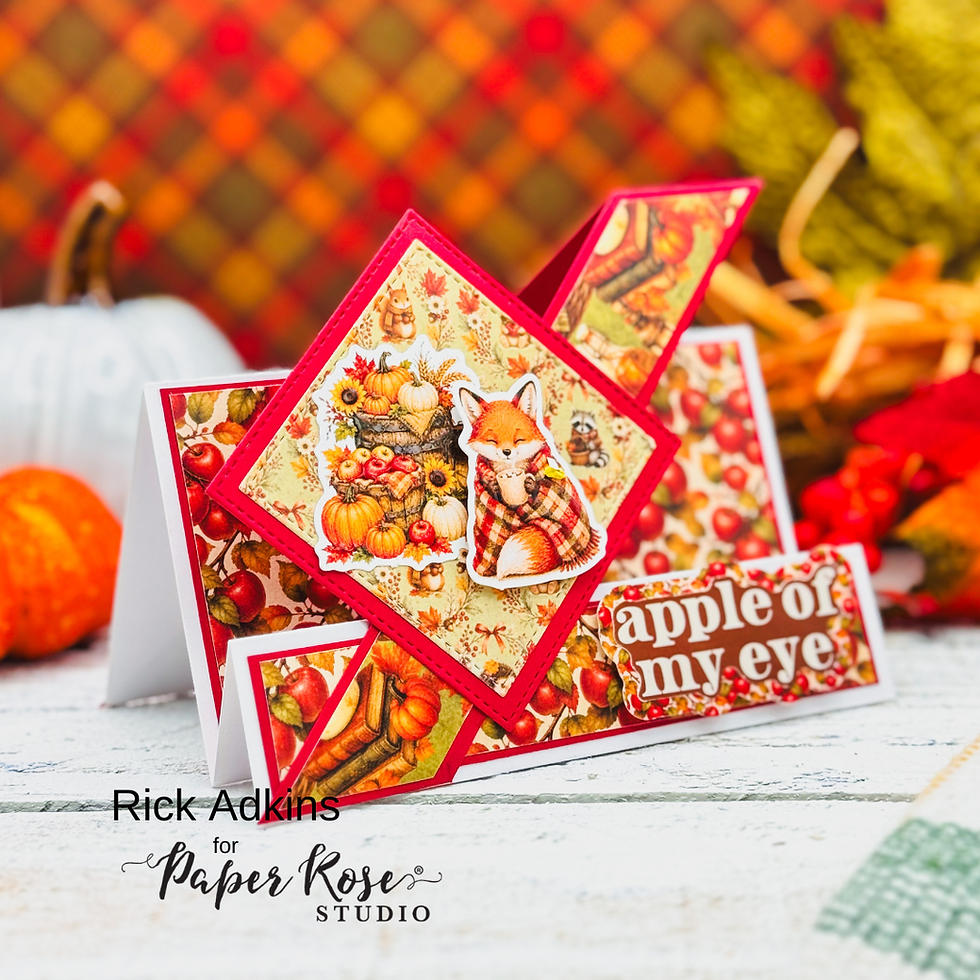
A dimensional card does not have to be complicated to feel special. For me, the secret is choosing a strong layout, repeating a few colors throughout the design, and giving each layer a purpose. This sashed faux step fun fold card brings those ideas together with patterned paper, crisp cardstock borders, and a few carefully placed decorative elements. I hope it inspires you to look at your paper stash a little differently and try a fold you may not have made before. Pull out a few coordinating prints, experiment with your favorite colors, and remember that the best part of handmade cardmaking is making a design your own!
Thanks for dropping by today I hope that you found a little spark of creative inspiration with my project today. Wondering what I used in this project? Everything is linked to multiple sources in the thumbnails in the Materials Used section, or in the text below. Compensated affiliate links used when possible.
Supplies Used
Here you will find the list of supplies that I used to create today's card. All supplies are linked to supply sources below. Compensated affiliate links may be used at no cost to you.
Happy Crafting,

Rick Adkins
Affiliate Disclaimer:
This post contains affiliate links. If you choose to shop through these links, I may earn a small commission at no extra cost to you. Thank you so much for supporting my business!


Comments