
Small Town Big Stories: Create a Storytelling Scene Card

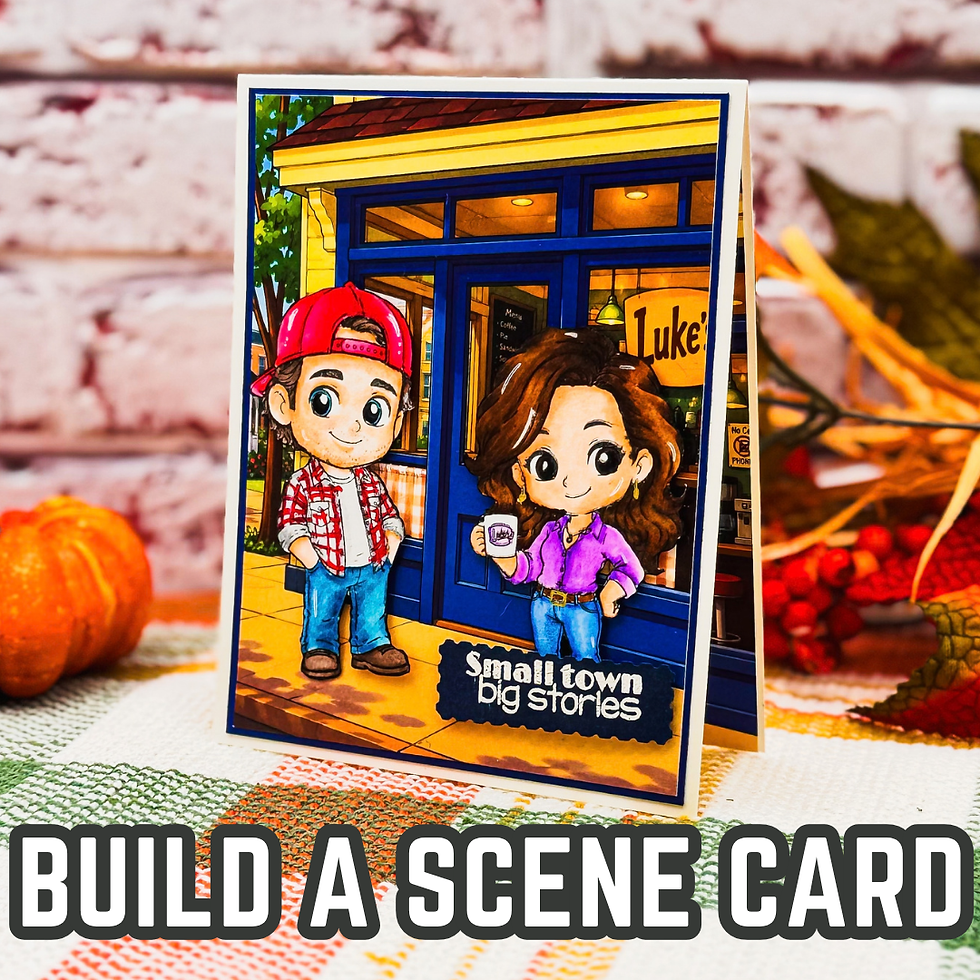
There’s something I really enjoy about a good scene card: it gives the recipient a little story to discover. Instead of simply placing a stamped image on a card front, you can combine characters, a setting, color, and a sentiment to create a moment that feels like it could belong in a much bigger story. That was the idea behind this card for the new C. C. Designs release and today’s Cards, Coffee, and Stars Hollow Instagram Hop. I wanted these two characters to feel like they belonged together in the same little town, so I used the pattern paper as more than a background—it became the setting for the entire scene.
Small Town Big Stories: Create a Storytelling Scene Card
For this scene card tutorial, I combined the Stars Hollow Stamp Set and Where You Lead Stamp Set from C. C. Designs. I used the guy image and sentiment from Stars Hollow and paired him with the girl from Where You Lead. The Where You Lead 6x6 Paper Pack was especially helpful because the patterns gave me an instant setting to build around rather than starting with a completely blank background.
One of the biggest design decisions here was letting the patterned paper do some of the storytelling. The storefront, sidewalk, windows, and warm colors create a sense of place before I even add the stamped characters. This is a useful trick whenever you're creating a scene card: look at your patterned paper as part of the illustration, not simply as something that fills empty space. A piece of paper with a building, landscape, woodgrain, or even a simple geometric pattern can give your stamped images context.

Think About the Characters Before You Color
I also wanted the two stamped images to feel connected, so I kept my coloring palette fairly cohesive. I colored the images with my Tombow Dual Brush Pens, paying attention to the colors already present in the patterned paper. That helped everything feel like it belonged together instead of looking like several separate elements placed on the same card.
This is one of those little design lessons that can make a big difference. You don't have to color every image in completely different colors just because you can. Pick two or three colors from your background paper and repeat those colors in your stamped images. It creates visual connections throughout the card and makes a busy scene feel much more intentional.
The characters were fussy cut and then placed into the scene, which is another technique I like for storytelling cards. Fussy cutting lets you decide exactly where your characters belong instead of being limited to the shape of a stamped panel. In this case, it allowed me to position the characters directly in front of the storefront and make them feel like part of the environment.

Let the Sentiment Finish the Story
The “Small Town Big Stories” sentiment was the perfect finishing touch because it reinforces what the card is trying to communicate without competing with the scene. I heat embossed the sentiment to give it some extra definition and make it stand out against the background.
I think sentiments can sometimes be treated as an afterthought, but on a scene card, they can actually help explain the story you're creating. When you're choosing one, ask yourself whether it simply fits the occasion or whether it adds something to the image. Here, the sentiment helps turn two stamped characters and a storefront into a little moment.

Adapt the Idea With What You Already Have
You certainly don't need these exact stamp sets to use this approach. Start by looking through your own stash for two or more images that could logically share the same setting. They don't even have to come from the same stamp set. A person from one set, a building or background from another, and a sentiment from a third can work beautifully together when the colors and scale make sense.
And if you don't have the coordinating outline dies, don't let that stop you. I didn't have the Stars Hollow Outline Die Set or Where You Lead Outline Die Set available when I made this card, so I simply fussy cut the images. If you do have the coordinating dies, they can certainly make the process quicker, but fussy cutting is a perfectly good option when you're working from your existing supplies.

The larger lesson I hope you take from this card is that you don't always need more supplies to create something that feels more detailed. Sometimes it's about looking at what you already have differently. Choose a background with a sense of place, find images that can interact with it, repeat a few colors, and let the sentiment complete the story. That's how a handful of stamped images can become a handmade card with a whole lot of personality.
Whether you're joining me through the Cards, Coffee, and Stars Hollow Instagram Hop or simply looking for a new way to use the stamps and patterned paper in your stash, I hope this gives you a little inspiration to create your own small-town story. The next time you pull out your stamps, don't just ask, “What card can I make with these?” Try asking, “What story could these images tell?” You might be surprised by where that question takes your cardmaking.

Thanks for dropping by today I hope that you found a little spark of creative inspiration with my project today. Wondering what I used in this project? Everything is linked to multiple sources in the thumbnails in the Materials Used section, or in the text below. Compensated affiliate links used when possible.
Supplies Used
Here you will find the list of supplies that I used to create today's card. All supplies are linked to supply sources below. Compensated affiliate links may be used at no cost to you.
Happy Crafting,

Rick Adkins
Affiliate Disclaimer:
This post contains affiliate links. If you choose to shop through these links, I may earn a small commission at no extra cost to you. Thank you so much for supporting my business!


Comments