
Spooky Cute Halloween Card with the Vampy Friends Stamp Set
- Rick Adkins

- Sep 1, 2025
- 4 min read
Updated: Oct 3, 2025
Halloween cards are some of my favorites to make because they let me mix spooky details with playful, lighthearted designs. I love the challenge of balancing the “creepy” with the “cute,” and today’s card does just that. I pulled out the Vampy Friends Stamp Set from C.C. Designs and instantly knew that the little mummy would be the star of this project. From there, I layered in patterned paper, stenciling, and a few glow-in-the-dark accents to create a card that’s fun, unique, and full of personality.

Spooky Cute Halloween Card with the Vampy Friends Stamp Set:
Bringing the Mummy to Life
I started by stamping the mummy from the Vampy Friends Stamp Set onto OLO Blending Card using Memento Tuxedo Black Ink. This paper and ink combo is one of my go-to’s for alcohol marker coloring because it gives such crisp results. Using my OLO Markers, I added shading to give the mummy dimension, and then came back in with a white gel pen for highlights. That tiny extra step may seem small, but it makes such a big difference. Whenever I want a stamped image to pop off the page, gel pen details are my secret weapon.

Building the Perfect Halloween Backdrop
Halloween cards beg for bold backgrounds, but they don’t have to be complicated. For this one, I added a piece of patterned paper from the Spooky Things 6 x 8 Pattern Paper Pad by Simple Stories to a top-folding A2 card base. I love how patterned paper instantly sets the tone and fills in that empty space without extra fuss. If you’ve ever stared at a blank card base wondering where to start, patterned paper is the fastest solution to get past that block.

Tags as a Design Element
One of my favorite design tricks is to use tags as a focal point. They give structure to your card and act almost like a stage where your stamped images can shine. I used the Infinity Tag Dies from Hero Arts to cut two layers—one from Bristol Smooth Cardstock and one from a coordinating piece of Spooky Things patterned paper. Layering the tags gave me the perfect spot to build up my design without the background feeling too busy.
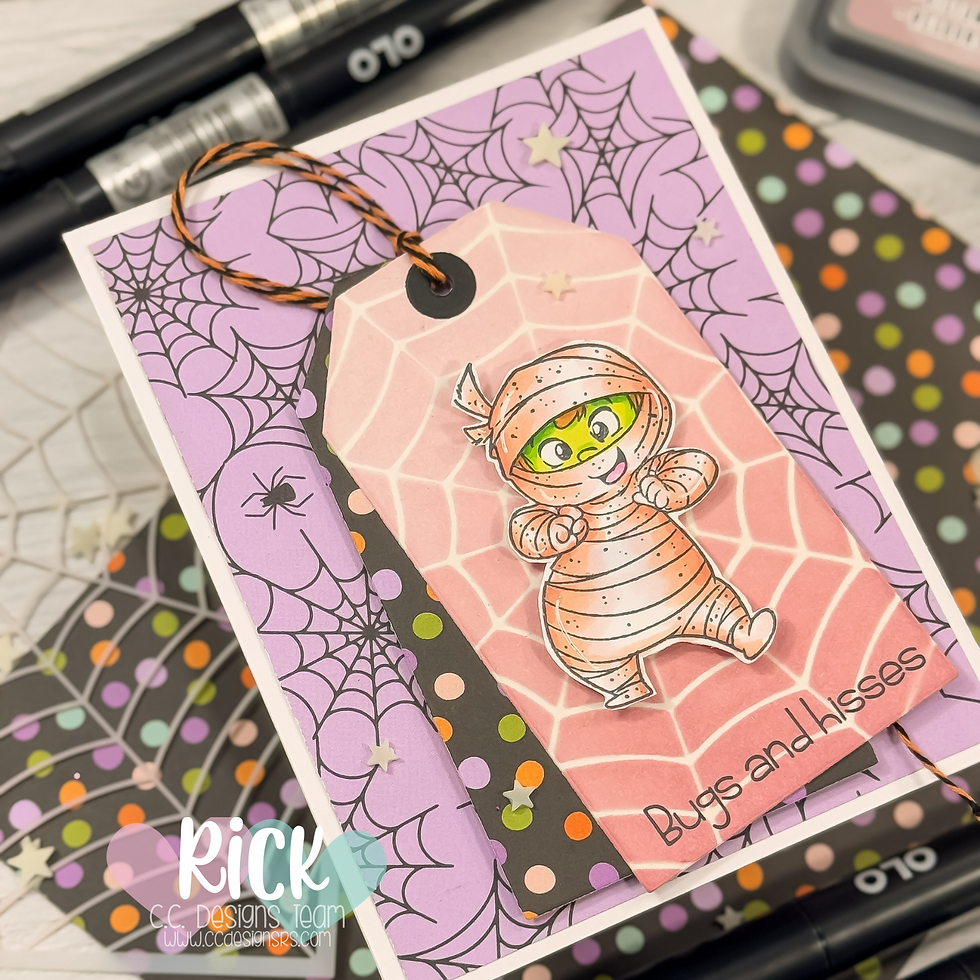
A Web of Soft Color
To bring in more Halloween vibes, I placed the Cobweb Stencil from Paper Rose Studio over the Bristol tag and blended ink over it using Victorian Velvet and Spun Sugar Distress Oxide Inks. I love that these softer pink tones balance out the darker Halloween colors. It reminds me that spooky doesn’t always have to mean black and orange. Sometimes a softer palette can make your card stand out even more. If you’ve ever struggled with how to use your stencils in a fresh way, try pairing unexpected colors—it can completely change the mood of your design.

Finishing Touches on the Front
After layering the tags together and tying a bit of baker’s twine from my stash through the hole, I attached the pair to the card base. The fussy-cut mummy fit perfectly right on top, bringing the whole piece to life. I couldn’t resist adding a few pieces from the Glowing Sky Glow-In-The-Dark Embellishment Mix by Trinity Stamps to the background. They add just the right amount of sparkle during the day, and at night they give the card a playful, interactive twist.
Pro tip: glow-in-the-dark embellishments are a great way to surprise the recipient and make handmade cards even more memorable.

Don’t Forget the Inside
I always like to carry the theme to the inside of my cards. For this one, I stamped the werewolf from the Vampy Friends Stamp Set along with the sentiment “You’re My Favorite Monster” in Victorian Velvet Distress Oxide Ink. It’s such a sweet little detail that ties everything together. Finishing the inside makes your handmade card feel polished and complete—like a little extra treat for the person opening it.

Wrapping It Up
This card combines so many of the things I love about Halloween crafting: fun characters, playful details, and just the right amount of spooky charm. By mixing stamps, patterned paper, stenciling, and embellishments, you can create something that’s layered and unique without being overwhelming. If you’d like to see exactly how this card came together, I’ve filmed a video tutorial where I walk through the process step by step. You can watch it and craft along to create your own spooky-cute Halloween cards.
Cute Halloween Card Tutorial | Vampy Friends Stamp Set Video Tutorial:
If you have problems watching the video here on my blog you can always watch it on my YouTube Channel by Clicking Here!
(Wondering what I used in this video? Everything is linked to multiple sources in the thumbnails at the end of this post, or in the text below. Compensated affiliate links used when possible). As always I appreciate your support of my videos!
Materials Used:
Here you will find the list of supplies that I used to create today's card. All supplies are linked to supply sources below. Compensated affiliate links may be used at no cost to you.
Happy Crafting,

Rick Adkins
Affiliate Disclaimer:
Just a friendly reminder, as part of my commitment to transparency, please note that some of the links provided maybe affiliate links. This means that if you make a purchase through these links, I may earn a small commission at no extra cost to you. Your support is truly appreciated!
Additionally, I kindly ask that you always accept the tracking cookie for the affiliate websites. Rest assured, this will not in any way expose your computer to viruses or compromise your information. It's simply necessary for the company to attribute the sale to the affiliate, ensuring creators like myself receive their rightful commissions.
Your trust and support enable me to continue sharing creativity through my email lists, blog, and YouTube channel. Thank you for being a valued part of our crafting community!


Comments