
Adorable Mousey Christmas Card with Copic Coloring and Holly Express Pattern Paper
- Rick Adkins

- Aug 23, 2025
- 4 min read
Updated: Oct 3, 2025
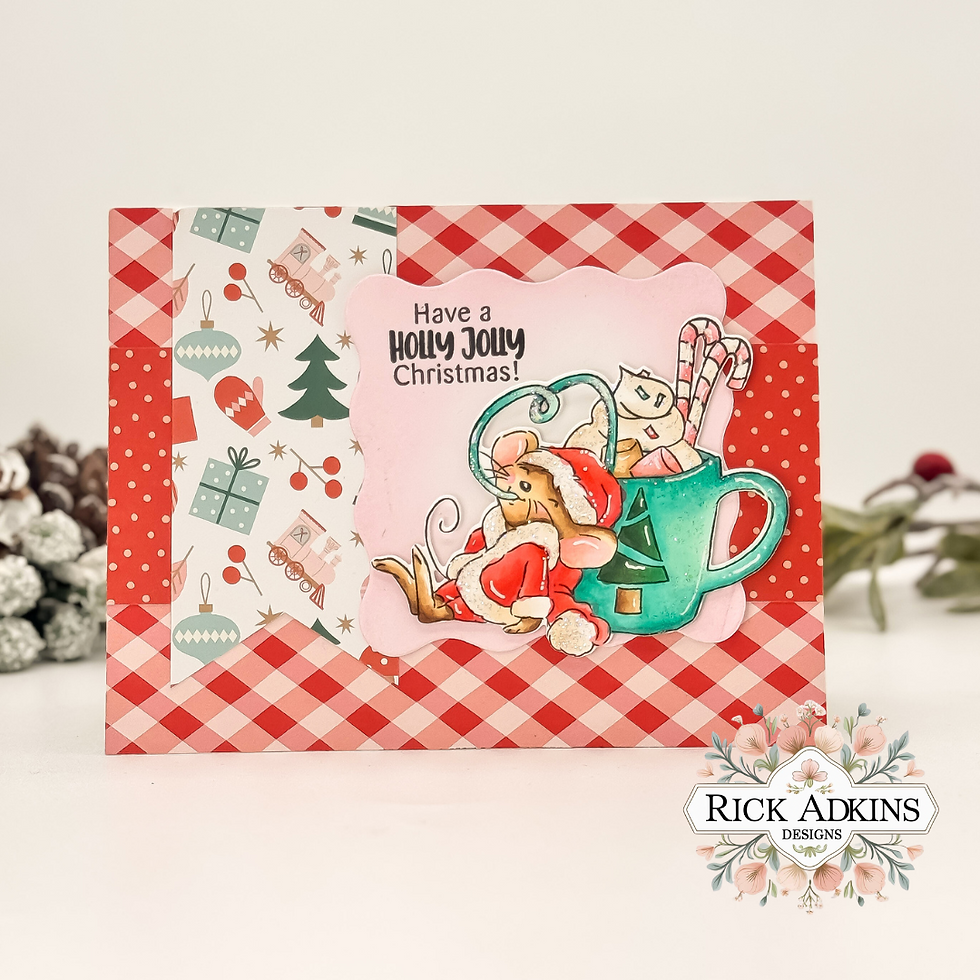
The holiday season is one of my favorite times to make cards, but I’ll admit—sometimes my designs can start to feel a little too similar. I find myself reaching for the same color palettes and layouts, and before long, every card starts blending together. To shake things up, I decided to let patterned paper do the heavy lifting for this design, and it ended up inspiring one of the cutest Christmas cards I’ve made this season. This little mouse sipping cocoa stole the show, and pairing him with bright, playful patterns gave me a design that feels festive, cheerful, and anything but ordinary.

Adorable Mousey Christmas Card with Copic Coloring and Holly Express Pattern Paper
A Whimsical Mouse to Set the Scene
I started with the Mousey Christmas Stamp Set & Dies from Art Impressions, and chose the sweet image of the mouse dressed in a Santa suit, sipping cocoa through a straw. There’s just something about his relaxed little pose that instantly makes me smile. Once I stamped the image, I used the coordinating die to cut it out—because let’s be honest, no one has time to fussy-cut tiny candy canes during the busiest crafting season.
Pro Tip: If you ever find yourself skipping over detailed stamps because of the cutting, look for sets with matching dies. They save a ton of time and make it easier to focus on the fun parts, like coloring and layering.

Copic Coloring Inspired by Patterned Paper
One of the easiest ways to ensure your colors look intentional is to pull them straight from your patterned paper. For this card, I used the Holly Express A2 Pattern Paper Pad from Scrapbook.com, and let it guide my Copic coloring choices. The reds, teals, and soft neutrals in the paper set the perfect palette, so my little mouse’s outfit and the cocoa cup instantly felt like they belonged on the card.
Pro Tip: If you ever struggle with deciding on Copic colors, lay your patterned paper next to you while you color. Match your markers directly to the shades in the paper, and you’ll have instant color harmony without second-guessing.
Creating a Soft Focal Point
With the mouse colored and cut out, I knew I needed a place for him to shine without being lost in all the patterns. That’s where the Nested Wavy Squares Die Set from Scrapbook.com came in handy. I die cut a piece of Bristol Smooth Cardstock, then softly ink blended the edges with Spun Sugar Distress Oxide Ink. This gave me a gentle pink frame that grounded the image while still keeping the overall look light and playful.
Pro Tip: If your focal image ever feels like it’s disappearing against a busy background, add a softly ink-blended die-cut panel. It creates breathing room for the eye and helps your stamped image stand out beautifully.

Mixing Patterns with Confidence
The fun part of this card was layering papers from the Holly Express A2 Pattern Paper Pad. I chose three different designs—a bold red gingham, a playful present-and-tree pattern, and a classic red polka dot. On their own, each pattern is busy, but together they created a lively background that stayed cohesive because all the colors tied back to the same palette.
When I first started cardmaking, I was so intimidated by mixing patterns. I’d pick two that I loved but worry they clashed. Over time, I learned a little trick: if the papers come from the same pad, they’re designed to coordinate. Think of it like a capsule wardrobe for your cards—everything works together.

A Sentiment That Sings
To finish things off, I stamped the sentiment “Have a Holly Jolly Christmas” directly onto the pink die-cut panel. It’s simple, cheerful, and echoes the playful feeling of the card. The sentiment placement also helps balance the image and ties everything into a polished design.

Wrapping It Up
This card was such a joy to create, and it reminded me how much fun it is to let patterned paper inspire the entire design. If your Christmas cards are starting to feel repetitive this season, try pulling out a playful stamp set, color it to match a patterned paper pad you love, and add a softly ink-blended die-cut panel behind it. It’s a recipe for a card that feels both festive and unique, without adding extra complexity.
So tell me—are you team patterned paper, or do you usually keep things clean and simple? I’d love to know how you mix patterns into your holiday cardmaking!
How To Make A Cute Mousey Christmas Card Video Tutorial:
If you have problems watching the video here on my blog you can always watch it on my YouTube Channel by Clicking Here!
(Wondering what I used in this video? Everything is linked to multiple sources in the thumbnails at the end of this post, or in the text below. Compensated affiliate links used when possible). As always I appreciate your support of my videos!
Materials Used:
Here you will find the list of supplies that I used to create today's card. All supplies are linked to supply sources below. Compensated affiliate links may be used at no cost to you.
Happy Crafting,

Rick Adkins
Affiliate Disclaimer:
Just a friendly reminder, as part of my commitment to transparency, please note that some of the links provided maybe affiliate links. This means that if you make a purchase through these links, I may earn a small commission at no extra cost to you. Your support is truly appreciated!
Additionally, I kindly ask that you always accept the tracking cookie for the affiliate websites. Rest assured, this will not in any way expose your computer to viruses or compromise your information. It's simply necessary for the company to attribute the sale to the affiliate, ensuring creators like myself receive their rightful commissions.
Your trust and support enable me to continue sharing creativity through my email lists, blog, and YouTube channel. Thank you for being a valued part of our crafting community!


Comments