
Bold Patriotic 5x7 Card Idea with Scrappy Boy Stamps | American Flag Die Tutorial
- Rick Adkins

- Jun 23, 2025
- 5 min read
Updated: Aug 10, 2025
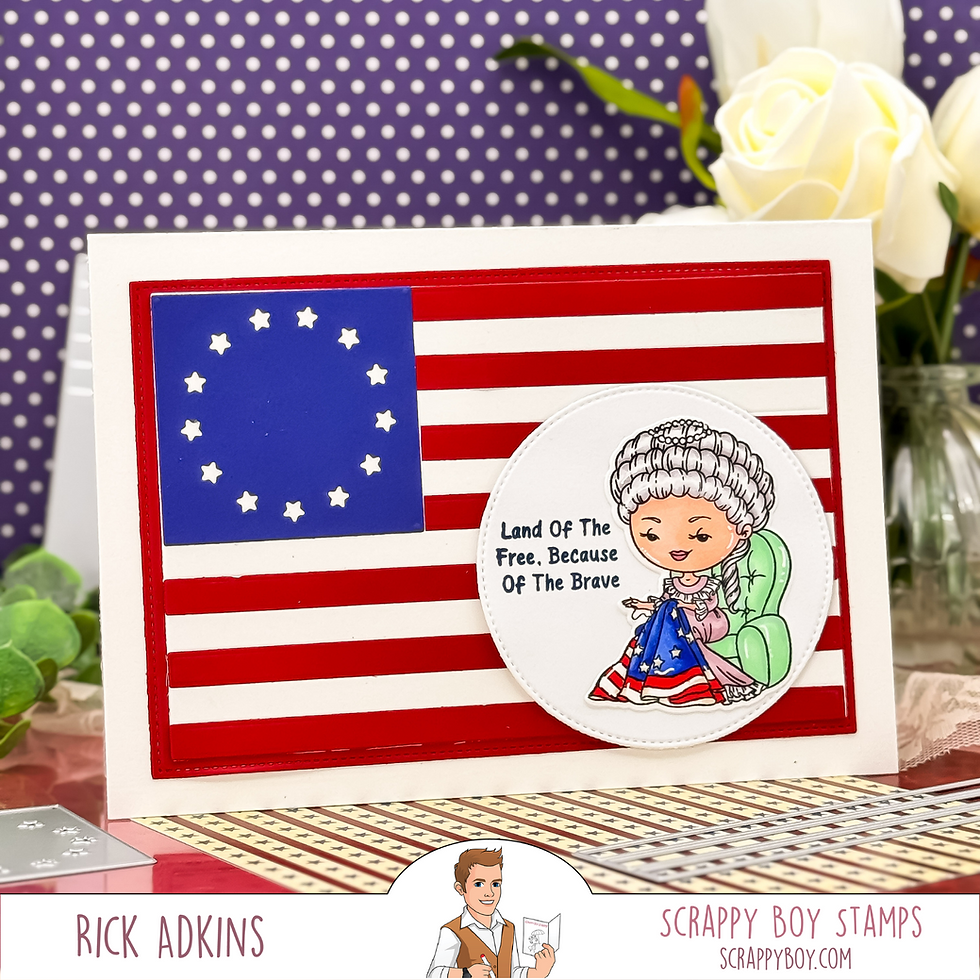
The moment I saw the American Flag 2 Ways Die Set from Scrappy Boy Stamps, I knew I wanted to create something bold, clean, and meaningful—something that would really showcase this incredible die set in all its glory. But here’s the thing: most of my card designs tend to stick to the A2 format, and this die set was practically begging for more space. So I decided to switch things up and go with a 5x7 card base, and let me tell you—it made all the difference. The larger format gave me plenty of room to build out those striking flag panels and still have space for focal images, sentiments, and dimension. If you’ve ever struggled with fitting larger dies onto your usual card sizes, this is your sign to think bigger.

Bold Patriotic 5x7 Card Idea with Scrappy Boy Stamps:
Why a 5x7 Card Base Was the Perfect Fit
I started this project by cutting a couple of 5x7 card bases from Brilliant White 110 lb Smooth Cardstock, one of my go-to staples when I want a strong, sturdy base. This heavier cardstock really helps larger cards feel balanced and substantial. Plus, I knew I’d be building up some layers with the flag elements and character images, so a heavier weight cardstock helped keep everything nice and flat.
What made the 5x7 size a win here was how beautifully the stitched flag panels from the American Flag 2 Ways Die Set fit on them. No trimming, no awkward overlaps—just a clean layout that allowed every die-cut element to shine.
Characters That Bring It to Life
To add personality to these patriotic cards, I reached for the Spirit of 1776 Stamp Set and its matching Outline Dies. I stamped out two images that I thought would be perfect for this theme—Betsy Ross and the Revolutionary War Band—using Memento Tuxedo Black Ink on Neenah Classic Crest Solar White 80 lb Cardstock.
I colored both characters with my Ohuhu Honolulu Brush Markers, which blend beautifully and offer great vibrancy—especially important when you're working with a red, white, and blue palette. I like to think of this part of the process as a little storytelling moment—bringing history to life through ink and paper. I still remember being fascinated by the Betsy Ross story in elementary school, and it felt full-circle to bring her into a card design. Sadly during the video I couldn't remember her name and kept calling her Susan B. Anthony. Boy did I fail History Class after this long being out of school. My History teachers would be applauded.
Pro tip: If you’re using alcohol markers, do your coloring before die-cutting. It gives you a little more room to work without worrying about going outside the lines.

Building the Flags for a Bold Impact
The real stars of these cards—pun absolutely intended—are the layered American flags. I cut the stitched background panels (also included in the American Flag 2 Ways Die Set) from rich red and navy cardstock. These served as the base layers to help frame the flags and set a bold tone for each design.
Then I got to work assembling the flags using the die set. I cut the base of each flag from Neenah white cardstock, the star panels from that same navy I used on the background, and the stripes from the same red cardstock to keep everything coordinated.
There are two star panel options in this die set—one that reflects the original 13 colonies and one that mirrors the modern U.S. flag. I thought it was such a thoughtful touch to include both. I used one of each to create two distinct cards with shared structure but different historical flavor. It was a fun nod to the evolution of our flag and allowed me to play with symmetry in my layout.
Here’s a little trick that saved me time: I cut a few extra red stripes while I was at it. That way, if one shifted in the glue or didn’t line up just right, I had backups ready. No frustration, no wasted time.

Sentiments That Anchor the Message
For the sentiments, I reached for the Stitched Circle Nested Die Set, which gave me the perfect space to add some heartfelt words without taking focus away from the flags or characters.
I used Versafine Clair Twilight Ink to stamp “Land of the Free. Because of the Brave” on one circle and “United We Stand” on the other. I love this ink for sentiments—it stamps crisp, dark, and beautifully detailed. The stitched edge of the circle adds just enough detail to break up the layers and draw the eye.
I popped each circle up with foam tape for a bit of dimension and then tucked the colored characters beside them. Betsy Ross fit beautifully with the “Land of the Free” sentiment, and the Revolutionary War Band brought so much movement to the “United We Stand” design.

Finishing Details That Make a Difference
To pull everything together, I added a few highlights to the stamped images using a white gel pen. It’s a small step, but it adds that perfect little sparkle to eyes, hair, and fabric folds. It gives everything a slightly more polished, dimensional look, especially when you’re working with such bold color contrasts.
I love how these cards came out—clean, bright, and full of patriotic pride. And even more, I love that the design can be adapted in so many ways. You could switch out the characters, layer in other sentiments, or even turn this into a shaker design using the stitched circle as a window.

Final Thoughts
Sometimes the best cardmaking moments happen when we step just slightly outside our usual routine. For me, that was going from an A2 to a 5x7 card base—and I’m so glad I did. It gave me the space to really showcase these incredible products from Scrappy Boy Stamps and let the layers tell the story. If you’ve been looking for a bold way to celebrate the red, white, and blue, I hope this inspires you to try something a little bigger.
And if you want to see how it all came together, you can check out the full video tutorial for a closer look at the process.
Bold Patriotic 5x7 Card Idea with Scrappy Boy Stamps Video Tutorial:
If you have problems watching the video here on my blog you can always watch it on my YouTube Channel by Clicking Here!
(Wondering what I used in this video? Everything is linked to multiple sources in the thumbnails at the end of this post, or in the text below. Compensated affiliate links used when possible). As always I appreciate your support of my videos!
Materials Used:
Here you will find the list of supplies that I used to create today's card. All supplies are linked to supply sources below. Compensated affiliate links may be used at no cost to you.
Happy Stampin'

Rick Adkins
Affiliate Disclaimer:
Just a friendly reminder, as part of my commitment to transparency, please note that some of the links provided maybe affiliate links. This means that if you make a purchase through these links, I may earn a small commission at no extra cost to you. Your support is truly appreciated!
Additionally, I kindly ask that you always accept the tracking cookie for the affiliate websites. Rest assured, this will not in any way expose your computer to viruses or compromise your information. It's simply necessary for the company to attribute the sale to the affiliate, ensuring creators like myself receive their rightful commissions.
Your trust and support enable me to continue sharing creativity through my email lists, blog, and YouTube channel. Thank you for being a valued part of our crafting community!


Comments