
Clean & Simple Christmas Card with C.C. Designs Bumbles
- Rick Adkins

- Oct 6, 2025
- 4 min read
Today’s card is a sneak peek of the brand-new Bumbles Stamp Set from the C.C. Designs October Release, and let me tell you—it’s an adorable one! I’ve always had a soft spot for characters with big personalities, and these Bumbles absolutely stole my heart the second I stamped them. I wanted to show how you can take one cute image and let it truly shine in a clean and simple Christmas card design that still feels festive and polished.

One of the most common things I hear from other cardmakers is that “clean and simple” often feels too plain—but I promise, it doesn’t have to be! With the right touches of color, texture, and a hint of sparkle, you can keep your design minimal while still packing in plenty of personality.
Clean & Simple Christmas Card with C.C. Designs Bumbles
Creating a Simple Focal Point with Ink Blending
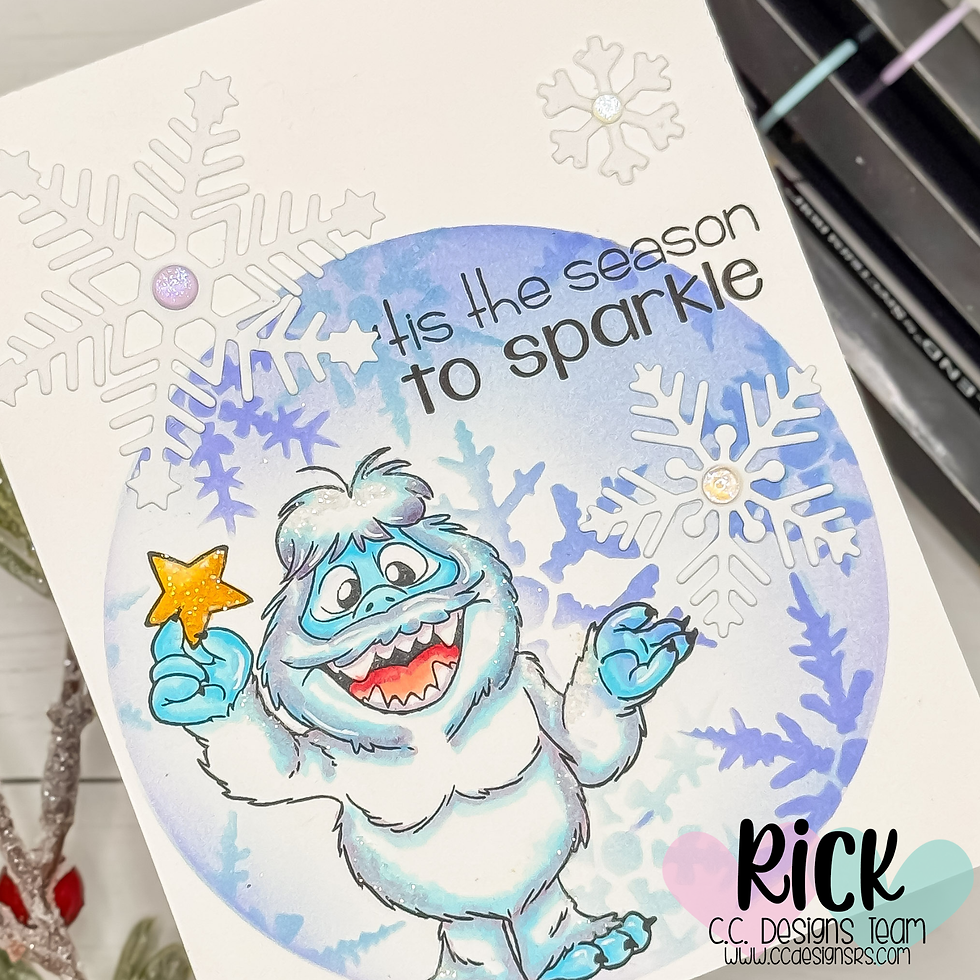
When I want a soft, focused area that draws attention right where I want it, I reach for my Background Basics Stencils from Penny Black. It’s one of those tools that seems simple but can completely transform a card layout. I went with the larger circle opening, typically sized for a 5" x 7" card, because it gives more space for the image to breathe.
I blended Tumbled Glass and Shaded Lilac Distress Inks together to create that dreamy, wintery glow. These two colors blend beautifully—they’re soft, not overpowering, and perfect for winter scenes. Once I had the background blended, I used the Layering Snowflakes Stencil from Tim Holtz to add subtle snowflakes inside the circle. I stuck with tone-on-tone inking here (same colors, just slightly more saturated) to add depth without cluttering the design.
Pro Tip: When you’re creating a clean design, try using variations of the same color family to build texture and interest. It keeps the design cohesive while still adding detail.

Bringing Bumbles to Life
For the star of the show, I stamped one of the adorable Bumbles from the C.C. Designs Bumbles Stamp Set using Memento Tuxedo Black Ink on Neenah Classic Crest Solar White Cardstock. This cardstock is my go-to for marker coloring—it’s smooth and holds up beautifully with alcohol-based markers.
I colored Bumbles with my Triblend Brush Markers, keeping his fur light and frosty with hints of blue to match the background. The little yellow star in his hand made me smile and inspired the sentiment I used—‘Tis the Season to Sparkle. There’s just something about this little guy that radiates joy, and I wanted the design to reflect that.
To finish his look, I added a few highlights with a white gel pen and touched up some areas with my Zig Two Way Glue Pen before sprinkling on a bit of Rock Candy Glitter. That subtle shimmer ties everything together without being too much.

Snowflakes and Sparkle
Snowflakes always make a clean and simple card feel complete. I die cut a few from white cardstock scraps using two small snowflake dies from the Mini Snowflakes Die Set and one from the Winter Wishes Die Set, both from Scrapbook.com. Layering different snowflake shapes adds texture without adding bulk, and it gives that “frosty flurry” look I love.
To give them a little extra shine, I added Iridescent Dew Drops to the centers. These tiny embellishments catch the light beautifully, making the whole card shimmer just enough to live up to that “sparkle” sentiment.
Pro Tip: When working with white-on-white die cuts, add dimension by layering two or three die cuts together. It gives a beautiful shadow effect that stands out in person but still feels subtle in photos.
Finishing the Design
Once the card front was complete, I adhered it to a top-folding A2 card base made from Neenah Ultra Thick Cardstock for extra stability. On the inside, I stamped another one of the Bumbles and a coordinating sentiment from the same set.
Now, full transparency—while stamping the inside, I had a little “oops” moment. But instead of starting over, I shared in the video tutorial exactly how I fixed it (because let’s be honest, we all have those crafty slip-ups). It’s a good reminder that mistakes are part of the process and often lead to creative solutions.

Clean, Simple, and Full of Holiday Cheer
I love how this card turned out—simple layout, cheerful image, soft color palette, and just the right amount of sparkle. It’s proof that clean and simple cards don’t have to feel empty. With thoughtful ink blending, cohesive color choices, and a fun focal point like Bumbles, you can create something that’s both easy to replicate and visually impactful.
If you’re looking for an easy Christmas card idea that’s fun to color and quick to assemble, this one’s perfect for your holiday lineup. Be sure to check out the video tutorial for a closer look at the coloring and inside-card details, and keep an eye out for the C.C. Designs October Release—the Bumbles Stamp Set will be available starting October 10, 2025!

Clean & Simple Christmas Card with Bumbles | Ink Blended Snowflake Background Video Tutorial:
If you have problems watching the video here on my blog you can always watch it on my YouTube Channel by Clicking Here!
(Wondering what I used in this video? Everything is linked to multiple sources in the thumbnails at the end of this post, or in the text below. Compensated affiliate links used when possible). As always I appreciate your support of my videos!
Materials Used:
Here you will find the list of supplies that I used to create today's card. All supplies are linked to supply sources below. Compensated affiliate links may be used at no cost to you.
Happy Crafting,

Rick Adkins
Affiliate Disclaimer:
Just a friendly reminder, as part of my commitment to transparency, please note that some of the links provided maybe affiliate links. This means that if you make a purchase through these links, I may earn a small commission at no extra cost to you. Your support is truly appreciated!
Additionally, I kindly ask that you always accept the tracking cookie for the affiliate websites. Rest assured, this will not in any way expose your computer to viruses or compromise your information. It's simply necessary for the company to attribute the sale to the affiliate, ensuring creators like myself receive their rightful commissions.
Your trust and support enable me to continue sharing creativity through my email lists, blog, and YouTube channel. Thank you for being a valued part of our crafting community!


Comments