
Dive In! Make This Under the Sea Card in Just 4 Easy Steps
- Rick Adkins

- May 24, 2025
- 5 min read
Updated: Aug 15, 2025
Every once in a while, I sit down at my craft table with an idea that doesn’t quite fit the usual mold—and this card was one of those moments. I wanted to make something for the 4th of July, but instead of reaching for stars and stripes, my mind wandered straight to the ocean. Maybe it's all the heat here in Alabama or the memories of going to the ocean for the 4th, but a sea-themed celebration just felt right.
So, I grabbed the Sea-ing Is Believing Stamp Set and Sea-ing Is Believing Outline Dies from The Rabbit Hole Designs, along with the Sentimentally Speaking Holidays Bundle, and decided to dive into a playful, unexpected take on patriotic cardmaking. If you’ve ever felt boxed in by holiday themes, this combo is a great way to shake things up while still keeping the message festive.

Dive In! Make This Under the Sea Card in Just 4 Easy Steps:
Let’s Talk About These Stamps
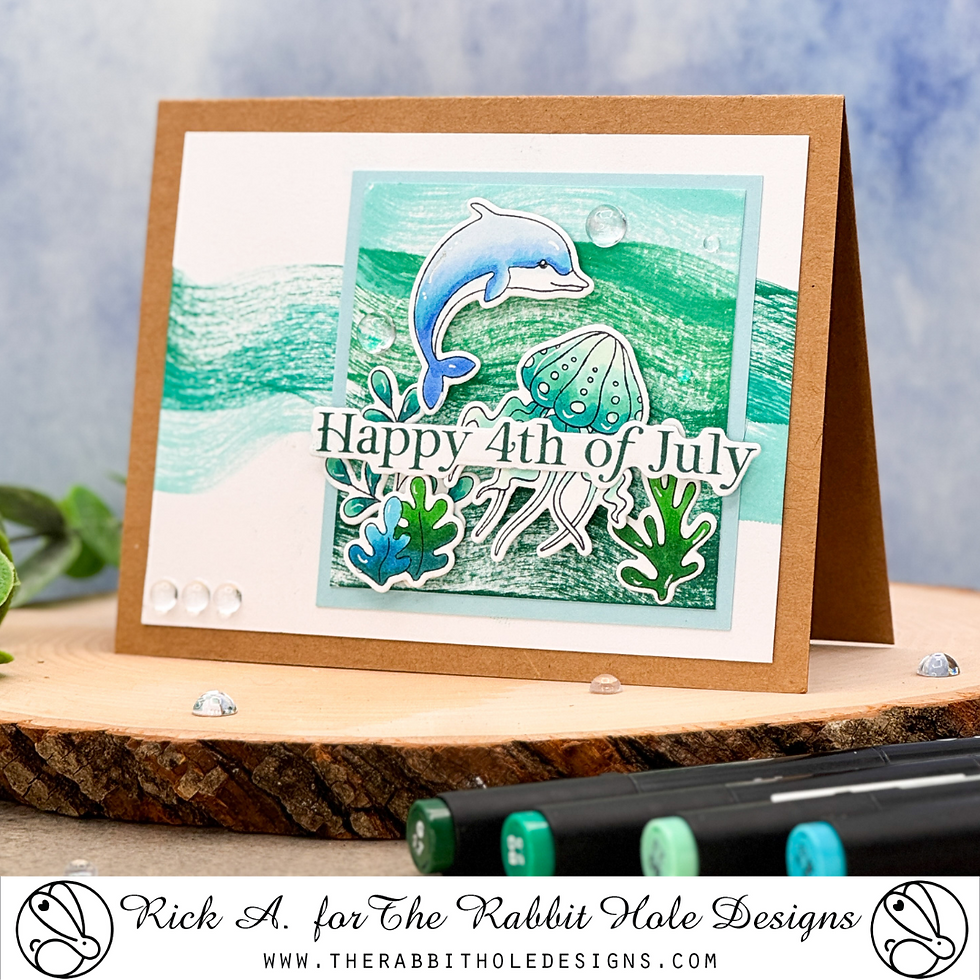
The Sea-ing Is Believing Stamp Set is one of those stamp sets that immediately makes you smile. The dolphin and jellyfish have such personality, and the little plants add the perfect touch of underwater whimsy. I love sets that feel like little stories waiting to be told—and this one’s like opening a portal into a bubbly ocean scene.
I stamped my images onto a scrap of OLO Premium Marker Blending Card using Memento Tuxedo Black Ink (my go-to for alcohol marker coloring). Then I brought them to life with a mix of Blue-Green shades and a few brighter greens using my OLO Markers. I kept the palette ocean-calm and summery, letting the coloring do most of the storytelling.
Pro Tip: When coloring translucent creatures like jellyfish, less is more. Use a light touch and leave plenty of white space to mimic that natural glow.
After coloring, I used the Sea-ing Is Believing Outline Dies to cut everything out—those coordinating dies made it so easy to create a clean and polished look, especially around the finer details like the plant fronds and jellyfish tendrils.

The Ink-Swipe Background Technique
For the background, I really wanted to evoke the feeling of ocean currents and sea breezes—but in a way that felt modern and artsy, not overly blended or fussy. Enter one of my favorite quick techniques: ink swiping directly with ink cubes.
I used Ocean Breeze and Mermaid Cove from the Island Oasis Ink Cube Set (from Pinkfresh Studio) and simply swiped the edge of the ink pads across Brilliant White 110 lb Cardstock. That was it. The texture and movement this creates gives so much interest without needing any extra tools. For the smaller panel, I used all four colors from the ink cube set and layered the swipes horizontally to build a sort of "ocean current" effect.
Pro Tip: Don’t overthink your swipes. Uneven edges and color variation are what make this technique shine. And if your ink pad is a little dry? Even better—it adds a gorgeous texture.
I matted this smaller panel on a light blue cardstock from the Kaleidoscope Paper Pack, which gave just the right amount of contrast to frame the scene without overpowering it.

Building the Scene with Layers and Dimension
Once the background was done, I played around with arranging the die cuts on the smaller inked panel. Some pieces were glued flat with liquid adhesive, and others were popped up with foam squares to give a bit of ocean “depth.” I love doing this with sea scenes—it really makes everything feel like it’s floating in different parts of the water.
I reached for the Sentimentally Speaking Holidays Bundle to find a fitting 4th of July sentiment. I ended up stamping “Happy 4th of July” in Tidal Pond Ink and cutting it out with the coordinating die. Nestled across the jellyfish, it tied the whole theme together: ocean meets holiday, and it works surprisingly well.

Finishing Touches That Make a Splash
To finish off the card, I added the entire scene to an A2-sized card base made from Kraft 110 lb cardstock (I love how it warms up the cool-toned background). A few white gel pen highlights on the dolphin and plants gave everything just a little more dimension and sparkle.
And of course, I couldn’t resist a bit of embellishment—I added Clear Water Dewdrops to mimic bubbles. I placed three in the bottom left corner of the card front, then sprinkled a few more around the focal panel to guide the eye and keep that underwater vibe flowing.
Why This Card Works
What I love most about this project is that it takes two themes that don’t typically go together—ocean life and a national holiday—and makes them feel cohesive and joyful. It’s a reminder that cardmaking doesn’t have to follow a strict formula. Sometimes the best designs come from asking, What if I tried this instead?
This card also comes together quickly once your elements are stamped and colored, which makes it great for last-minute crafting or batch making with different sentiments. And that ink swipe background? Total game-changer if you're short on time or just want something a little artsy without pulling out a full-blown set of tools.

Want to See It in Action?
You can catch the full card-making process in my [Fast & Fabulous: Cards in 4 Easy Steps] video tutorial—it walks you through each part of the project so you can recreate it or put your own twist on it.
And if you give this card a try, I’d love to see what you make. Come say hi in one of the Facebook groups or tag me on Instagram—I’m always inspired by how you make these designs your own.
Dive In! Make This Under the Sea Card in Just 4 Easy Steps Video Tutorial:
If you have problems watching the video here on my blog you can always watch it on my YouTube Channel by Clicking here!
(Wondering what I used in this video? Everything is linked to multiple sources in the thumbnails at the end of this post, or in the text below. Compensated affiliate links used when possible). As always I appreciate your support of my videos!
Materials Used:
Here you will find the list of supplies that I used to create today's card. All supplies are linked to supply sources below. Compensated affiliate links may be used at no cost to you.
Happy Stampin'

Rick Adkins
Affiliate Disclaimer:
Just a friendly reminder, as part of my commitment to transparency, please note that some of the links provided maybe affiliate links. This means that if you make a purchase through these links, I may earn a small commission at no extra cost to you. Your support is truly appreciated!
Additionally, I kindly ask that you always accept the tracking cookie for the affiliate websites. Rest assured, this will not in any way expose your computer to viruses or compromise your information. It's simply necessary for the company to attribute the sale to the affiliate, ensuring creators like myself receive their rightful commissions.
Your trust and support enable me to continue sharing creativity through my email lists, blog, and YouTube channel. Thank you for being a valued part of our crafting community!


Comments