
Easy Cardmaking Idea for Creative Slumps: A Clean and Simple Anniversary Card
- Rick Adkins

- Apr 27
- 5 min read
Have you ever sat down to make a card, looked at your supplies, and suddenly had no idea what to create? I think every cardmaker has been there. Sometimes the hardest part of making a handmade card isn’t the stamping or die cutting—it’s simply deciding where to begin. That’s exactly why I created my Draw Four Make a Card series. It’s a simple, practical way to take the guesswork out of designing by using four prompts to guide the process.
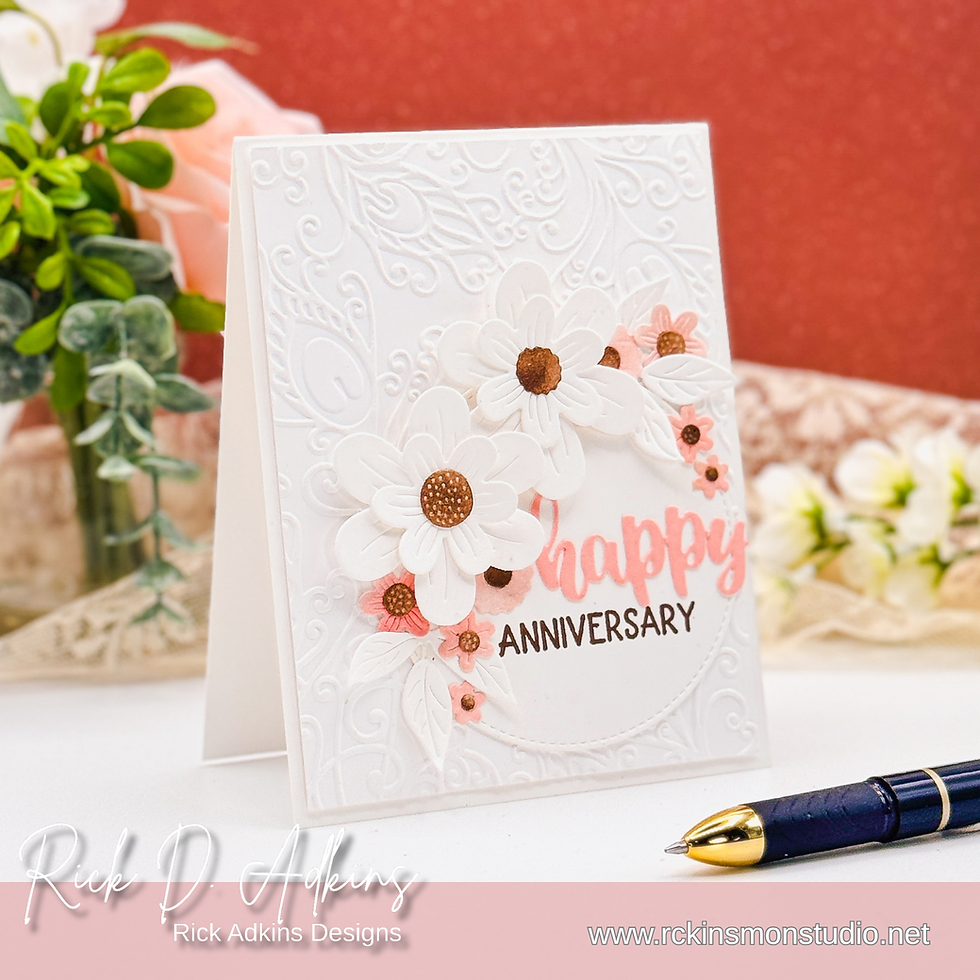
For this clean and simple anniversary card, the prompts led me to use a neutral color palette, dry embossing, and a simple floral arrangement to create an elegant design that feels polished without being complicated. I walk through the full process in the video, but here on the blog I wanted to share the why behind those choices so you can use the same approach with whatever supplies you already have in your craft room.

Why This Simple Formula Works
One of the biggest reasons creative slumps happen in cardmaking is decision fatigue. With so many stamps, dies, colors, and layouts to choose from, it’s easy to get overwhelmed before you even begin. Using four prompts narrows your choices and gives you a creative direction right away.
That’s what made this anniversary card come together so smoothly. Instead of trying to decide on every design element from scratch, the prompts set the foundation:
a soft neutral color palette,
a clean and simple design rule,
dry embossing for texture,
and an anniversary theme.
With those decisions already made, I could focus on creating balance and keeping the design elegant.
The embossed background was an especially important choice here. When you’re working with a clean and simple card design, texture helps add visual interest without adding clutter. The soft raised detail from the Peacock Pattern Embossing Folder gives the background movement while keeping the card light and refined. This is a great technique any time you want your card to feel detailed without relying on embellishments.
Using Layers to Add Interest Without Bulk
Another design decision that made this card effective was layering die-cut florals over the embossed panel. On a clean and simple card, every element needs to earn its place, so I wanted the focal point to provide softness and dimension while still keeping the overall layout uncluttered.
The Etched Blooms 3 Dies worked beautifully for this because the floral shapes are detailed enough to stand out against the textured background but simple enough to maintain the clean design. Adding a little ink blending to some of the flowers introduced just enough contrast to warm up the neutral palette without overwhelming the white-on-white look.
This is one of my favorite ways to create elegant handmade cards—using layers and subtle color shifts instead of extra embellishments. It keeps the design sophisticated and also makes it easier to mail.

A Clean and Simple Card Doesn’t Mean “Plain”
One of the most common mistakes cardmakers make when trying a clean and simple style is leaving too much empty space without adding enough contrast or texture. Clean and simple cards need intention behind every layer.
In this card, the contrast comes from three places:
the embossed texture in the background,
the layered floral die cuts,
and the darker sentiment.
That sentiment grounds the design and gives the eye a clear focal point. The Blessed & Happy Everything sentiment set worked especially well here because the mix of script and bold lettering adds variety while keeping the greeting easy to read.
When creating clean and simple cards, think about how each element contributes either texture, contrast, or focus. If every piece serves one of those purposes, the design will feel balanced instead of empty.

Make This Idea Work With Your Own Supplies
The best part about this approach is that it’s completely stash-friendly. Even if you don’t have the exact embossing folder or floral dies I used, you can recreate the same look with similar products you already own.
Try substituting:
any detailed embossing folder for the textured background,
a simple floral die or stamp set for the focal point,
and two coordinating ink colors for soft blending.
You can also adapt this layout for almost any occasion. Swap the anniversary sentiment for birthday, thinking of you, or sympathy greetings, and the same elegant design will work beautifully. That’s what makes this kind of handmade card idea so useful—it gives you a flexible design formula you can return to again and again.
And if you’re newer to cardmaking, this is a great reminder that you don’t need a lot of techniques on one card to make something beautiful. A few thoughtful choices can create a polished result.

A Simple Way to Beat Creative Block
If you’ve been feeling stuck in your cardmaking lately, I hope this project encourages you to simplify the process. Limiting your choices with a few prompts can make creating feel fun again, and it often leads to designs you might not have come up with otherwise.
The goal isn’t to make the “perfect” card—it’s to make it easier to start. Once you have a direction, creativity follows.
If you’d like to see how this card came together, you can watch the full video below. I think it will really help if you’re a visual learner, and I hope it inspires you to pull out your supplies and give this prompt-based approach a try.

Watch the Video
You can watch the full process here and see how these simple design choices come together to create an elegant anniversary card:
If you have problems watching the video here on my blog you can always watch it on my YouTube Channel by Clicking Here!
If this idea sparked some inspiration for you, I’d love to hear how you tackle creative slumps in your own cardmaking. And if you haven’t tried creating with prompts yet, this might be the perfect project to start with.
(Wondering what I used in this video? Everything is linked to multiple sources in the thumbnails at the end of this post, or in the text below. Compensated affiliate links used when possible). As always I appreciate your support of my videos!
Materials Used:
Here you will find the list of supplies that I used to create today's card. All supplies are linked to supply sources below. Compensated affiliate links may be used at no cost to you.
Happy Crafting,

Rick Adkins
Affiliate Disclaimer:
Just a friendly reminder, as part of my commitment to transparency, please note that some of the links provided maybe affiliate links. This means that if you make a purchase through these links, I may earn a small commission at no extra cost to you. Your support is truly appreciated!
Additionally, I kindly ask that you always accept the tracking cookie for the affiliate websites. Rest assured, this will not in any way expose your computer to viruses or compromise your information. It's simply necessary for the company to attribute the sale to the affiliate, ensuring creators like myself receive their rightful commissions.
Your trust and support enable me to continue sharing creativity through my email lists, blog, and YouTube channel. Thank you for being a valued part of our crafting community!


Comments