
Elegant Groom-Approved Wedding Gift Bag with Pixi Dust Designs Gift Bag & Vest Dies
- Rick Adkins

- May 10, 2025
- 5 min read
Updated: Aug 15, 2025
Hey friends, today I’m excited to share something a little different — a groom-themed 3D project that's perfect for weddings, groomsmen gifts, or even an elegant party favor. I used the Gift Bag Die Set and the Vest Gift Bag Add-on Die Set from Pixi Dust Designs to bring this idea to life, and I can’t wait to tell you all about it.

Now, if you're anything like me, 3D projects might feel a little intimidating at first. I used to shy away from anything that wasn’t a traditional card because it seemed like “too many steps.” But honestly? Having the right die sets makes all the difference. They practically do the hard work for you — and today’s project is the perfect example of that.
Whether you’re prepping for a wedding, a fancy dinner party, or just want to surprise someone with a beautifully presented treat, this gift bag idea might be just what you’re looking for.
Elegant Groom-Approved Wedding Gift Bag with Pixi Dust Designs Gift Bag & Vest Dies:
Why I Love This Gift Bag Project
One of the things I really appreciate about using a die set like this is how it makes customization so easy. Weddings especially are all about the details — the colors, the little personalized touches. This project lets you tailor the look to match any event or theme.
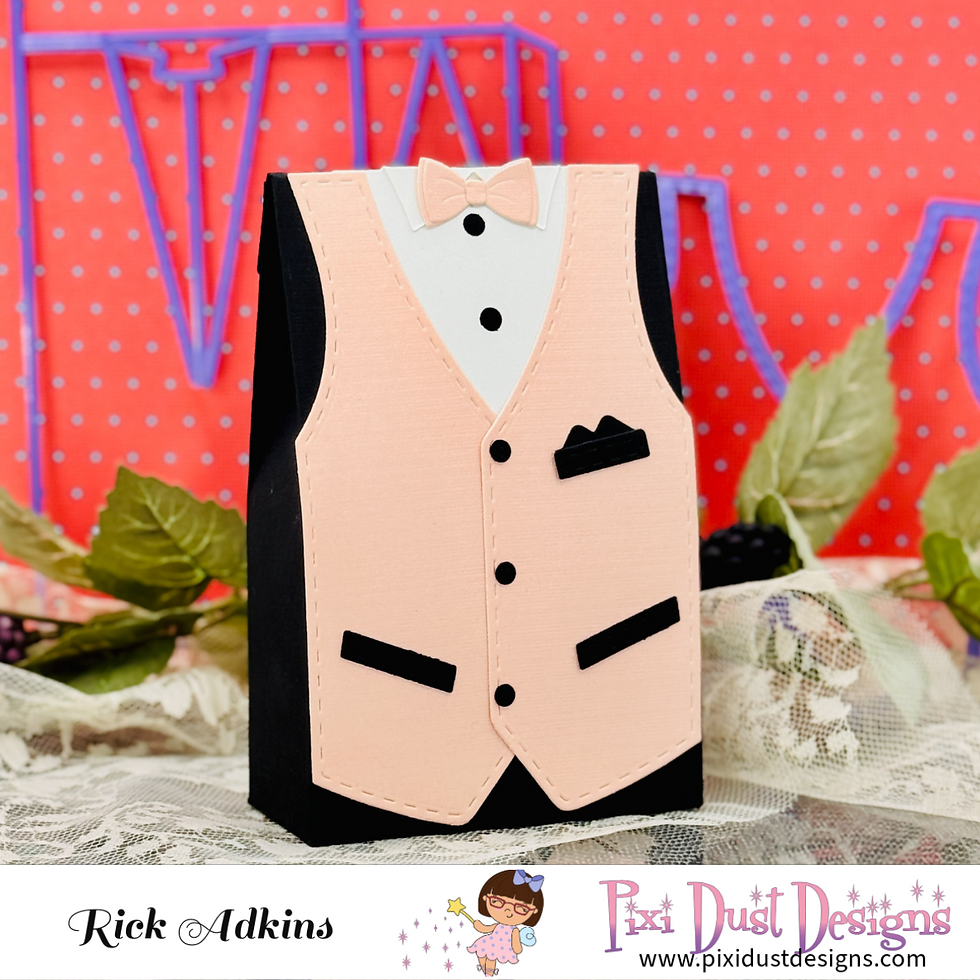
For my project, I envisioned a classic black-and-white groom’s tux with a fun pop of color for the vest and bow tie. That little splash of Coral Cream Textured Cardstock (from Bazzill) gives it a modern, fresh look without losing the formality.
And the size of the finished bag? It’s perfect. You can tuck in some chocolates, a mini bottle of champagne, a special note — all those small but meaningful favors that make an event memorable.
Pro Tip: When working on projects like this, always think about the cardstock textures. A little bit of texture on pieces like the vest adds so much visual interest and makes the project feel extra polished, like real fabric.

Building the Gift Bag
Once all my pieces were cut, the fun part really began: building and decorating. One of my favorite parts about using the Gift Bag Die Set is that it scores all your fold lines for you. No guessing, no measuring — everything is ready to go as soon as it comes out of the machine.
I always recommend using a bone folder to crease your folds nicely. Trust me, this one little step can make the difference between a bag that looks homemade in a charming way and one that looks truly professional.
Pro Tip: When assembling 3D projects, I prefer liquid glue over tape. Liquid adhesive gives you a few seconds of wiggle room to adjust the placement before it sets, which is especially helpful when you're lining up scored edges.

After the base was together, adding the decorative pieces was like dressing up a paper doll. The shirt front went down first, followed by the two vest panels, slightly overlapping to create that classic vest look. Adding the little buttons and vest pockets gave it so much personality, and honestly, I could’ve stopped right there and been happy.
But the bow tie? That little detail took it to a whole new level.
It’s funny — when I was first crafting this project, it reminded me of helping my little brother get ready for prom years ago. I still remember standing on my tiptoes trying to fix his crooked bow tie because he was too nervous to get it right. Adding that paper bow tie to the gift bag gave me such a full-circle moment — those small details really do matter.

Little Details That Make a Big Impact
The Vest Gift Bag Add-on Die Set comes with thoughtful extras like pocket squares and tiny buttons, which add layers of charm without a lot of extra work. I tucked the tiny pocket square into the vest’s top pocket, and I couldn't help but smile — it’s these tiny touches that make your handmade projects unforgettable.
If you’re making several of these for an event, you can batch-cut all your pieces first, then spend an afternoon assembling while you watch your favorite show or listen to a podcast. It turns what could feel like "work" into a really relaxing craft session.
Pro Tip: If you’re customizing colors to match a specific wedding theme, cut a few extra pieces in various colors ahead of time. Sometimes seeing the combinations in person helps you make that final choice faster — and you’ll have backup pieces ready just in case.

Finishing Thoughts
This little gift bag came together quicker than I expected, and it turned out even better than I had hoped. It’s sturdy, elegant, and just the right size for small favors or gifts.
I love how the Pixi Dust Designs die sets make creating detailed projects feel accessible, even for those of us who usually stick to flat cards. If you’ve been nervous to try 3D paper crafting, I can’t recommend these dies enough. They make the process smooth, fun, and honestly addictive — I’m already planning the next 3D gift project for Father's Day, so stay tuned!
Thanks so much for stopping by today and sharing a little crafty time with me. I hope you’re feeling inspired to try a 3D project like this — and to maybe add a few personal touches of your own that make it even more special.
Elegant Groom-Approved Wedding Gift Bag with Pixi Dust Designs Gift Bag & Vest Dies Video Tutorial:
If you have problems watching the video here on my blog you can always watch it on my YouTube Channel by Clicking here!
(Wondering what I used in this video? Everything is linked to multiple sources in the thumbnails at the end of this post, or in the text below. Compensated affiliate links used when possible). As always I appreciate your support of my videos!
Materials Used:
Here you will find the list of supplies that I used to create today's card. All supplies are linked to supply sources below. Compensated affiliate links may be used at no cost to you.
Happy Stampin'

Rick Adkins
Affiliate Disclaimer:
Just a friendly reminder, as part of my commitment to transparency, please note that some of the links provided maybe affiliate links. This means that if you make a purchase through these links, I may earn a small commission at no extra cost to you. Your support is truly appreciated!
Additionally, I kindly ask that you always accept the tracking cookie for the affiliate websites. Rest assured, this will not in any way expose your computer to viruses or compromise your information. It's simply necessary for the company to attribute the sale to the affiliate, ensuring creators like myself receive their rightful commissions.
Your trust and support enable me to continue sharing creativity through my email lists, blog, and YouTube channel. Thank you for being a valued part of our crafting community!


Comments