
How to Create a Handmade Birthday Card with Die Cutting Pattern Paper & Stamping

I love a birthday card that feels cheerful and a little bit unexpected, and this rainbow unicorn card definitely falls into that category! For this project, I combined die cutting, pattern paper, and stamping to create a card that has plenty of personality without requiring a complicated cardmaking technique. The fun part is that the same design principles can be used with supplies you already have, even if unicorns and rainbows aren't your thing. My goal with this card was to show how a few well-chosen elements can work together to create a focal point that feels intentional rather than simply adding more and more embellishments.
How to Create a Handmade Birthday Card with Die Cutting, Pattern Paper & Stamping
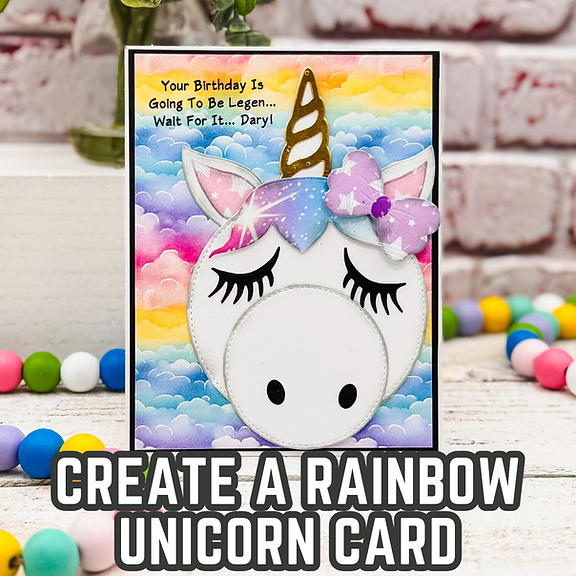
The first design decision I made was to let the rainbow pattern paper do some of the visual heavy lifting. The Rainbow 6x9 Pattern Paper Pack from Scrappy Boy Stamps gives me a colorful background without requiring me to build the entire scene myself. That's one of my favorite ways to use patterned paper: instead of treating it as something that simply fills empty space, I look for papers that can establish the mood or color palette for the entire card. Here, the soft rainbow colors give the unicorn a playful backdrop while the repeated cloud-like pattern adds interest without competing with the focal image.

The unicorn itself is where the die cutting really becomes the star of the design. I used the Unicorn Backpack Add On Die Set along with the Stitched Circle Nesting Die Set to create the large, dimensional focal area. Notice how much of the card the unicorn occupies. That's intentional. When you're working with a large die-cut image, you don't necessarily need lots of additional elements around it. Giving one element plenty of room to breathe can actually make the card feel more polished. I also kept the unicorn mostly white, which creates a nice visual pause against all of those colorful rainbow hues. The colorful bow, ears, and horn then become little opportunities to repeat colors from the background.

Let Your Stamped Sentiment Become Part of the Design
The stamped sentiment is another place where I made a deliberate choice. Rather than placing a large sentiment across the center of the card, I tucked the birthday message into the upper portion of the design. The Legendary Love Story 6x8 Stamp Set provided the sentiment I needed, and the placement keeps the greeting visible while allowing the unicorn to remain the star. This is a useful lesson when you're working with a busy patterned paper: look for an area where the pattern naturally has a little breathing room, then use that space for your sentiment. You don't always need a separate sentiment strip or label.

One thing I especially like about this card is how easy the concept is to adapt. You could use the same basic approach with a large animal die, a floral die cut, a stamped character, or even a collection of die-cut shapes from your stash. If you don't have rainbow pattern paper, choose a colorful paper that coordinates with your focal image. And if you prefer a more sophisticated birthday card, try using a limited color palette instead of the full rainbow. The important part isn't having these exact products. It's understanding the relationship between the background, focal point, and sentiment.

If you're newer to cardmaking, this is also a great example of why you don't have to master complicated techniques to make a card that looks thoughtfully designed. Start by choosing one main focal point, one supporting background, and one clear sentiment. Then use color repetition to connect those pieces. If you're more experienced, challenge yourself to look through your existing supplies and recreate the same visual balance with completely different products. That's one of my favorite ways to stretch a stash and discover combinations I might not have considered otherwise.

I also have a companion video for this project if you'd like to see the card come together while I share more about the design choices and products I used. But whether you follow along with the video or simply use this card as inspiration, I hope you'll take away more than just an idea for a unicorn birthday card. The next time you're staring at your supplies wondering how to put everything together, remember that you don't need more products—you may just need to give one element the starring role, let your patterned paper establish the color story, and allow the rest of the design to support it. That's when cardmaking starts to feel less like following a recipe and more like creating something that's truly your own.
Watch the Video
If you have problems watching the video here on my blog you can always watch it on the Scrappy Boy Stamps YouTube Channel by Clicking Here!
(Wondering what I used in this video? Everything is linked to multiple sources in the thumbnails at the end of this post, or in the text below. Compensated affiliate links used when possible). As always I appreciate your support of my videos!
Supplies Used
Here you will find the list of supplies that I used to create today's card. All supplies are linked to supply sources below. Compensated affiliate links may be used at no cost to you.
Happy Crafting,

Rick Adkins
Affiliate Disclaimer:
Just a friendly reminder, as part of my commitment to transparency, please note that some of the links provided maybe affiliate links. This means that if you make a purchase through these links, I may earn a small commission at no extra cost to you. Your support is truly appreciated!
Additionally, I kindly ask that you always accept the tracking cookie for the affiliate websites. Rest assured, this will not in any way expose your computer to viruses or compromise your information. It's simply necessary for the company to attribute the sale to the affiliate, ensuring creators like myself receive their rightful commissions.
Your trust and support enable me to continue sharing creativity through my email lists, blog, and YouTube channel. Thank you for being a valued part of our crafting community!


Comments