
Moon Landing Card That’s Out of This World!
- Rick Adkins

- Jul 28, 2025
- 4 min read
Updated: Aug 15, 2025
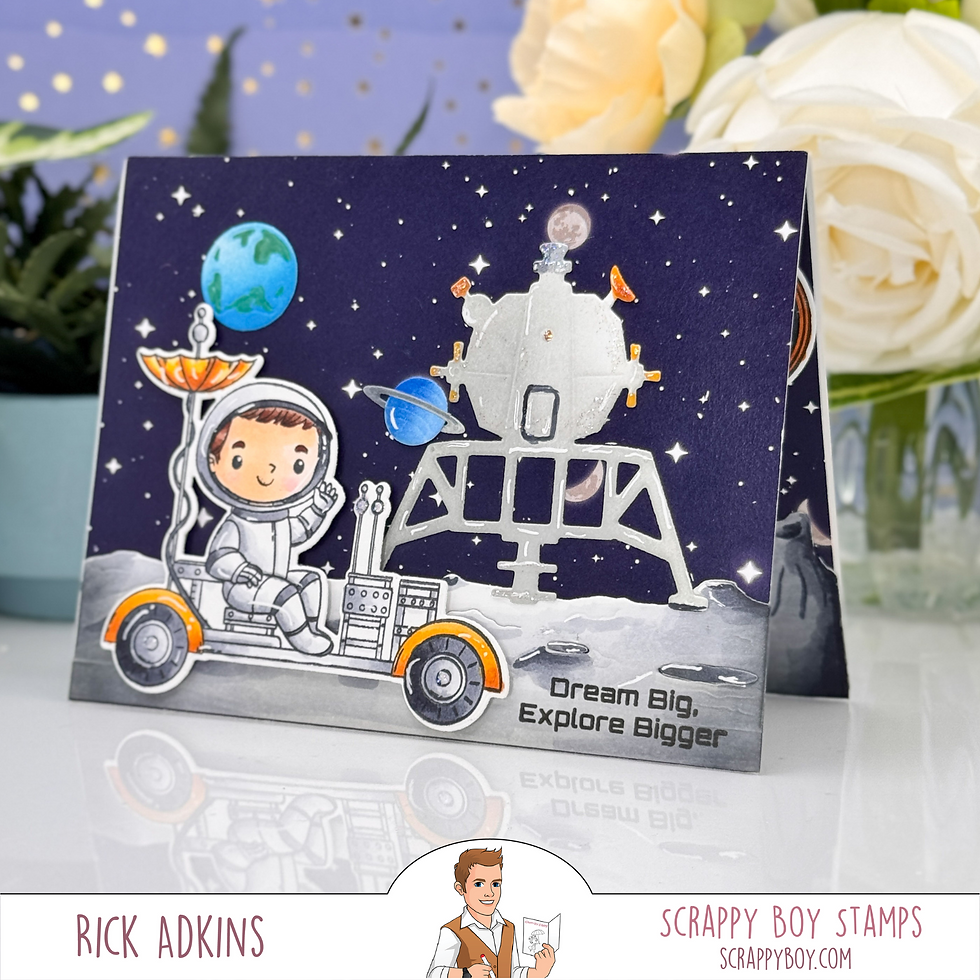
There’s just something magical about space-themed stamps. Maybe it’s the endless possibilities or maybe it’s just the inner kid in me who still dreams about moon landings and far-off galaxies. Either way, when I saw the Moon Landing Stamp Set and coordinating dies from Scrappy Boy Stamps, I knew I had to create a card that captured that sense of wonder. And let me tell you—this card was a total blast to make.
I started this project on a rainy afternoon with a strong cup of coffee and a pile of die cuts on my desk. I’d just finished reorganizing my craft space (again), and this set was calling to me from the top of the stack. I wasn’t sure exactly where the card would go, but once I pulled out the coordinating pattern paper and that amazing Moon Landing Scene Builder Die Set, it all started to come together like the pieces of a puzzle. That’s what I love most about themed collections—you’re not just making a card, you’re building a little story.

Moon Landing Card That’s Out of This World!
Building the Galaxy with Layers and Texture
One of my favorite things about this card is how easy it was to create depth and interest just by layering the coordinating products. The Moon Landing Pattern Paper instantly set the tone with its rich starry sky, which meant I didn’t have to do any ink blending or background stamping. That saved me time, and to be honest, I was ready to get right to the fun part—building the scene.

Next came the Moon Landing Scene Builder Dies. If you’re someone who loves a dimensional card but doesn’t want the bulk that comes with foam tape overload, these dies are a dream. I used them to create the moon’s surface and assemble the lunar lander, which added just the right amount of structure without overpowering the background.
Pro Tip: When using busy backgrounds like patterned paper, choose solid die-cut pieces in neutrals or muted tones to help your stamped images stand out. That contrast helps your focal points pop while still keeping everything cohesive.

Bringing the Characters to Life with Copic Coloring
Let’s talk about that little astronaut—seriously, how cute is he? The Moon Landing Stamp Set includes the most charming space-themed illustrations, and I knew he needed to be front and center. I stamped the images on alcohol marker-friendly cardstock and colored everything with my Copic markers, focusing on cool grays for the suit and soft browns for the skin and hair.
I kept the rover and lander mostly in grayscale to maintain that classic lunar look but added a few pops of orange for a retro NASA vibe. I couldn’t resist including some of the planets from the set too—because when you're already on the moon, why not bring Saturn along for the ride?
Pro Tip: If you want to give your planets a glowing effect, try blending your Copics out toward the center and finishing with a white gel pen highlight. It’s a small detail, but it makes a big impact.

Finishing Touches That Make the Card Shine
Once all the elements were colored and die-cut using the Moon Landing Outline Dies, it was time to put the whole scene together. I played around with the layout until it felt balanced—astronaut on the left, lander on the right, planets floating above. A few of the pieces are popped up on foam tape for dimension, but most are adhered flat to keep things easy to mail.
The finishing touch? That sentiment: “Dream Big, Explore Bigger.” It’s such a beautiful reminder—and one that felt especially fitting for this card. I stamped it directly onto the lunar surface layer, which helped it feel grounded in the design (pun totally intended).
Pro Tip: When stamping sentiments over layered elements, use a stamp positioner like a MISTI to make sure everything lines up just right. One misaligned sentiment and all that hard work can feel wasted—ask me how I know.
Final Thoughts
This card was a joy to make from start to finish. Using a full collection like the Moon Landing line from Scrappy Boy Stamps makes designing so much easier because everything works together seamlessly. Whether you’re building a full scene or just looking for a few cute elements to color, this set delivers.
If you’ve ever felt stuck when trying to combine pattern paper, dies, and stamps into one cohesive design, I hope this card inspires you to give it a try. Don’t be afraid to mix textures, build layers, and let your imagination go a little wild. After all, space is the one place where there really are no limits.
I’ll be back soon with more fun ideas, but until then—keep dreaming big and crafting even bigger.

Moon Landing Card That’s Out of This World Video Tutorial:
If you have problems watching the video here on my blog you can always watch it on my YouTube Channel by Clicking Here!
(Wondering what I used in this video? Everything is linked to multiple sources in the thumbnails at the end of this post, or in the text below. Compensated affiliate links used when possible). As always I appreciate your support of my videos!
Materials Used:
Here you will find the list of supplies that I used to create today's card. All supplies are linked to supply sources below. Compensated affiliate links may be used at no cost to you.
Happy Stampin'

Rick Adkins
Affiliate Disclaimer:
Just a friendly reminder, as part of my commitment to transparency, please note that some of the links provided maybe affiliate links. This means that if you make a purchase through these links, I may earn a small commission at no extra cost to you. Your support is truly appreciated!
Additionally, I kindly ask that you always accept the tracking cookie for the affiliate websites. Rest assured, this will not in any way expose your computer to viruses or compromise your information. It's simply necessary for the company to attribute the sale to the affiliate, ensuring creators like myself receive their rightful commissions.
Your trust and support enable me to continue sharing creativity through my email lists, blog, and YouTube channel. Thank you for being a valued part of our crafting community!


Comments