
One Fall Design, Four Handmade Thank You Cards

Fall is one of my favorite times of year to play with color, texture, and simple card designs. There is something about those deep burgundies, warm oranges, golden yellows, and earthy browns that makes even a clean and simple card feel special. For this project, I wanted to see how far I could take one basic card layout. The result is a set of four handmade thank you cards that use the same design idea but feel slightly different because of the changing color combinations. I combined dry embossing, die cutting, and layering with a beautiful mix of CutCardStock papers to create these Fall Thanks cards.

One Fall Design, Four Handmade Thank You Cards
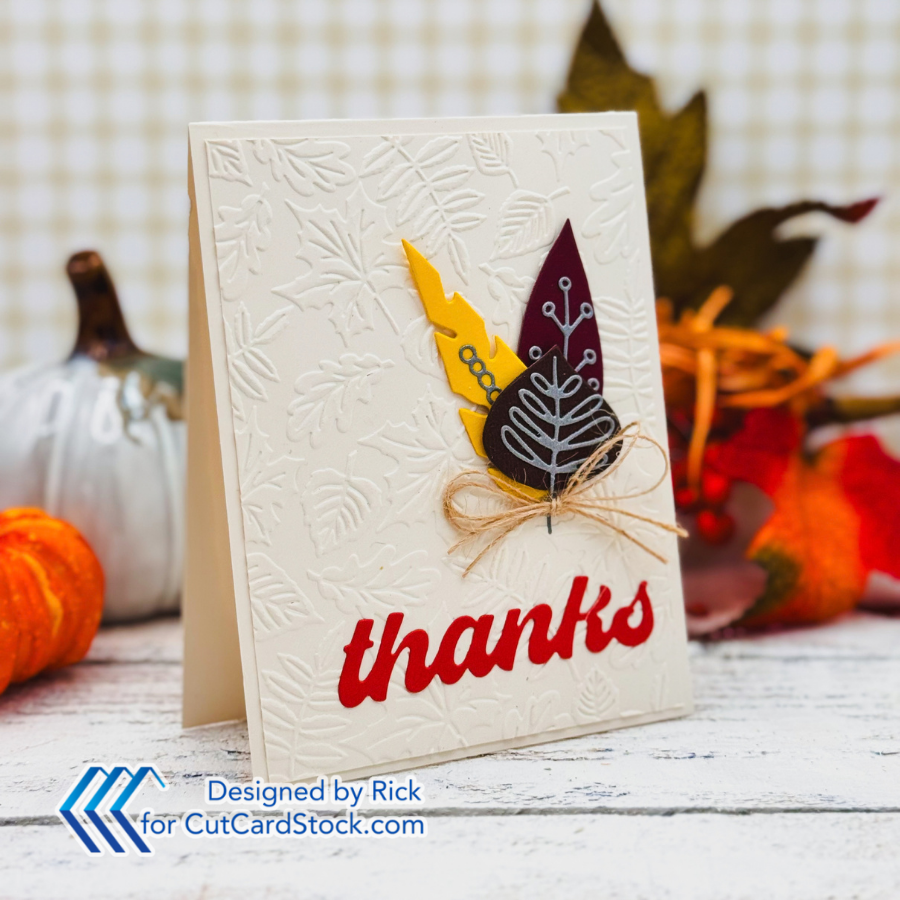
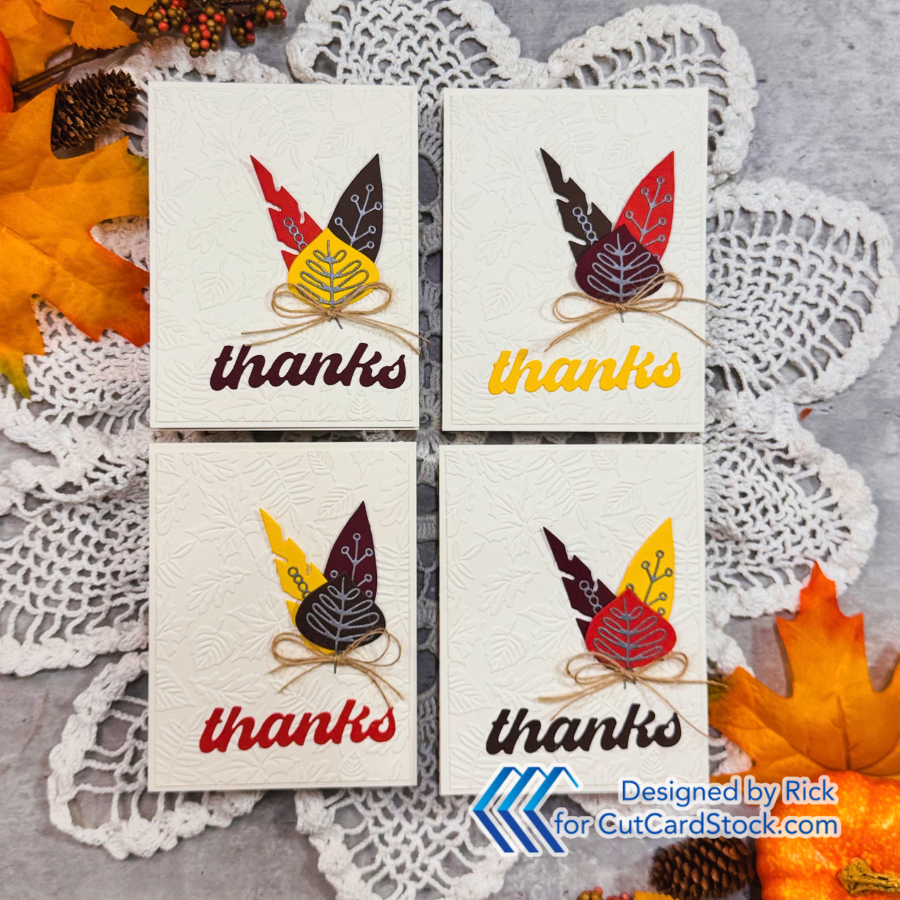
The main idea behind this card set was to keep the design simple while letting the cardstock do the heavy lifting. Each card starts with the same natural cardstock background, an embossed leaf pattern, and a cluster of three layered leaves. What changes is the color combination. This is one of my favorite ways to create a coordinated card set because I don't have to reinvent the design four times.
For the card bases and embossed panels, I used COUGAR Opaque NATURAL 100 lb. Cardstock. The warm natural tone is softer than a bright white and works beautifully with a fall palette. I paired it with DCS Vanilla Bean Brown Cardstock, DCS Burgundy Cardstock, Pop Tone Tangy Orange Cardstock, and Lessebo Colors Premium Sunflower Cardstock for the leaves and sentiments. I also used DCS Arrowhead Gray Cardstock for the leaf stems. The variety of textures is part of what makes this combination work. I especially like the pearlized finish of the Arrowhead Gray because it adds a subtle detail without competing with the focal point.

Why Dry Embossing Works So Well
The embossed leaf background is one of those details that looks complicated but is actually a very easy way to add interest to a clean and simple card. Instead of adding another layer of patterned paper or ink blending, I used the Falling Leaves Embossing Folder to create tone-on-tone texture on the natural cardstock.
This is a great technique to remember when a card feels like it needs something, but you don't want to make the design busier. Dry embossing adds dimension without introducing another color. It also gives the background a tactile quality that you can appreciate when the card is held in your hand.
The important design lesson here is contrast. The embossed leaves are subtle, while the layered die-cut leaves are bold and colorful. That difference helps the focal point stand out.

Let the Cardstock Create the Color Story
When I design fall cards, I often start with the colors rather than the embellishments. For these cards, I wanted the leaves to feel like they had naturally fallen from different trees, so I didn't use the same three colors on every card.
One card features a bright sunflower yellow leaf as the focal point, while another puts burgundy or brown at the center. The orange, yellow, burgundy, and brown pieces can be rearranged in countless combinations. This gives you an easy way to create variety while keeping the cards visually connected.
This approach also makes the design very stash-friendly. You don't need the exact cardstock colors I used. Look through your scraps and pull together three or four colors that remind you of fall. Rust, olive green, mustard, cream, dark brown, and muted red would all work beautifully. You could even create a monochromatic set using several shades of the same color.
Build Dimension Without Overcomplicating the Design
The leaf clusters are intentionally simple. I grouped three leaves together and used thin foam adhesive to lift the cluster away from the embossed background. That small amount of dimension is enough to create a clear focal point.
I also kept the “Thanks” sentiment flat and placed it directly below the leaves. This gives the card a visual hierarchy: texture in the background, dimension in the focal point, and a simple sentiment to finish the design.
The leaf dies I used for this project are from the retired Artsy Leaves set, so you don't need to have that particular set to recreate the idea. Look through your own stash for any small leaf, branch, or botanical dies. You could even substitute punched leaves or simple die-cut shapes. The important thing is the arrangement, not the exact product.

Small Details Make the Cards Feel Finished
A double bow made from burlap twine finishes each card. I attached the bow to the stems of the leaf cluster with a mini glue dot. I like this detail because the twine adds another natural texture without distracting from the cardstock and embossed background.
This is also a good example of why I don't think every card needs lots of embellishments. When you already have texture, layered pieces, several colors, and dimension, one carefully chosen embellishment can be more effective than adding several more.
If you wanted to make this design your own, you could swap the burlap twine for linen thread, add a few small gems, or leave the bow off completely. You could also change the sentiment and turn these into birthday, friendship, or thinking-of-you cards.

Make the Design Work With What You Have
What I like most about this project is that the basic formula is easy to repeat:
embossed background + three layered leaves + simple sentiment + one small finishing detail.
Once you have that foundation, you can change almost anything else. Try different cardstock colors, use flowers instead of leaves, switch the sentiment, or experiment with a different embossing folder. You can also make the design more elaborate by adding another layer behind the embossed panel or keeping it even simpler by using just two leaves.
For me, that's where the real value of a cardmaking design comes in. I don't want you to feel like you have to copy my card exactly. I want you to see the why behind the design and then take that idea back to your own craft room. A simple layout can become the starting point for dozens of handmade cards.
I hope these One Fall Design, Four Handmade Thank You Cards give you a few ideas for using the supplies you already have in a new way. If you create your own version, I'd love to hear what colors you would choose for your fall card set. Leave a comment and tell me your favorite color combination, or share how you would adapt this design for another season!
Thanks for dropping by today I hope that you found a little spark of creative inspiration with my project today. Wondering what I used in this project? Everything is linked to multiple sources in the thumbnails in the Materials Used section, or in the text below. Compensated affiliate links used when possible.
Supplies Used
Here you will find the list of supplies that I used to create today's card. All supplies are linked to supply sources below. Compensated affiliate links may be used at no cost to you.
Happy Crafting,

Rick Adkins
Affiliate Disclaimer:
This post contains affiliate links. If you choose to shop through these links, I may earn a small commission at no extra cost to you. Thank you so much for supporting my business!


Comments