
Quick & Easy Christmas Card with the Holiday Lane Stamp Set
- Rick Adkins

- Oct 26, 2025
- 4 min read
During the busy holiday season, I’m all about finding simple ways to make handmade cards that still look special and heartfelt. There’s just something about sending a card that feels warm and personal — especially when it looks like it took hours but really came together in a fraction of the time. Today’s card is the perfect example of that balance. I used the Holiday Lane Stamp Set and North Pole Collection Paper Pack from Unity Stamp Company to create a cozy little neighborhood scene, complete with glowing windows, a soft winter sky, and Santa flying overhead. It’s quick, easy, and full of charm — exactly what I need when I’m making a big batch of Christmas cards. And if you’d like to see the full process, there’s a video tutorial linked below that walks through all the details.

Quick & Easy Christmas Card with the Holiday Lane Stamp Set
Creating a Cozy Holiday Glow
For this card, I started by pulling two coordinating patterned papers from the North Pole Collection Paper Pack — a soft cream print for stamping my scene and a subtle green pattern for the mat layer. I love how patterned paper adds instant texture and warmth without any extra work. To bring my stamped houses to life, I used a foam blending tool and Mustard Seed Distress Oxide Ink to softly add circles of light where I wanted the windows to glow. It’s such a simple trick, but it completely transforms the look of a stamped image.
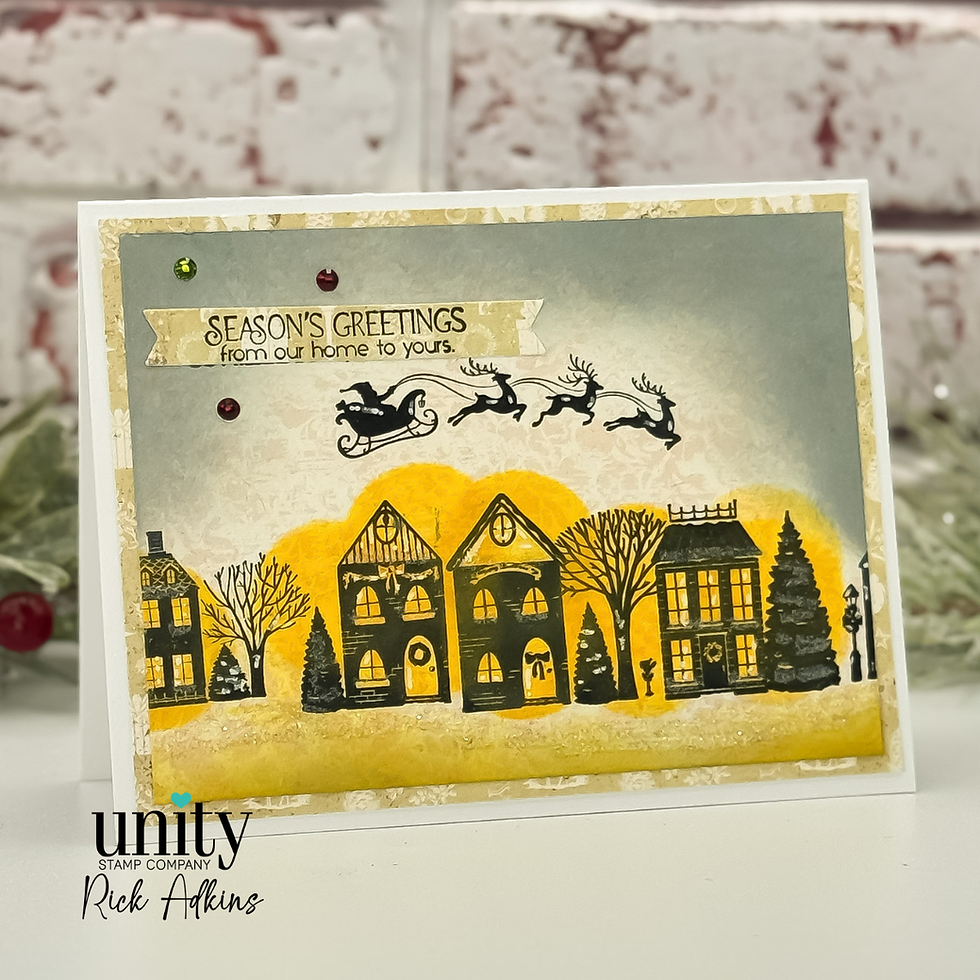
Once the ink was down, I used Versafine Clair Nocturne Ink to stamp the houses from the Holiday Lane Stamp Set right over the blended areas. Because I wanted my lines to be crisp and dark, I stamped them twice using my MISTI stamping tool. That extra layer of ink really helps the images stand out against the patterned background. And of course, no Christmas village is complete without Santa — so I added the sleigh and reindeer flying across the sky for that perfect finishing touch.
Pro Tip: When you’re ink blending over patterned paper, start with a very light hand and build up the color slowly. This helps the design of the paper peek through and creates that soft, glowing look without harsh edges.

Adding Depth and Dimension
To give the sky a bit more atmosphere, I reached for Weathered Wood Distress Oxide Ink and gently blended it around the top edges of the panel. This subtle shading makes a huge difference and helps draw the eye toward the center of the scene.
I’ll admit, I had a little stamping mishap with the sentiment — it ended up upside down the first time around! But instead of starting over, I simply restamped it on a scrap piece of the green patterned paper and cut it into a banner shape before layering it over the mistake. Honestly, I think it looks even better that way. Sometimes our “oops moments” turn into the best design choices.
Pro Tip: Keep your paper scraps nearby when stamping sentiments. If something doesn’t go as planned, you can easily restamp and add it as a layered element — it adds extra color and interest to your design.

Finishing Touches That Shine
Once everything was stamped and blended, I adhered the finished panel to my green mat layer using liquid adhesive, then mounted it onto a white A2 card base. To add a touch of sparkle, I brushed on Rock Candy Glitter over parts of the snow and rooftops — it catches the light beautifully without being too overpowering. I also used my Posca White Extra Fine Paint Marker to add a few highlights and snowy details throughout the scene.
For the inside of the card, I kept it simple with coordinating papers and a stamped sentiment to tie everything together. I love when the inside feels like a continuation of the front — it gives the whole card a finished, thoughtful look.
This project proves that you don’t need complicated techniques or hours of work to make a beautiful handmade card. By combining a little ink blending with the right stamp set and patterned paper, you can create something that feels both effortless and elegant.

Watch the Video Tutorial
If you’d like to see how this cozy Christmas scene came together, be sure to watch the video tutorial below. I walk through the blending, stamping, and layering process so you can see each step in action. It’s an easy project to recreate — perfect for mass-producing holiday cards or a relaxing afternoon of crafting with friends.

Easy Christmas Card Idea | Holiday Lane Stamp Set from Unity Stamp Company Video Tutorial:
If you have problems watching the video here on my blog you can always watch it on my YouTube Channel by Clicking Here!
(Wondering what I used in this video? Everything is linked to multiple sources in the thumbnails at the end of this post, or in the text below. Compensated affiliate links used when possible). As always I appreciate your support of my videos!
Materials Used:
Here you will find the list of supplies that I used to create today's card. All supplies are linked to supply sources below. Compensated affiliate links may be used at no cost to you.
Happy Crafting,

Rick Adkins
Affiliate Disclaimer:
Just a friendly reminder, as part of my commitment to transparency, please note that some of the links provided maybe affiliate links. This means that if you make a purchase through these links, I may earn a small commission at no extra cost to you. Your support is truly appreciated!
Additionally, I kindly ask that you always accept the tracking cookie for the affiliate websites. Rest assured, this will not in any way expose your computer to viruses or compromise your information. It's simply necessary for the company to attribute the sale to the affiliate, ensuring creators like myself receive their rightful commissions.
Your trust and support enable me to continue sharing creativity through my email lists, blog, and YouTube channel. Thank you for being a valued part of our crafting community!


Comments