
Shine Bright Like a Rainbow: Colorful Days Sneak Peek
- Rick Adkins

- Jun 4, 2025
- 4 min read
Updated: Aug 15, 2025
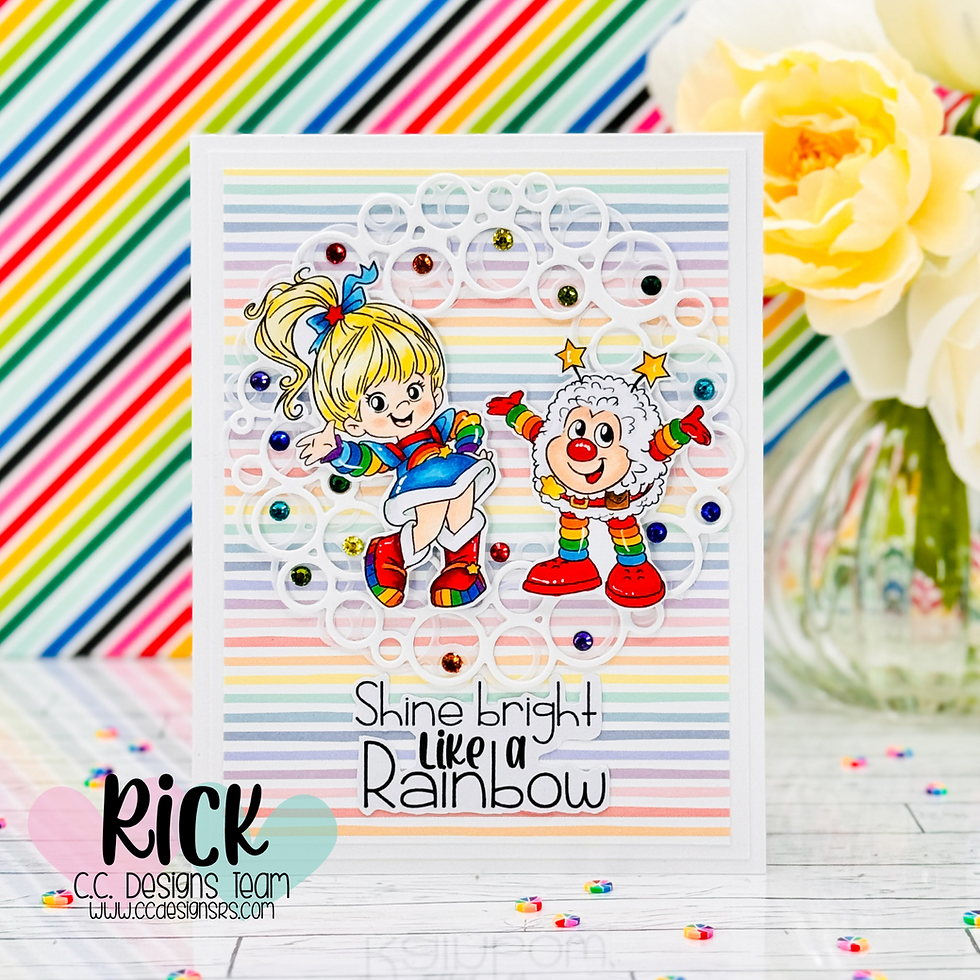
Hello, crafty friends! Today, I’m sharing a fun sneak peek project that’s all about bright colors, playful images, and a sprinkle of rainbow magic. When I sat down with the Colorful Days Stamp Set from C. C. Designs, I knew right away that Rainbow Brite and Twink were going to steal the show. But as with most of my card projects, I started with a simple idea and let it evolve as I played around with the supplies.

Shine Bright Like a Rainbow: Colorful Days Sneak Peek
Bringing Rainbow Brite and Twink to Life
I always find that the best cards come together when I give myself permission to experiment. I started by stamping out Rainbow Brite and Twink from the Colorful Days Stamp Set onto a piece of Hammermill Smooth 100 lbs Cardstock using Memento Tuxedo Black Ink. Coloring them in with my Ohuhu Brush Markers brought back memories of coloring these characters as a kid on a rainy afternoon — there’s something about those bright rainbow colors that always lifts my mood!
After fussy cutting the images with my snips, I set them aside and turned my attention to the card base.

Setting the Stage with a Rainbow Backdrop
I wanted to create a rainbow backdrop that would complement the characters without overwhelming them. I reached for the Rainbow Ever After 6 x 6 Petite Paper Pack from Lawn Fawn. Cutting the rainbow-striped patterned paper to 3 3/4" x 5" and matting it with Ivory Smooth 110 lbs Cardstock gave me a crisp, clean foundation to build on. I attached it to a top folding A2 card base cut from Brilliant White 110 lbs Smooth Cardstock.
Adding Texture and Dimension with Die Cuts
As I played around with the layout, I felt like the card needed a little more texture and dimension to make those adorable images pop. This is where layering die cuts really come in handy. I pulled out the Ring Wreath Wafer Die from Simon Says Stamp and cut it once from Brilliant White Cardstock and once from vellum. I love how layering vellum behind a white die cut creates a soft, dreamy effect that’s just the right amount of subtle drama. It’s one of my go-to tricks whenever I feel like a card is missing that little something extra.
I attached the layered Ring Wreath to the top center of the card front, slightly offsetting the vellum to create a shadow effect. This gave me the perfect landing spot for Rainbow Brite and Twink, who I popped up with foam squares for that instant dimension I love.

Finishing Touches and a Bit of Sparkle
One of my favorite parts of this card was adding the final touches — those tiny rainbow rhinestones in the openings of the Ring Wreath. There’s just something about a bit of sparkle that makes everything feel a little more special. I scattered them around the wreath for a rainbow of shimmer that ties the whole card together.
For the sentiment, I used “Shine Bright Like A Rainbow” from the Colorful Days Stamp Set. I stamped it with Versafine Onyx Black Ink onto a scrap of white cardstock, let it dry, and then added a hand-drawn pencil shadow before fussy cutting it out. This simple little detail gave the sentiment a bit of extra dimension without adding bulk.
To finish off the card, I added a few white gel pen highlights to Brite and Twink. It’s a small step, but those tiny pops of white really make the characters come alive.

Pro Tips for Adding Depth and Playfulness
When you’re layering die cuts, don’t be afraid to play around with different materials. Vellum, glitter cardstock, or even a subtle patterned paper can all add texture and interest without taking over the design. And don’t forget those little touches like foam squares and white gel pen highlights — they’re the secret sauce that makes your cards pop!

Let’s Keep the Conversation Going
I hope this sneak peek card has inspired you to shine bright with your own rainbow-inspired projects. Whether you’re coloring up your favorite stamps or layering up your die cuts, remember that a little playfulness and sparkle can go a long way in cardmaking. If you give this technique a try or have your own favorite way to add dimension and color, I’d love to hear about it in the comments below!
Thanks for dropping by today I hope that you found a little spark of creative inspiration with my project today. Wondering what I used in this project? Everything is linked to multiple sources in the thumbnails in the Materials Used section, or in the text below. Compensated affiliate links used when possible.
Materials Used:
Here you will find the list of supplies that I used to create today's card. All supplies are linked to supply sources below. Compensated affiliate links may be used at no cost to you.
Happy Stampin'

Rick Adkins
Affiliate Disclaimer:
Just a friendly reminder, as part of my commitment to transparency, please note that some of the links provided maybe affiliate links. This means that if you make a purchase through these links, I may earn a small commission at no extra cost to you. Your support is truly appreciated!
Additionally, I kindly ask that you always accept the tracking cookie for the affiliate websites. Rest assured, this will not in any way expose your computer to viruses or compromise your information. It's simply necessary for the company to attribute the sale to the affiliate, ensuring creators like myself receive their rightful commissions.
Your trust and support enable me to continue sharing creativity through my email lists, blog, and YouTube channel. Thank you for being a valued part of our crafting community!


Comments