
Stretch Your Dies: Little Pig Backpack Shaker Card Idea
- Rick Adkins

- Mar 30
- 4 min read
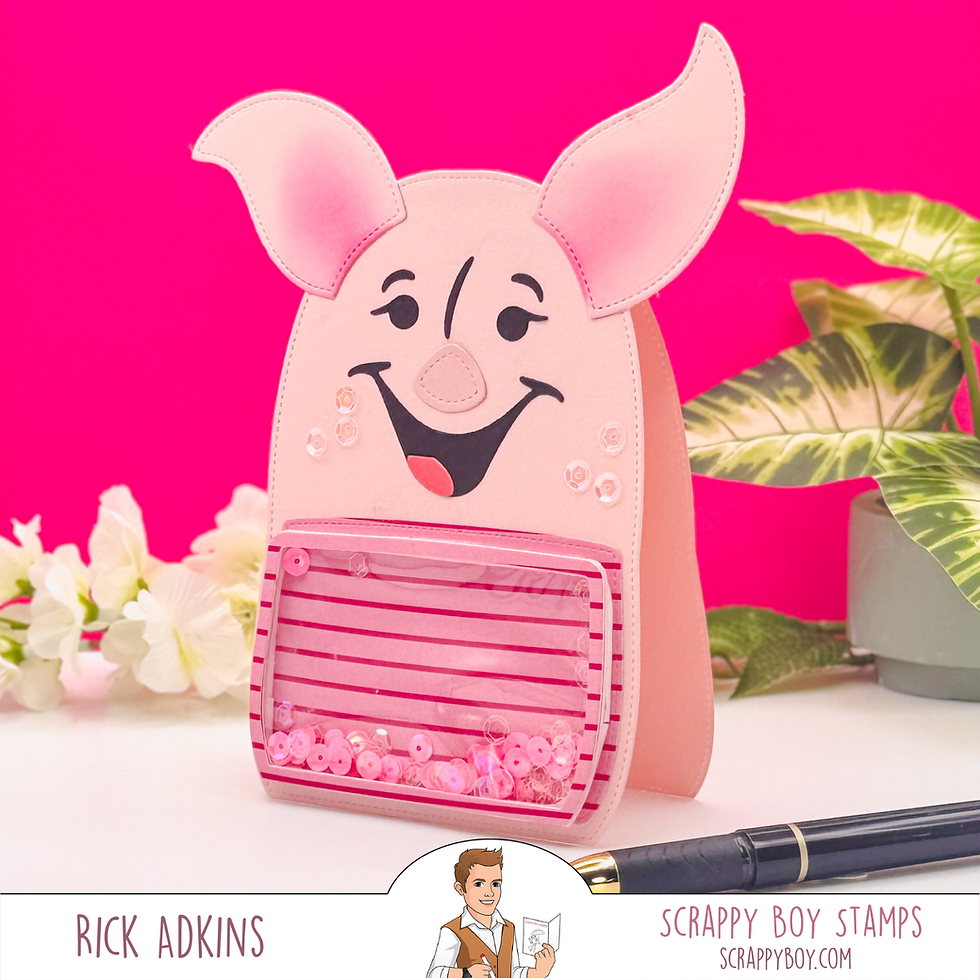
Sometimes the best cardmaking ideas come from looking at your supplies a little differently. That was exactly my goal with this project—I wanted to see how far I could stretch a few die sets and turn them into something completely new. Instead of using each set as intended, I mixed elements together to create a shaped shaker card… and this adorable little pig backpack design came to life.
I did walk through the full process in my video so you can see how all the pieces come together visually, but here I wanted to slow things down and talk through the why behind the design. Because once you understand how to combine dies like this, you’ll start seeing so many more possibilities in your own stash.

Why Mixing Die Sets Works So Well
One of the biggest challenges I hear from cardmakers is feeling like they need the “perfect” product for every idea. But in reality, some of the most creative cards come from using what you already have in new ways.
For this card, I pulled from multiple die sets from Scrappy Boy Stamps—not because I needed all of them, but because each one offered a different piece of the puzzle. One set helped build the base shape, another added structure for the shaker element, and another brought in those cute character details that turned it into a pig.
That’s the key takeaway here:Instead of asking “What does this die set make?” start asking “What parts of this can I use?”

Designing a Shaped Shaker Card (Without Overthinking It)
Shaped cards can feel a little intimidating at first, especially when you add a shaker element into the mix. But breaking it down into layers makes it much more manageable.
For this design, the backpack shape gave me a clear foundation. From there, the shaker frame naturally became the focal point. I didn’t have to guess where to place elements or how to balance the design—it was already built into the shape.
That’s one of the reasons I love this approach:
The structure is already decided for you
The focal point is obvious (hello, shaker window!)
It reduces decision fatigue
If you’ve ever sat at your desk wondering where to start, this is a great method to try.

Adding Interest with Pattern Paper
I brought in the Honey Bear pattern paper to add a little extra personality without needing to do any coloring. This is one of my favorite shortcuts, especially when I want a polished look but don’t have a lot of time.
Pattern paper works beautifully here because:
It adds color and texture instantly
It keeps the design cohesive
It pairs perfectly with die cut shapes
A quick tip: when you’re working with smaller shaped cards like this, go for patterns that aren’t too busy. That way, your main design (in this case, the pig shaker) still stands out.

Common Mistakes to Watch For
When you’re mixing dies and creating shaker cards, there are a couple of things to keep in mind:
Overcomplicating the design – It’s easy to want to use everything, but keeping the focus on one main idea (like the pig shaker) makes a stronger card.
Forgetting dimension balance – Shaker elements already add bulk, so be mindful of how many extra layers you include.
Not testing the fit – When combining dies from different sets, always do a quick dry fit before assembling. It saves a lot of frustration later.
Make It Work with What You Have
This idea is incredibly flexible, which is what makes it so useful.
You can easily:
Swap the pig for another animal or character
Use different shaped dies (not just backpacks)
Turn this into a non-shaker card for a flatter design
Replace pattern paper with ink blending or coloring
Even if you don’t have these exact die sets, look for:
A base shape
A window or frame element
Small pieces you can combine to create a character
Once you start thinking in those categories, your stash opens up in a whole new way.

A Little Encouragement
If you’ve never tried mixing die sets like this before, this is your sign to give it a go. It doesn’t have to be perfect—and honestly, that’s part of the fun. Some of the best ideas come from experimenting and seeing what works.
And if you’re more of a visual learner, I think seeing this one come together will really help it click.
Watch the Full Process
You can watch the process here and see exactly how all the pieces come together: Stretch Your Dies! Create a Pig Shaker Card from Backpack Dies
If you have problems watching the video here on my blog you can always watch it on my YouTube Channel by Clicking Here!
(Wondering what I used in this video? Everything is linked to multiple sources in the thumbnails at the end of this post, or in the text below. Compensated affiliate links used when possible). As always I appreciate your support of my videos!
Materials Used:
Here you will find the list of supplies that I used to create today's card. All supplies are linked to supply sources below. Compensated affiliate links may be used at no cost to you.
Happy Crafting,

Rick Adkins
Affiliate Disclaimer:
Just a friendly reminder, as part of my commitment to transparency, please note that some of the links provided maybe affiliate links. This means that if you make a purchase through these links, I may earn a small commission at no extra cost to you. Your support is truly appreciated!
Additionally, I kindly ask that you always accept the tracking cookie for the affiliate websites. Rest assured, this will not in any way expose your computer to viruses or compromise your information. It's simply necessary for the company to attribute the sale to the affiliate, ensuring creators like myself receive their rightful commissions.
Your trust and support enable me to continue sharing creativity through my email lists, blog, and YouTube channel. Thank you for being a valued part of our crafting community!


Comments