
Three Clean and Simple Hello Cards with the Paper Rose Studio Campfire Tales Collection

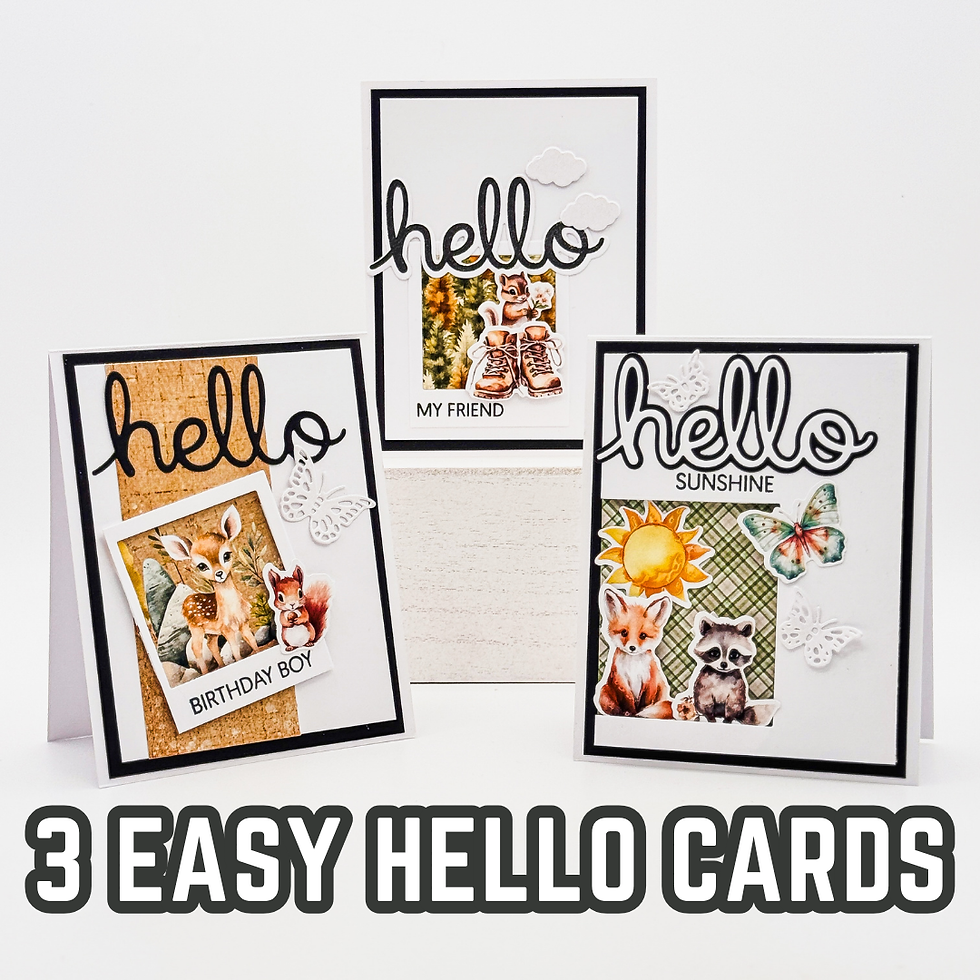
Sometimes the best card designs come from giving yourself a few creative boundaries. Instead of starting with three completely different ideas, I challenged myself to use one basic layout and see how many unique cards I could create simply by changing the patterned paper, focal images, and sentiments. It's a great reminder that you don't need an elaborate design to make something memorable.
For these cards, I reached for the Paper Rose Studio Campfire Tales Collection and paired it with a few coordinating dies and stamps. Even though each card has its own personality—a friendly hello, a cheerful sunshine greeting, and a birthday card for a special boy—they all share the same clean and simple foundation. That consistency not only makes creating multiple cards faster, but it also gives the finished set a cohesive look.
Why One Layout Works So Well
One of my favorite ways to stretch both my time and my supplies is to find a layout that works and repeat it. Rather than reinventing the design with every card, I let the papers and embellishments become the stars.
Each card begins with plenty of white space framed by a bold black mat. The clean background keeps the design feeling fresh while allowing the warm woodland imagery from the Campfire Tales Collection to stand out. Using a consistent layout also makes it much easier to experiment with different focal points without worrying about balancing an entirely new composition.
If you've ever struggled with designing cards from scratch, this is a wonderful approach to try. Once you find a layout you enjoy, you can recreate it dozens of times using different themes, colors, or occasions.

Let Pattern Paper Do the Heavy Lifting
Patterned paper is often one of the most overlooked supplies in a paper crafter's stash. It's easy to save those pretty papers for "the perfect project," but they're designed to be used.
For these cards, I intentionally chose smaller pieces of patterned paper instead of large background panels. Smaller layers provide color, texture, and interest without overwhelming the clean and simple style. They also make it easy to use leftover scraps from previous projects.
If your paper collection doesn't match the Campfire Tales Collection, don't worry. This same idea works beautifully with florals, holiday papers, masculine prints, seasonal collections, or even simple geometric patterns. The layout stays the same—the papers simply tell a different story.

Large Sentiments Create Instant Impact
One design choice that really ties these cards together is the oversized Hello Clear Stamp Set and Hello Layered Metal Die.
Large word dies or stamps naturally draw the eye and create a strong visual anchor. Because the greeting becomes part of the overall design instead of simply being added at the end, the rest of the card can remain wonderfully uncluttered.

I also love layering the black die-cut sentiment over white cardstock. The contrast creates definition and helps the greeting stand out without needing additional embellishments or complicated techniques.
This is an easy design principle to remember whenever you're creating clean and simple cards: when one element is bold, the remaining elements can stay beautifully understated.

Small Details Add Personality
Although all three cards use the same basic design, each one feels unique because of the little details.
The woodland animals tucked into the Polaroid frame immediately create a focal point and add personality. Delicate butterfly die cuts soften the design on two of the cards, while the tiny cloud die cuts add a playful touch to the friendship card. Even small stamped greetings help customize each project for a different recipient without changing the overall layout.
These finishing touches may seem subtle, but they help guide the viewer's eye around the card while reinforcing the theme.

Make This Design Your Own
One of the reasons I enjoy creating with simple layouts is how easily they can be adapted.
Try swapping the Polaroid frame for a stitched rectangle or circle die. Replace the woodland images with florals, holiday characters, or stamped images you've colored yourself. Use a different oversized sentiment like "Thanks," "Happy Birthday," or "Thinking of You" to create an entirely new collection of cards.
If your stash includes embossing folders, ink blending, or textured cardstock, those can also be incorporated while keeping the same overall composition. The goal isn't to copy the design exactly—it's to use the layout as a starting point for your own creativity.

A Simple Layout You'll Reach for Again
These three cards are a wonderful reminder that clean and simple cardmaking doesn't have to mean plain or repetitive. By combining one versatile layout with patterned paper, layered die-cut sentiments, and thoughtfully chosen focal images, you can create multiple cards that feel coordinated while still having their own unique character.
Whether you're trying to use more of your patterned paper, create cards more efficiently, or simply build confidence in your cardmaking, repeating a favorite layout is a technique worth adding to your creative toolbox. Sometimes the simplest designs are the ones you'll return to again and again, and they often become the cards that friends and family remember most.
I hope these cards inspire you to look through your own paper collections and create a set of clean and simple cards using supplies you already have. You might be surprised by how many beautiful designs can come from one layout and a little creative experimentation.

Thanks for dropping by today I hope that you found a little spark of creative inspiration with my project today. Wondering what I used in this project? Everything is linked to multiple sources in the thumbnails in the Materials Used section, or in the text below. Compensated affiliate links used when possible.
Supplies Used
Here you will find the list of supplies that I used to create today's card. All supplies are linked to supply sources below. Compensated affiliate links may be used at no cost to you.
Happy Crafting,

Rick Adkins
Affiliate Disclaimer:
Just a friendly reminder, as part of my commitment to transparency, please note that some of the links provided maybe affiliate links. This means that if you make a purchase through these links, I may earn a small commission at no extra cost to you. Your support is truly appreciated!
Additionally, I kindly ask that you always accept the tracking cookie for the affiliate websites. Rest assured, this will not in any way expose your computer to viruses or compromise your information. It's simply necessary for the company to attribute the sale to the affiliate, ensuring creators like myself receive their rightful commissions.
Your trust and support enable me to continue sharing creativity through my email lists, blog, and YouTube channel. Thank you for being a valued part of our crafting community!


Comments