
How to Design a Fun Mailbox Birthday Card with Die Cutting and Pattern Paper
- Rick Adkins

- Jul 15
- 5 min read
One of my favorite things about making birthday cards is finding creative ways to make the design feel just as special as the person receiving it. Sometimes that means reaching for bright colors, and other times it's about choosing a focal point that instantly tells a story. When I saw the Mailbox Shaker with Mouse Ears Die Set from Scrappy Boy Stamps, I knew it would be the perfect starting point for a cheerful birthday card that looks like happy mail arriving on someone's special day.
While the companion video shares the process of putting this project together, I wanted to spend some time talking about the design choices behind the card. Understanding why certain elements work together can help you confidently create your own handmade cards, even if you're working with completely different supplies.

Start with One Strong Focal Point
Whenever I'm designing a card with several fun elements available, I try to remind myself that everything doesn't have to compete for attention. Instead, I like to choose one feature to become the star of the design.
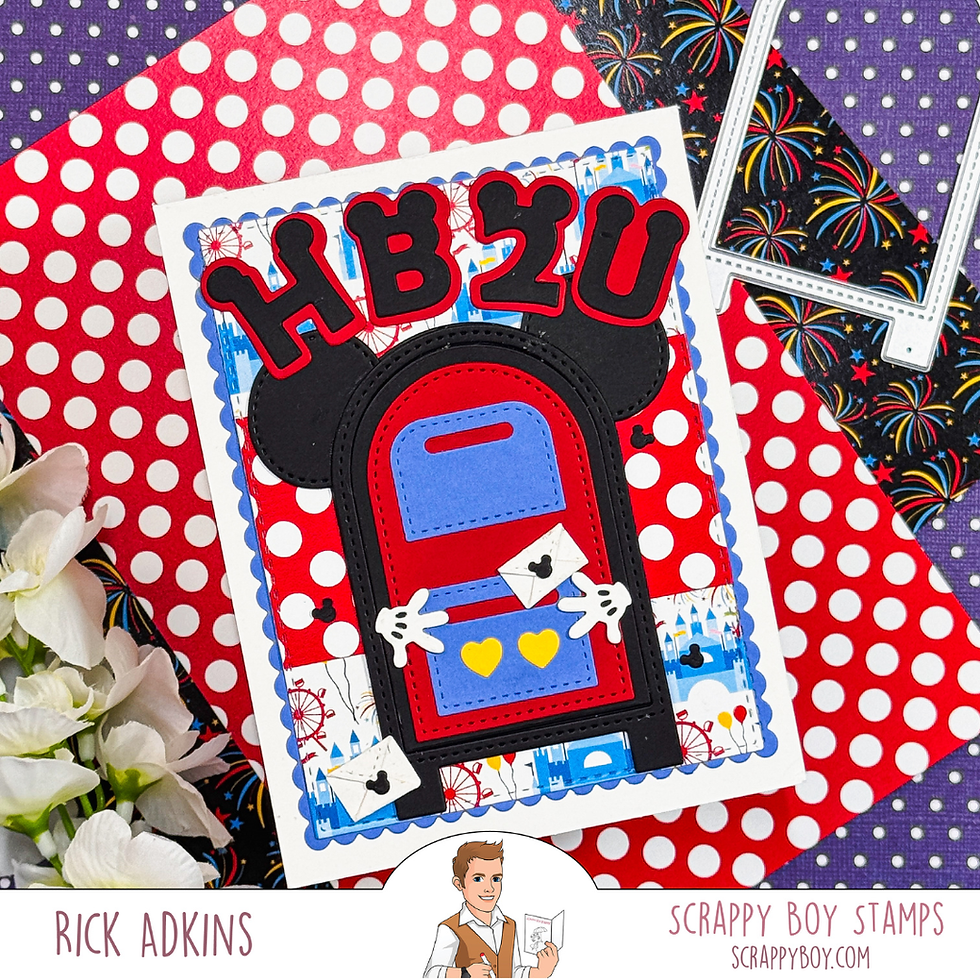
For this card, the oversized mailbox naturally became that focal point. Its bold shape immediately catches your eye, so I kept the rest of the layout fairly simple. Rather than adding multiple images around it, I let the mailbox take center stage while using a few tiny envelopes and layered letters to reinforce the birthday theme.
This approach is especially helpful when you're working with detailed die sets. Giving the main image plenty of breathing room allows all those fun details to shine without making the finished card feel crowded.

Let Pattern Paper Do Some of the Work
Pattern paper is one of the easiest ways to add personality without spending extra time on inking or creating backgrounds from scratch.
For this project, I combined several patterns from the Magical Memories 6x9 Pattern Paper Pack. Although there are multiple prints, they share a coordinated color palette, making it easy to mix stripes, dots, and themed images without creating visual chaos.
When using several patterns on one card, I like to think about scale. A larger pattern works well in the background, while a bold print can become an accent strip that draws your eye toward the focal point. This simple design principle creates movement while keeping everything balanced.
It's also a great reminder that patterned paper doesn't always have to cover an entire card front. Even small strips can make a big impact.

Build Depth with Die Cutting
One reason I enjoy die-cutting so much is that it naturally creates layers and dimension.
Using the Stitched Nested Rectangles Dies and A2 Stitched Scalloped Edge Dies helped frame the design while adding subtle texture through the stitched details. These layers create separation between the background papers and the mailbox without overwhelming the overall design.
I also chose to layer the Mouse Ears Alphabet and Numbers Dies with black letters over a red shadow layer. That small detail gives the greeting extra contrast and helps it stand out against the colorful background.
Whenever you're layering die cuts, think about contrast as much as color. Dark shapes against lighter backgrounds—or adding a shadow layer behind your sentiment—can make your focal elements much easier to read.

A Limited Color Palette Creates Unity
Although this card has plenty of playful details, it still feels cohesive because I stayed with a limited color palette.
The red, black, blue, and white colors repeat throughout the card—from the mailbox and greeting to the patterned papers and tiny embellishments. Repeating colors in multiple places helps tie everything together and keeps your eye moving naturally around the design.
This is one of my favorite tricks whenever a project starts feeling busy. Instead of removing elements, I often simplify the color choices.

Make the Design Your Own
One of the things I appreciate most about this style of card is how easy it is to personalize.
If you don't have the featured die set, look through your stash for another large focal image like a gift box, birthday cake, balloon, or even a floral arrangement. The same layout works beautifully with almost any themed die or stamped image.
You can also change the personality of the card by simply swapping the patterned paper. Bright primary colors create a playful birthday design, while soft florals or pastels would give the exact same layout a completely different feel.
Even the greeting can be customized. Instead of "HB2U," you could use a traditional "Happy Birthday" sentiment, add the recipient's initials, or include numbers to celebrate a milestone birthday.
The layout provides the framework, while your supplies make it uniquely yours.
Confidence Comes from Understanding Design
As cardmakers, it's easy to focus on learning new techniques or collecting new products. While those things are certainly fun, I've found that understanding basic design principles often makes a bigger difference than owning the newest supplies.
Thinking about focal points, balancing pattern, repeating colors, and layering for contrast are skills you can use on almost every handmade card you create. Once those ideas become second nature, you'll find it much easier to look at your stash with fresh eyes and create projects that feel polished and intentional.
I hope today's birthday card inspires you to experiment with your own die cuts and patterned papers. Whether you're using the featured Scrappy Boy Stamps products or adapting the design with supplies you already own, remember that great cardmaking isn't about copying a project exactly—it's about taking inspiration and making it your own.
Happy crafting, and I'll see you again soon with another creative cardmaking idea!
Watch the Video
If you have problems watching the video here on my blog you can always watch it on my YouTube Channel by Clicking Here!
(Wondering what I used in this video? Everything is linked to multiple sources in the thumbnails at the end of this post, or in the text below. Compensated affiliate links used when possible). As always I appreciate your support of my videos!
Supplies Used
Here you will find the list of supplies that I used to create today's card. All supplies are linked to supply sources below. Compensated affiliate links may be used at no cost to you.
Happy Crafting,

Rick Adkins
Affiliate Disclaimer:
Just a friendly reminder, as part of my commitment to transparency, please note that some of the links provided maybe affiliate links. This means that if you make a purchase through these links, I may earn a small commission at no extra cost to you. Your support is truly appreciated!
Additionally, I kindly ask that you always accept the tracking cookie for the affiliate websites. Rest assured, this will not in any way expose your computer to viruses or compromise your information. It's simply necessary for the company to attribute the sale to the affiliate, ensuring creators like myself receive their rightful commissions.
Your trust and support enable me to continue sharing creativity through my email lists, blog, and YouTube channel. Thank you for being a valued part of our crafting community!


Comments