
Triple Accordion Step Card with the Christmas Holly Collection | Elegant Holiday Card Idea
- Rick Adkins

- Nov 7, 2025
- 5 min read
Updated: Mar 5
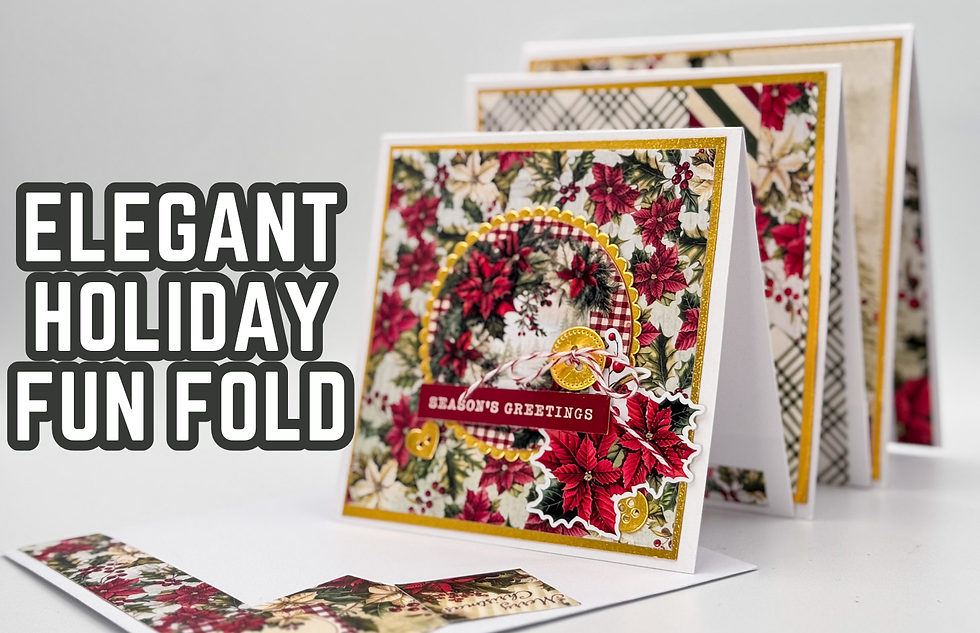
Every year as the holidays roll around, I love finding ways to make my Christmas cards feel extra special without spending hours at my craft desk. This year, I wanted something that felt elegant and dimensional—something that would stand out on a mantel but still fit neatly into a square envelope. That’s how this Triple Accordion Step Fun Fold Card came to life. It looks like a showstopper, but once you understand how the layers come together, it’s actually quite simple. I used the gorgeous Christmas Holly Collection from Paper Rose Studio, and let me tell you—it’s one of those collections that practically builds the card for you. The rich reds, warm golds, and traditional holly designs made this project come together beautifully.
Triple Accordion Step Card with the Christmas Holly Collection | Elegant Holiday Card Idea
A Classic Fold with a Festive Twist
One of my favorite things about fun folds is that they instantly add “wow” without much extra effort. This one uses three square card bases—stacked, layered, and connected with cardstock bridges—to create that cascading accordion look. I started with a 6 x 6 Square Card Base and added two more panels cut from Basic White 12 x 12 Cardstock, then used small scored strips as hinges to connect them. It sounds fancy, but the secret is in the scoring and alignment. Once those bridges are in place, the card opens up like a festive little display.
The beauty of this fold is how it gives each panel its own stage. You can showcase patterned papers, sentiments, and embellishments across multiple layers—almost like telling a story as the card unfolds. And since I used Paper Rose Studio’s Christmas Holly 6 x 6 Pattern Paper and Christmas Holly Basics 6 x 6 Pattern Paper, all the designs coordinated perfectly. Mixing the holly florals with plaid patterns kept things visually interesting while staying cohesive.
Pro Tip: When working with multiple patterned papers, choose one bold print, one medium, and one subtle background. It keeps your layers balanced and avoids that “too busy” look.

Elegant Layers and Gold Accents
Once the base was ready, it was time to bring in the sparkle. I layered each panel with Gold Foil Cardstock before adding the patterned paper. This small detail made a huge difference—it framed each design beautifully and added just enough shimmer to make the card feel luxurious.
I love that the Christmas Holly Collection includes so many mix-and-match options. The poinsettias and holly prints are traditional but still fresh, and they pair beautifully with the embossed die cuts from the same line. I added a few of those embossed pieces to each section of the card, letting the holly leaves and berries peek out from behind the focal points.
When I first started making interactive cards, I used to shy away from gold foil because I thought it would overwhelm the design. But over the years, I’ve learned that using it as a thin border or accent—rather than a large background—adds just the right amount of shine.

Dimensional Details that Make It Pop
For the focal point on the front panel, I die cut a 3" scalloped circle from gold foil cardstock and layered one of the circular Christmas Holly Embossed Die Cuts on top using thin foam tape. The dimension helps it stand out just enough, especially when paired with the rich patterned background.
To finish off the front, I used one of the sentiment banners from the Christmas Holly Tags & Tickets Embossed Die Cuts—“Season’s Greetings”—and popped it up with thicker foam tape for extra lift. A few gold button die cuts with the Lots of Buttons Metal Die added a bit of charm. I even threaded one with baker’s twine and tied it into a tiny bow for a handmade touch.
Pro Tip: When working with foam adhesives, layer different thicknesses (thin for background details, thicker for focal points). It gives your card professional-looking depth without adding too much bulk for mailing.

Finishing Touches That Pull It All Together
The inside panels deserve attention too, so I added narrow strips of coordinating patterned paper and a few smaller tags from the Christmas Holly Tags & Tickets Embossed Die Cuts. On the largest panel, I tucked in a gold scalloped circle and another embossed holly circle to echo the front design.
And of course, I couldn’t forget the envelope! A simple strip of patterned paper across the flap and a few cut-aparts from the 6 x 6 pad turned a plain square envelope into a coordinating piece of art. It’s those small details that make the card feel complete and thoughtful.
When I first assembled this fold, I’ll admit—I held my breath opening it for the first time. But watching it expand and stand upright made me smile. It’s the kind of card that begs to be displayed, and that’s exactly what I love about fun folds. They bring a sense of joy and surprise before the recipient even reads the message inside.

Why I Love This Design
What I enjoy most about this project is how achievable it is. At first glance, the Triple Accordion Step Fold looks intricate, but it’s really just about layering square bases and adding beautiful paper. It’s one of those techniques that looks far more complicated than it is—perfect for impressing friends and family this holiday season.
And while I used the Christmas Holly Collection from Paper Rose Studio for a traditional Christmas look, you could easily adapt this layout for birthdays, weddings, or any special occasion by swapping out the papers and colors.
So if you’ve ever looked at a fun fold and thought, “That’s too much work,” give this one a try. I promise—it’s simpler than it looks, and the results are absolutely worth it.

Thanks for dropping by today I hope that you found a little spark of creative inspiration with my project today. Wondering what I used in this project? Everything is linked to multiple sources in the thumbnails in the Materials Used section, or in the text below. Compensated affiliate links used when possible.
Materials Used:
Here you will find the list of supplies that I used to create today's card. All supplies are linked to supply sources below. Compensated affiliate links may be used at no cost to you.
Happy Crafting,

Rick Adkins
Affiliate Disclaimer:
Just a friendly reminder, as part of my commitment to transparency, please note that some of the links provided maybe affiliate links. This means that if you make a purchase through these links, I may earn a small commission at no extra cost to you. Your support is truly appreciated!
Additionally, I kindly ask that you always accept the tracking cookie for the affiliate websites. Rest assured, this will not in any way expose your computer to viruses or compromise your information. It's simply necessary for the company to attribute the sale to the affiliate, ensuring creators like myself receive their rightful commissions.
Your trust and support enable me to continue sharing creativity through my email lists, blog, and YouTube channel. Thank you for being a valued part of our crafting community!


Comments