
Turn Pattern Paper Into Amazing Halloween Cards

Halloween cardmaking is one of those times when I’m perfectly happy to let the patterned paper do some of the heavy lifting. Those spooky prints, colorful pumpkins, little ghosts, bats, skulls, and Halloween motifs already bring so much personality to a card. The trick is learning how to use all that visual information without letting the card feel too busy.
That was the creative challenge behind this collection of eight Halloween cards. Rather than treating patterned paper as just a small accent, I wanted to explore what happens when we make it a major part of the design. The result is a collection of cards with very different looks, but they all use the same basic idea: let the patterned paper help make the design decisions for you.
I walk through the cardmaking process in the accompanying video, including how I cut and combine the papers. But before you watch, I want to talk about the design decisions behind these cards because I think that is where patterned paper becomes especially useful in cardmaking.

Let the Patterned Paper Set the Theme
One of my favorite things about patterned paper is that it can instantly establish the mood of a card.
Instead of starting with a blank piece of cardstock and wondering, What should I do with this?, start by choosing a patterned paper that already gives you a direction.
For Halloween, that might be:
A traditional orange, black, and purple pattern
A spooky print filled with ghosts or bats
A whimsical Halloween print
A geometric pattern in seasonal colors
A small repeating pattern that can act almost like a texture
Once you have that paper, your color palette is already partially chosen.
That can make the rest of the design process much easier.
For example, I used solid green cardstock throughout these cards as a supporting color. It gives the eye a place to rest against some of the busier Halloween patterns while also creating a visual connection between the different cards.
This is an important cardmaking principle: You don't always need to choose every color independently. Let your patterned paper choose the palette for you, then pull one or two colors from the pattern for your cardstock.
That little trick can save a surprising amount of time.

Bold Patterns Work Better With a Visual Rest
There is a temptation to think that if a patterned paper is busy, you need to use less of it.
Not necessarily.
Sometimes a bold pattern looks better when you use a larger piece of it and give it room to be seen.
The key is what you put next to it.

In several of these cards, I paired patterned paper with larger areas of white cardstock and solid-color mats. Those quieter areas give the eye somewhere to rest.
Think of it as a conversation between busy and quiet.
If your patterned paper has lots of detail, give it a larger solid border.
If you are combining several patterns, let one pattern be the star while the others play supporting roles.
This is one of the easiest ways to keep Halloween cards playful without crossing the line into visual chaos.
Haunted House Card Measurements:
Card base: 4 1/4" x 11" scored at 5 1/2"
Mat Layer 1: 4 1/8" x 5 3/8"
Pattern Paper Layer 1: 4" x 5 1/4"
Mat Layer 2: 2 1/8" x 5 1/4"
Pattern Paper Layer 2: 2" x 5 1/4"
Mat Layer 3: 1 1/8" x 4"
Pattern Paper Layer 3: 1" x 4"
Try the 60–30–10 Idea With Patterned Paper
When I'm mixing patterns, I like to think about them in terms of visual importance rather than trying to make everything match perfectly.
A simple formula to try is:
60% — dominant pattern or background
30% — secondary pattern or solid cardstock
10% — small accent pattern or embellishment
You don't have to measure this literally. It's simply a way to think about proportion.
If you put three equally bold patterns together in equal amounts, the eye doesn't know where to look first.
Instead, choose one pattern to be the star.
Then use another pattern in a smaller area.
Finally, add a tiny strip, die cut, or accent from a third pattern.
This works especially well with Halloween papers because many Halloween collections contain everything from large, dramatic prints to tiny repeating patterns. They don't all have to compete for attention.
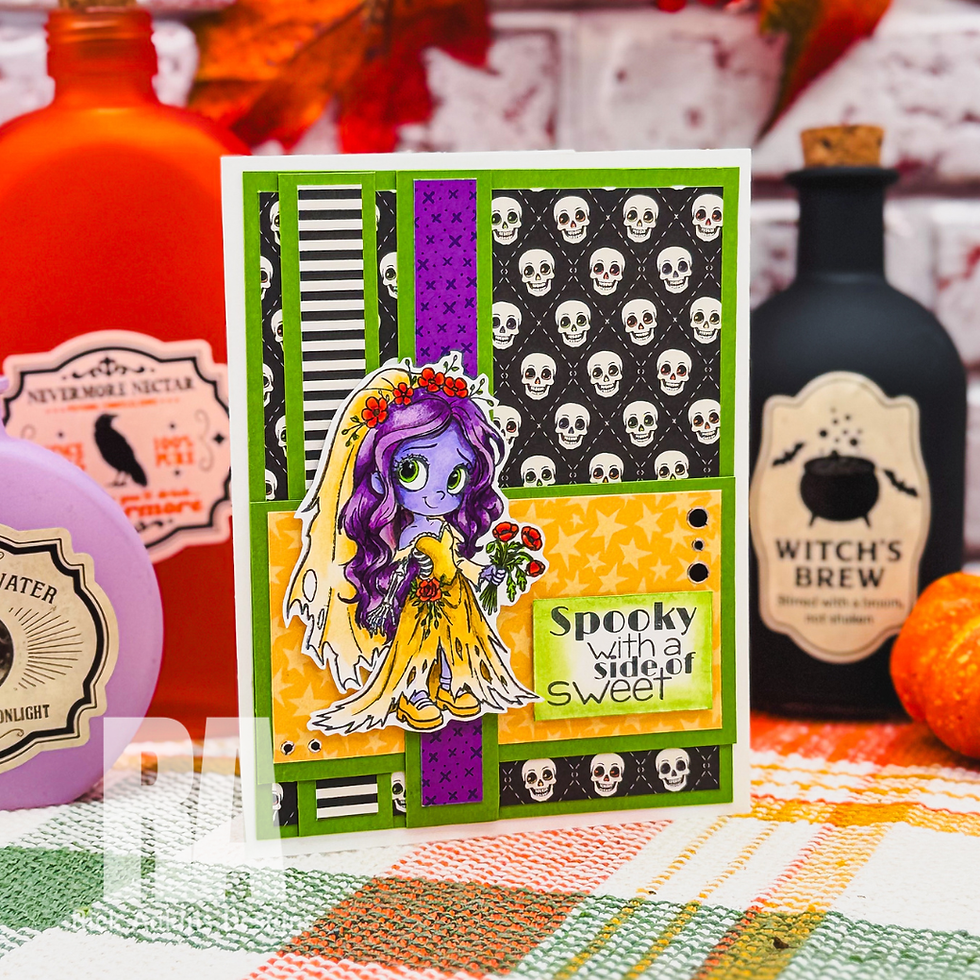
Zombie Bride Card Measurements:
Card Base: 5 1/2" x 8 1/2" scored at 4 1/4"
Mat Layer 1: 4" x 5 1/4"
Pattern Paper Layer 1: 3 3/4" x 5"
Mat Layer 2: 3/4" x 5 1/4"
Pattern Paper Layer 2: 1/2" x 5"
Mat Layer 3: 3/4" x 5 1/4"
Pattern Paper Layer 3: 1/2" x 5"
Mat Layer 4: 2 1/4" x 4 1/4"
Pattern Paper Layer 4: 2" x 3 3/4"
Don't Forget to Die-Cut Your Patterned Paper
One of the easiest ways to get more mileage from patterned paper is to stop thinking of it as a background only.
Patterned paper can become the focal point.
Cut pumpkins from it.
Cut leaves.
Cut circles.
Cut frames.
Cut geometric shapes.

Even a small scrap can become an interesting accent when you put it through a die-cutting machine.
I especially like this approach when a sheet contains a particular image or area that I love. Instead of covering it up, I can isolate that part of the pattern and turn it into a design element.
And this is where patterned paper becomes much more than "pretty paper."
It becomes a design supply.
Happy Halloween Pumpkin Card Measurements:
Card Base: 4 1/4" x 11" scored at 5 1/2"
Pattern Paper for Leaves & Stems: Scraps or 3" x 6"
Pattern Paper for Pumpkins: Scraps or 3" x 6"
Paper Strips Are a Great Way to Use Scraps
If you have a pile of Halloween scraps sitting on your desk, don't automatically throw them away.
Strips can create a lot of movement on a card.

Try cutting scraps into different widths and arranging them vertically, horizontally, or diagonally. Diagonal strips are particularly useful when you want to add energy to a design because they naturally lead the eye across the card.
You can also use strips to:
Frame a focal image
Separate two patterns
Create a background
Highlight a sentiment
Add a pop of color
Use up narrow scraps that aren't large enough for traditional layers
This is one of those techniques where there really isn't a "wrong" scrap.
The goal is simply to create enough repetition that the strips feel intentional.
Spooky Vibes Card Measurements:
Card Base: 5 1/2" x 8 1/2" scored at 4 1/4"
Pattern Paper Stirps: different size strips 1/2" to 1" or any size strips
Mat Layer 1: 3 1/8" x 4 1/8"
Cut A Part from Pattern Paper: 3" x 4"
The 6x6 One-Sheet Wonder Approach
One of the ideas I particularly wanted to explore with this collection is how much you can get from a single 6x6 sheet of patterned paper.
A small sheet may not look like it has enough paper to make multiple cards, but careful cutting can turn it into several different design elements.
This is essentially the idea behind a 6x6 One-Sheet Wonder.
The beauty of this approach is that you aren't trying to invent eight completely different designs from scratch. You're working from a limited amount of paper and finding different ways to arrange the pieces.
That limitation can actually make designing easier.
Instead of asking:
"What should I make?"
you're asking:
"What can I do with these pieces?"
That's a much more manageable design problem.
And if you are someone who has a hard time cutting into your favorite patterned paper, this is a great exercise. You get to use the paper rather than saving it indefinitely for that mysterious "perfect project" that may never come!

Shake Rattle and Boo Card Measurements:
Card Base: 4 1/4" x 11" scored at 5 1/2"
Mat Layer 1: 3 1/8" x 3 5/8"
Pattern Paper Layer: 3" x 3 1/2"
Mat Layer 2: 2 3/4" x 3 3/4"
Focal Image: 2 1/2" x 3 1/2"
How to Mix Patterns Without Making a Mess
Here is the biggest mistake I see when people start mixing patterned papers:
They choose patterns based only on whether they coordinate.
Coordinating colors are helpful, but pattern scale matters just as much.
When combining papers, try pairing:
One bold pattern + one subtle pattern + one simple geometric pattern.
For example, you might have a Halloween paper covered with large pumpkins. Pair that with a small repeating dot or star pattern. Then add a stripe or other simple geometric print.
The patterns don't have to be identical in style.
They simply need different levels of visual intensity.
Another helpful trick is to repeat a color.
If the same green appears in two different patterns, for example, the papers will feel connected even if their designs are completely different.

Halloween Fly By Card Measurements:
Card Base: 4 1/4" x 11" scored at 5 1/2"
Mat Layer 1: 1 1/4" x 3 1/4"
Pattern Paper Layer 1: 1" x 3"
Mat Layer 2: 1 1/4" x 3 1/4"
Pattern Paper Layer 2: 1" x 3"
Mat Layer 3: 1 1/4" x 3 1/4"
Pattern Paper Layer 3: 1" x 3"
Mat Layer 4: 2 3/4" x 3 3/4"
Focal Panel: 2 1/2" x 3 1/2"
Solid Cardstock Is Doing More Work Than You Think
The solid cardstock layers in these cards aren't just there to make the patterned paper look pretty.
They're helping organize the design.
A solid mat can:
Separate two competing patterns
Create a frame around a focal point
Pull a color from the patterned paper
Add contrast
Make a busy pattern feel more intentional
This is why I don't think patterned paper cards need to be complicated.
You can often take a great sheet of paper, add a solid cardstock mat, place a focal element or sentiment on top, and you already have the foundation of a finished card.
The design work is happening in the relationship between the layers.

Just Creeping In Card Measurements:
Card Base: 5 1/2" x 8 1/2" scored at 4 1/4"
Mat Layer 1: 2 3/4" x 2 3/4" cut on diagonal
Pattern Paper Layer: 2 1/2" x 2 1/2" cut on diagonal
Mat Layer 2: 2 3/4" x 3 3/4"
Focal Layer: 2 1/2" x 3 1/2"
What If You Don't Have Halloween Patterned Paper?
This idea is definitely not limited to Halloween.
The same design principles work with almost any patterned paper in your stash.
Try them with:
Christmas papers
Fall papers
Birthday patterns
Floral prints
Baby papers
Travel-themed collections
Geometric papers
Seasonal scraps
And you don't necessarily need a coordinating collection.
In fact, mixing papers from different collections can be a great way to use what you already own.
Look for a shared color, similar pattern scale, or a common visual element. That's often enough to make unrelated papers work together.

Frankly You're A Treat Card Measurements:
Card Base: 5 1/2" x 8 1/2" scored at 4 1/4"
Mat Layer 1: 2 5/8" x 3 5/8"
Pattern Paper Layer 2 1/2" x 3 1/2"
Mat Layer 2: 2 3/4" x 3 3/4"
Focal Image: 2 1/2" x 3 1/2"
Make It Easier at Your Own Skill Level
If you're newer to cardmaking, don't feel like you need to combine four or five patterns immediately.
Start with one patterned paper + one solid cardstock color.
Once you're comfortable with that, introduce a second pattern.
If you're more experienced, challenge yourself to take one sheet of patterned paper and create several cards that look different from one another.
You can also experiment with changing only one thing between cards:
Keep the papers the same but change the layout.
Keep the layout the same but change the focal element.
Use the same cardstock colors but reverse the patterned paper.
Turn a background pattern into die-cut accents.
Use the same scraps in completely different proportions.
That's a great way to practice card design without having to start from scratch every time.
The Real Secret: Stop Saving the Good Paper
I think this may be my favorite lesson from this collection.
Patterned paper is meant to be used.
Sometimes we buy a beautiful paper collection and then save our favorite sheets because we're afraid we'll "waste" them.
But when you use patterned paper intentionally, even a favorite sheet can go a long way.
A full sheet can become a card background.
A leftover section can become a die cut.
A narrow strip can become a border.
A small scrap can become a decorative accent.
And suddenly that one sheet isn't just one card anymore.
It's part of a whole collection of ideas.
That's exactly what I wanted to explore with these eight Halloween cards.

A Simple Formula to Try
If you're sitting at your craft desk with a stack of patterned paper and don't know where to begin, try this:
1. Choose one paper you love. Let it establish the theme and color palette.
2. Choose one solid cardstock color from that paper. Use it for mats, borders, or focal layers.
3. Choose one quieter pattern. Use it in a smaller area.
4. Look through your scraps. Can you turn one into a strip, die cut, or accent?
5. Give the eye somewhere to rest. White or solid cardstock can be just as important as the patterned paper.
6. Stop before everything competes. If you have one strong focal point, you probably don't need five more.
It's a simple process, but it takes a lot of the guesswork out of card design.

Eight Halloween Cards From One Design Idea
That's what I love about this collection. Although all eight cards share the same basic idea, they don't look like copies of one another.
Some use patterned paper as a major background.
Others use it in smaller pieces.
Some turn the paper into die-cut elements, while others use strips and scraps to create movement.
And that is the bigger lesson I hope you take away from these cards: you don't need eight completely different techniques to make eight interesting cards.
Sometimes you just need to look at one supply differently.
So the next time you pull out a favorite sheet of patterned paper, don't immediately ask what card it belongs on.
Ask yourself:
What could this paper become?
That question can lead you in some pretty fun directions!
Watch the Video
If you're a visual learner, the video will help you see how these patterned-paper ideas translate from individual sheets into finished Halloween cards.
You can watch the process here:
If you have problems watching the video here on my blog you can always watch it on my YouTube Channel by Clicking Here!
And if you try this idea, I'd love to know how you use patterned paper in your own cardmaking. Pull out those favorite papers, use up some of those scraps, and don't be afraid to experiment.
Remember, the goal isn't to make every card perfect. It's to learn how your supplies can work together so the next time you sit down to create, you have more confidence—and a few more ideas waiting for you.
(Wondering what I used in this video? Everything is linked to multiple sources in the thumbnails at the end of this post, or in the text below. Compensated affiliate links used when possible). As always I appreciate your support of my videos!
Supplies Used
Here you will find the list of supplies that I used to create today's card. All supplies are linked to supply sources below. Compensated affiliate links may be used at no cost to you.
Happy Crafting,

Rick Adkins
Affiliate Disclaimer:
This post contains affiliate links. If you choose to shop through these links, I may earn a small commission at no extra cost to you. Thank you so much for supporting my business!


Comments