
Caffeinated Bee Birthday Card – Fun Ink Blending & Layered Sentiments
- Rick Adkins

- Aug 1, 2025
- 4 min read
Updated: Oct 5, 2025
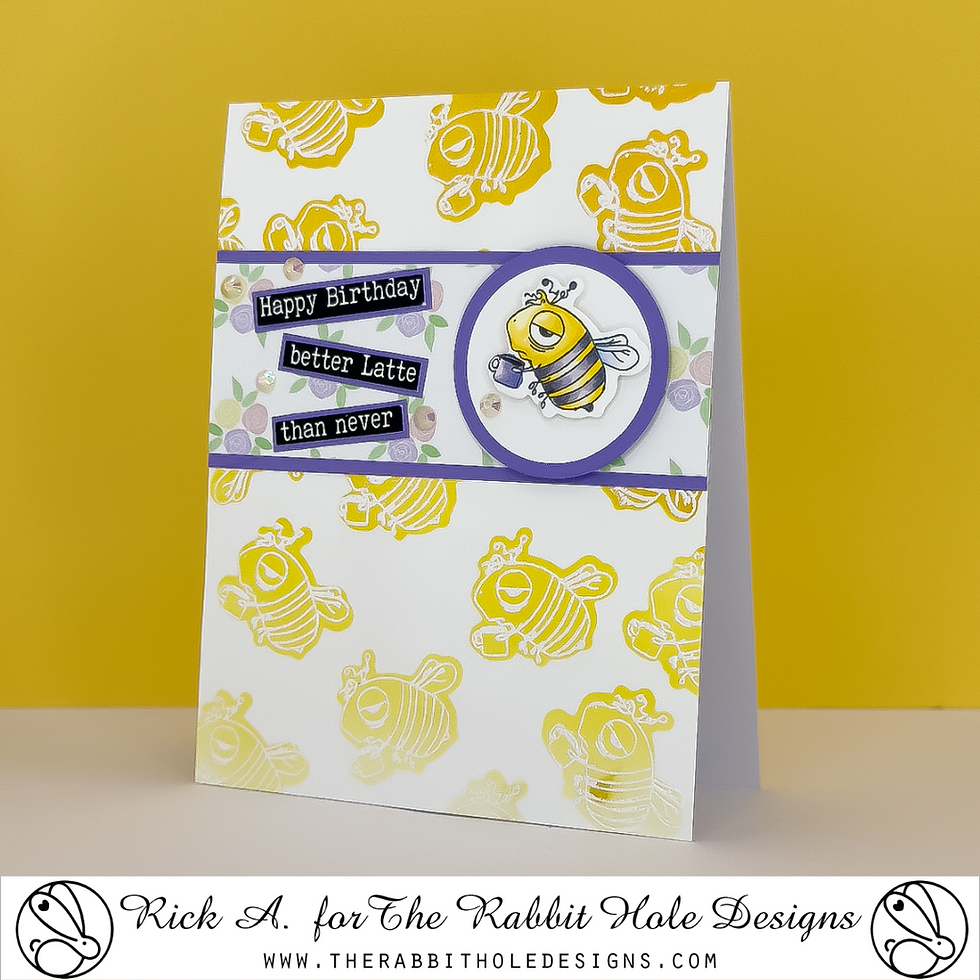
Some days, you just need a card that’s cheerful, punny, and comes together with minimal stress—and that was exactly my mood when I created this bee-lated birthday card. It all started with a little crafting detour I like to call "organized procrastination." You know the type—cleaning off your desk by making something instead. I had the Caffeinated Critters Limited Edition Bundle from The Rabbit Hole Designs sitting off to the side, and as soon as I saw that adorable bee holding a latte, the idea just took off. I knew I wanted something lighthearted and bold with a layout that would be easy to recreate, especially if you're short on time but still want something special.

Caffeinated Bee Birthday Card – Fun Ink Blending & Layered Sentiments
Let the Background Do the Work
The foundation of this card is all about a good ink-blended background—and it came together so much faster than it looks. I started with Neenah Classic Crest Solar White Cardstock and stamped that cute bee image repeatedly using Versamark ink. Since I planned to do a little heat embossing, I made sure to use my CottonTail Powder Tool beforehand. (Pro tip: don’t skip this step—it keeps those embossing flecks from clinging where you don’t want them.)
After heat embossing the stamped bees with clear embossing powder, I used the coordinating die from the Caffeinated Critters Limited Edition Bundle to cut a mask. I used that as a quick DIY stencil and blended over each bee using three shades of yellow to create a soft gradient. That resist effect from the heat embossing lets the bees peek through the color, creating a really dynamic but clean background.
One of the things I love about this technique is how flexible it is—change the critter, change the ink colors, and you’ve got a whole new look. And if you’re batch-making cards, this is a great way to keep the design consistent while still feeling layered and interesting.

A Focal Point with Personality
Even with all those bees buzzing in the background, I wanted one little guy to stand out. So I stamped the same image again, this time in Tuxedo Black Ink, and colored it with my OLO markers. I used a pretty bold purple for the coffee cup—just to give it a fun twist—and then pulled that color into the rest of the card design for a really cohesive look.
Here’s a quick tip: I used that same BV2.3 OLO marker to color both the mat behind the floral patterned paper strip and the circle die cut that frames the focal bee. That way, everything ties together even though the patterned paper and sentiment elements vary in texture and tone. It's an easy trick to keep your palette feeling intentional, especially when you're mixing patterns.
Speaking of patterns—the floral strip is from the Spring Florals 1 Pattern Paper Pack from The Rabbit Hole Designs. It adds a subtle sweetness without competing with the busy background. I love how the soft purples and greens in that pattern calm down all the buzzing yellow tones.

The Perfect Sentiment (with a Latte Charm)
Now let’s talk about that sentiment, because it might just be my favorite part of the card. I pulled it from the Blended Sentiments A2 Sentiment Sheets—which, if you haven’t tried these, are an absolute time-saver. I trimmed it into pieces so I could stack the phrases for more visual interest and dimension. The “Happy Birthday / better latte / than never” just makes me smile every time. It’s punny, it’s playful, and it totally fits the vibe of this card.
This kind of sentiment design also lets you play with layout. Try angling your strips, tucking them behind your focal point, or scattering them across the card—each tweak makes the design feel new again.

Bringing It All Together
After layering everything up on a top-folding A2 card base made from Neenah Ultra Thick cardstock (my go-to for a sturdy base), I added some white gel pen highlights to the bee and popped on a few rhinestones for just a little sparkle. That’s it—no extra fuss needed.
And honestly? This is one of those layouts I’ll definitely be coming back to. It’s versatile, it’s quick to adapt, and it gives you a chance to play with ink blending, patterned paper, and die cuts without overwhelming the card.
Final Thoughts
Whether you’re making a last-minute birthday card or just looking to try something playful and punny, this layout is such a fun one to experiment with. The Caffeinated Critters Bundle really brings the charm, and the mix of ink blending and layered sentiments adds just enough interest to keep things fun.
If you’ve got this set—or something similar—give this layout a try. And if you’re like me and occasionally forget a birthday (it happens!), this “better latte than never” sentiment is the perfect little wink.
Let me know if you try it—I’d love to see your spin on it.

Thanks for dropping by today I hope that you found a little spark of creative inspiration with my project today. Wondering what I used in this project? Everything is linked to multiple sources in the thumbnails in the Materials Used section, or in the text below. Compensated affiliate links used when possible. Make sure to use my code RICKCRAFTYCORNER at the Rabbit Hole Designs at checkout and get an exclusive free gift with your order.
Materials Used:
Here you will find the list of supplies that I used to create today's card. All supplies are linked to supply sources below. Compensated affiliate links may be used at no cost to you.
Happy Stampin'

Rick Adkins
Affiliate Disclaimer:
Just a friendly reminder, as part of my commitment to transparency, please note that some of the links provided maybe affiliate links. This means that if you make a purchase through these links, I may earn a small commission at no extra cost to you. Your support is truly appreciated!
Additionally, I kindly ask that you always accept the tracking cookie for the affiliate websites. Rest assured, this will not in any way expose your computer to viruses or compromise your information. It's simply necessary for the company to attribute the sale to the affiliate, ensuring creators like myself receive their rightful commissions.
Your trust and support enable me to continue sharing creativity through my email lists, blog, and YouTube channel. Thank you for being a valued part of our crafting community!

Comments