
Easy Graduation Cardmaking Tutorial Using Pop Up Envelope Dies

Graduation season is one of those times of year when I always seem to need a few special cards on hand. Whether you're celebrating a high school graduate, a college graduate, or someone earning a professional certification, a handmade card adds a personal touch that makes the occasion even more meaningful. I also love creating graduation cards because they're easy to customize with school colors, graduation years, and personal embellishments that make each card feel unique.
For today's project, I reached for the Happy Birthday Pop Up Envelope Die Set along with the Torn Edge Decorative Layers - Pop Up Envelope Add On Die Set and the Graduation Pop Up Envelope Add On Die Set from Scrappy Boy Stamps. Instead of focusing on lots of stamping or coloring, I let layered die cuts do most of the work. It's a great reminder that you don't always need complicated techniques to create a card that has plenty of impact.
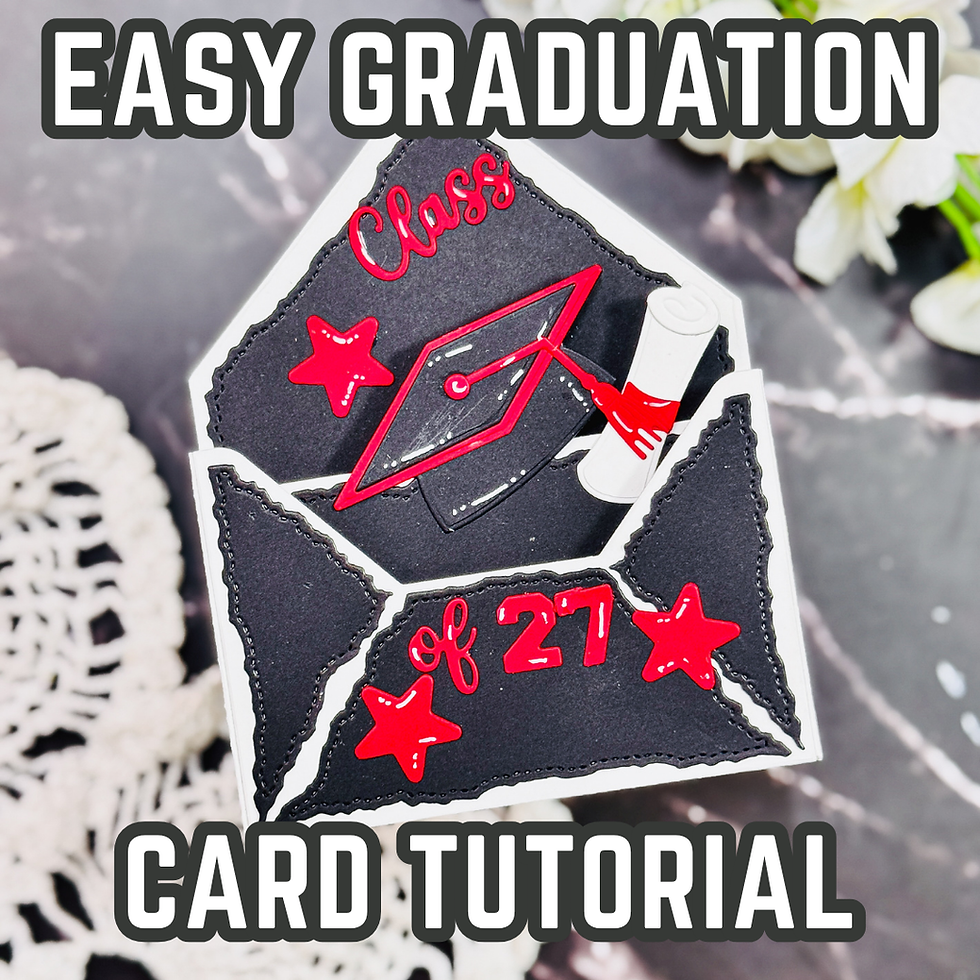
Easy Graduation Card Tutorial
Let the Die Cuts Tell the Story
One of my favorite things about interactive dies is that they naturally create a focal point. The pop-up envelope design instantly draws your eye to what's tucked inside, making it the perfect choice for a graduation theme.
Rather than adding lots of extra embellishments, I kept the design fairly clean and allowed the graduation cap, diploma, stars, and bold "Class of '27" sentiment to become the stars of the project. When your focal images already communicate the occasion clearly, adding more elements can sometimes compete for attention instead of enhancing the design.
The torn edge decorative layers also add texture without introducing busy patterns. They frame each section of the envelope while keeping the overall design polished and easy to read.

Why Limited Color Palettes Work So Well
For this card, I chose a simple color palette of black, white, and bright red. Graduation cards often feature school colors, but even if you don't know them, a classic high-contrast palette always feels elegant and celebratory.
Using only a few colors also helps create visual balance. Since interactive cards already have a lot happening with folds and layers, limiting the colors prevents the finished project from feeling overwhelming.
If you're making several graduation cards at once, choosing a small color palette can also speed up the process because you'll spend less time deciding which cardstock to use for every piece.

Die Cutting Doesn't Have to Be Complicated
Many cardmakers think interactive cards are difficult, but I find they're often much easier than they appear. The dies do most of the measuring and shaping for you, allowing you to focus on choosing colors and arranging the decorative pieces.
This type of project is also a wonderful way to use cardstock scraps. Small pieces are perfect for sentiments, stars, tassels, and other decorative accents, helping you get even more value from your crafting supplies.
If you're newer to die cutting, don't feel like you need every coordinating add-on. Start with the basic interactive die, then build your collection over time by adding themed accessory sets for birthdays, holidays, graduations, or other occasions you create most often.

Make the Design Your Own
One of the things I enjoy most about this layout is how easily it can be personalized.
Try changing the cardstock colors to match a graduate's school colors, or swap the shiny cardstock for glitter or mirror cardstock to add even more celebration. You could also tuck a handwritten note, a gift card, or even graduation photos inside the envelope for an extra-special surprise.
If you don't have the exact graduation dies, look through your stash for other celebratory elements like stars, confetti, balloons, or banner dies. Many birthday-themed supplies work beautifully for graduation cards when paired with a graduation sentiment.
You can even adapt this same interactive envelope design for retirement, promotions, weddings, baby showers, or birthdays simply by changing the decorative pieces tucked inside the envelope.

One Layout, So Many Possibilities
One of my favorite ways to get more from my supplies is to find layouts that can be used again and again. Interactive envelope cards are perfect for that because the base design stays the same while the theme changes with each new occasion.
Once you've created one, you'll probably start seeing endless possibilities for adapting it with different colors, die sets, and embellishments from your own collection. It's a great reminder that investing in versatile base dies often gives you far more creative options than buying products that only work for one occasion.
I hope this project encourages you to pull out your favorite die sets and create a graduation card that's uniquely yours. Sometimes the simplest combination of layered die cuts, thoughtful color choices, and an interactive design is all you need to create a card that's every bit as memorable as the milestone it's celebrating.

Watch the Video
If you have problems watching the video here on my blog you can always watch it on my YouTube Channel by Clicking Here!
(Wondering what I used in this video? Everything is linked to multiple sources in the thumbnails at the end of this post, or in the text below. Compensated affiliate links used when possible). As always I appreciate your support of my videos!
Supplies Used
Here you will find the list of supplies that I used to create today's card. All supplies are linked to supply sources below. Compensated affiliate links may be used at no cost to you.
Happy Crafting,

Rick Adkins
Affiliate Disclaimer:
Just a friendly reminder, as part of my commitment to transparency, please note that some of the links provided maybe affiliate links. This means that if you make a purchase through these links, I may earn a small commission at no extra cost to you. Your support is truly appreciated!
Additionally, I kindly ask that you always accept the tracking cookie for the affiliate websites. Rest assured, this will not in any way expose your computer to viruses or compromise your information. It's simply necessary for the company to attribute the sale to the affiliate, ensuring creators like myself receive their rightful commissions.
Your trust and support enable me to continue sharing creativity through my email lists, blog, and YouTube channel. Thank you for being a valued part of our crafting community!


Comments