
Handmade Christmas Card Idea | Gingerbread Greetings Series
- Rick Adkins

- Sep 26, 2025
- 4 min read
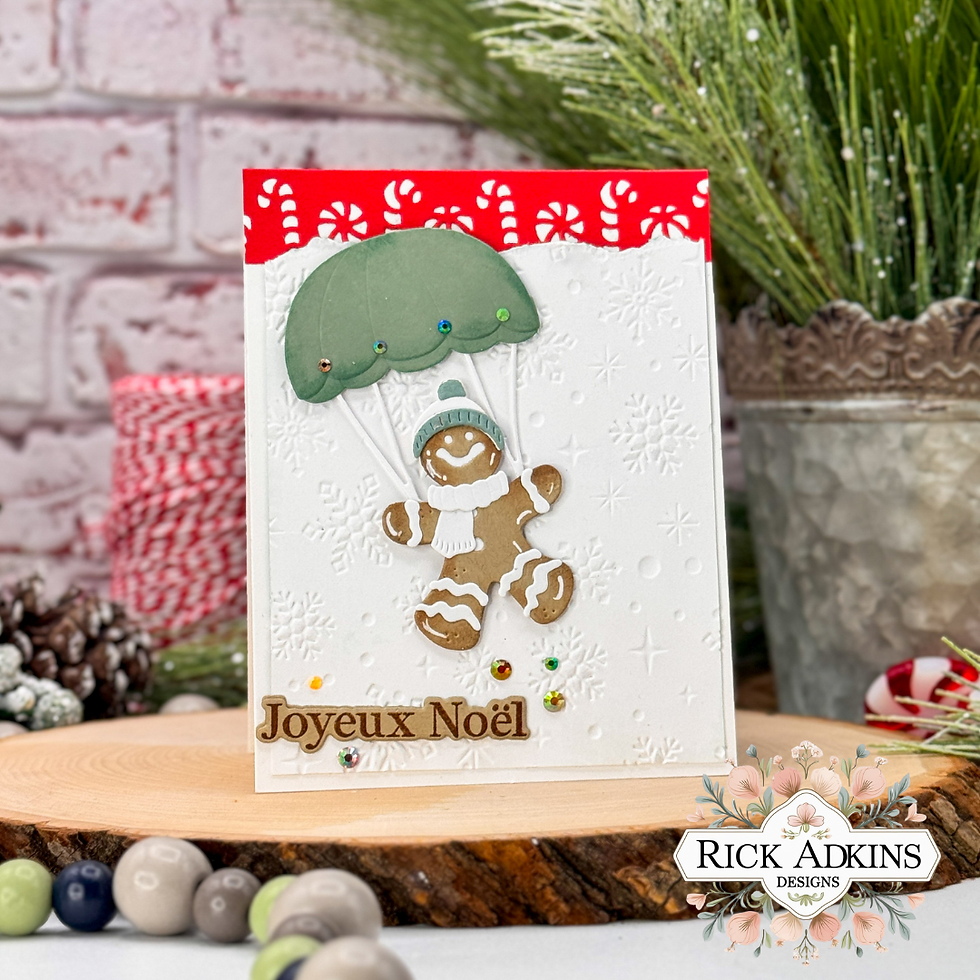
One of my favorite parts of the holiday season is making cards that feel playful and unexpected. Sure, I love a classic wreath or tree design, but sometimes it’s fun to surprise your recipient with something that makes them grin. This month in my Gingerbread Greetings series, I decided to do just that: a sweet little gingerbread man parachuting in to wish everyone a Joyeux Noël. It’s festive, whimsical, and still simple enough to put together without needing hours of crafting time.

Handmade Christmas Card Idea | Gingerbread Greetings Series
Creating a Playful Holiday Scene
When I sat down with the Gingerbread Delivery Die Set, I knew right away that little parachute had to be the star of the show. Pairing it with the cheerful gingerbread character was the perfect way to capture a bit of holiday whimsy. To keep the scene grounded, I layered the die cuts over a snowy embossed background created with the Sparkling Snow 3D Embossing Folder. Tearing the edge of the panel gave it the look of a snowbank, which is one of those small details that makes a big difference.
Pro Tip: If you’re ever looking for easy dimension, tear your cardstock edges instead of cutting them. It adds instant texture and looks much more dynamic than a straight edge.
A Candy Cane Touch
Every holiday card needs a pop of red, don’t you think? I used the Sweet Borders Die Set to cut a candy cane strip from cranberry cardstock and tucked it at the very top of my card base. It instantly brought that classic Christmas feel while balancing out all the white from the embossed background. I still remember making cards years ago where I struggled to make the background “feel finished”—a simple border like this can solve that problem instantly.

Building Dimension with Die Cuts
The sentiment was one of my favorite parts of this card. I used the Sentimentally Speaking Holidays Abroad bundle to stamp “Joyeux Noël” and cut it out with the matching die. But here’s the trick: I also cut a couple extra layers and stacked them behind the stamped one. It’s such an easy way to give your sentiment more presence on the card without adding bulk elsewhere.
Pro Tip: Always keep a few white cardstock scraps handy. You’ll be surprised how often you can use them for layering die cuts to create that professional, raised look.

The Finishing Details
Once the main pieces were in place, it was time for the fun part: details. I added white gel pen highlights to the gingerbread to make him pop, and then sprinkled a few Gingerbread Gem Stickers across the snowy background. Those little sparkles remind me of twinkling holiday lights and bring just the right amount of shine to the design.

Why This Card Works
This card has all the makings of a holiday favorite: a whimsical design that feels joyful, plenty of texture from embossing and torn paper, and just the right mix of festive colors. Most importantly, it’s approachable. You don’t need fancy techniques or complicated supplies to get a polished, unique look. And in a season when time is short but creativity is still calling, that’s exactly the kind of project we need.

Final Thoughts
If you’re looking for a Christmas card idea that stands out from the usual designs, this gingerbread parachute card is a great one to try. It shows how versatile die sets can be when paired with a little imagination and some thoughtful finishing touches. And that’s really what the Gingerbread Greetings series is all about—taking something sweet and simple and turning it into a design that makes someone’s holiday a little brighter.
Handmade Christmas Card Idea | Gingerbread Greetings Series Video Tutorial:
If you have problems watching the video here on my blog you can always watch it on my YouTube Channel by Clicking Here!
Quick Card Guide
Grab my Quick Card Guide for this project—absolutely FREE! You can find it in my Tutorial Store as an instant download. Inside, you’ll get a full-color photo of the finished card, easy step-by-step instructions, exact cutting dimensions, and a short supply list (with a link to the full list if you need it). I’ve also included direct links to the video tutorial and the featured company so you can check out the products for yourself.

(Wondering what I used in this video? Everything is linked to multiple sources in the thumbnails at the end of this post, or in the text below. Compensated affiliate links used when possible). As always I appreciate your support of my videos!
Materials Used:
Here you will find the list of supplies that I used to create today's card. All supplies are linked to supply sources below. Compensated affiliate links may be used at no cost to you.
Happy Crafting,

Rick Adkins
Affiliate Disclaimer:
Just a friendly reminder, as part of my commitment to transparency, please note that some of the links provided maybe affiliate links. This means that if you make a purchase through these links, I may earn a small commission at no extra cost to you. Your support is truly appreciated!
Additionally, I kindly ask that you always accept the tracking cookie for the affiliate websites. Rest assured, this will not in any way expose your computer to viruses or compromise your information. It's simply necessary for the company to attribute the sale to the affiliate, ensuring creators like myself receive their rightful commissions.
Your trust and support enable me to continue sharing creativity through my email lists, blog, and YouTube channel. Thank you for being a valued part of our crafting community!


Comments