
Spanner Fun Fold Halloween Card with Paper Rose Studio Supplies
- Rick Adkins

- Sep 15, 2025
- 5 min read
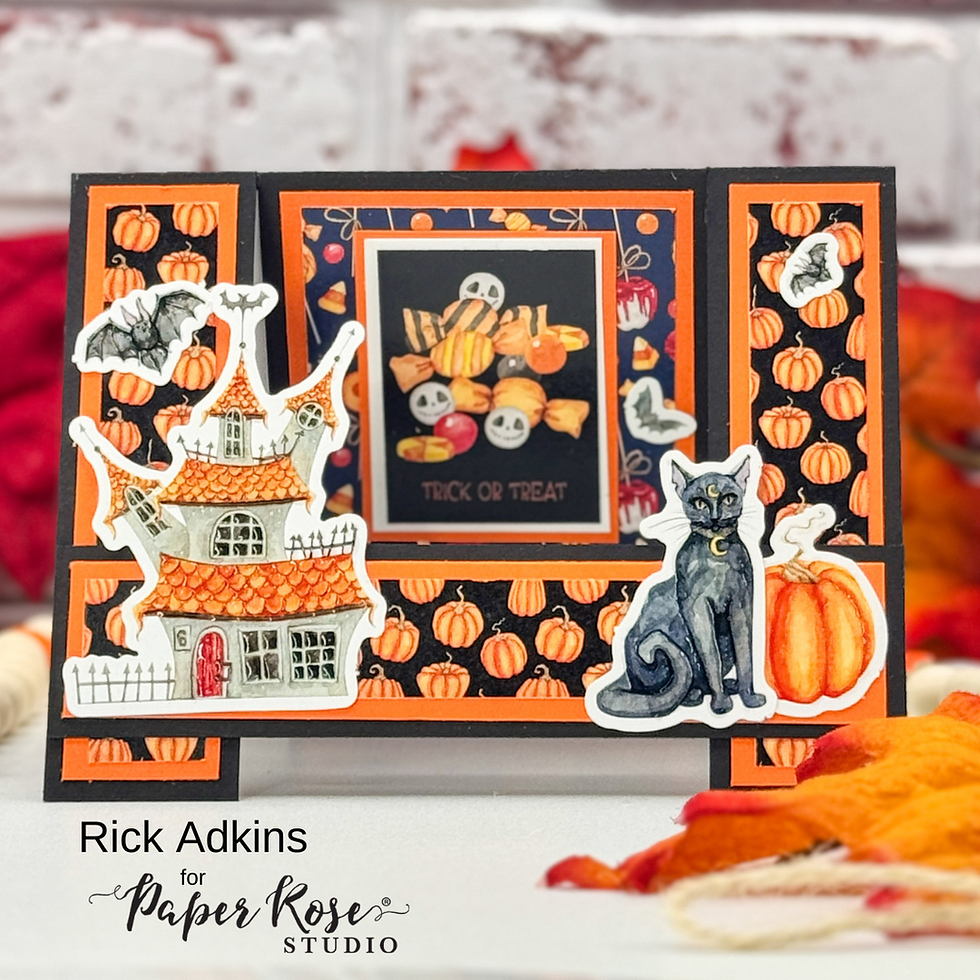
I love when a card design makes people stop and say, “Wait—how does that work?” That’s exactly what today’s project does. I’m sharing a playful Halloween spanner fun fold card that uses just three simple ingredients: cardstock, patterned paper, and die cuts. And the best part? It looks far more complicated than it really is. For this card, I reached for the Happy Halloween 6 x 6 Pattern Paper Pack and Happy Halloween Embossed Die Cuts from Paper Rose Studio, along with my go-to smooth cardstocks. Together, they came together beautifully for a design that’s dimensional, interactive, and still easy to recreate.

Spanner Fun Fold Halloween Card with Paper Rose Studio Supplies
A Fun Twist on a Classic Fold
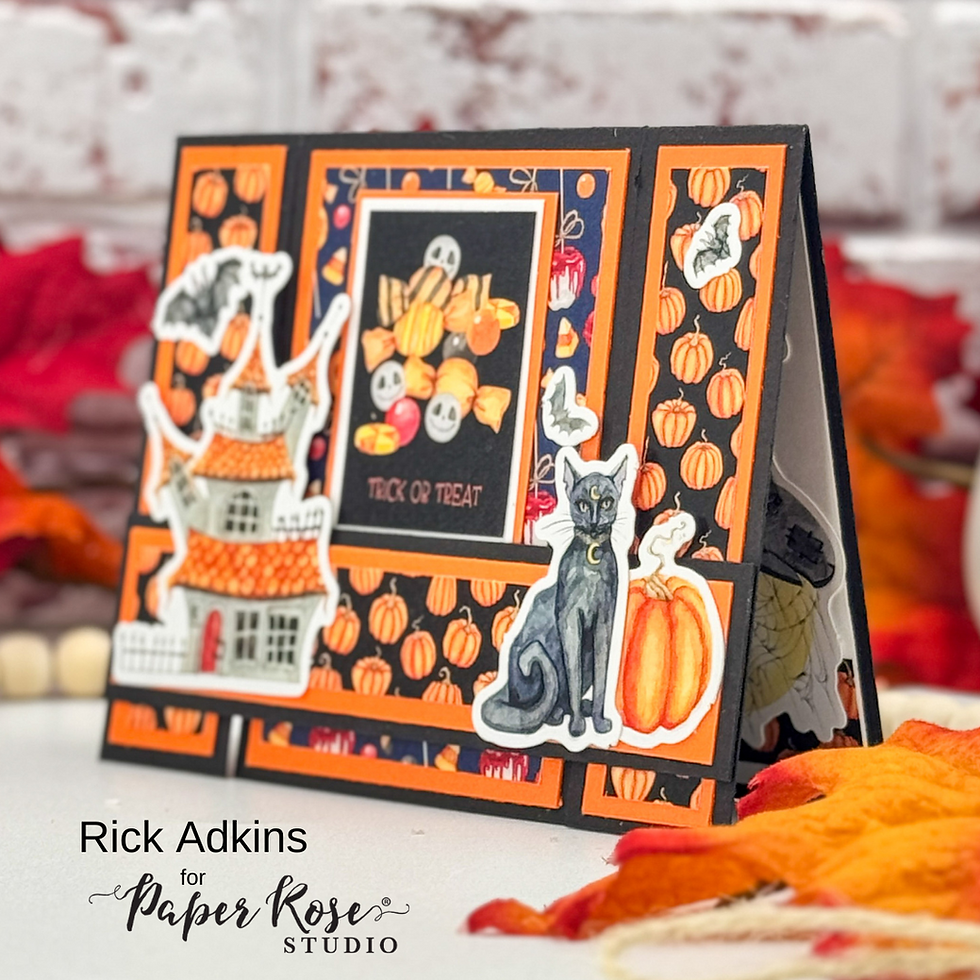
The spanner fun fold is one of those designs that feels fresh every single time you use it. It’s basically an A2 card with an extra strip of cardstock across the front that “spans” between two side panels, giving you room for added layers and embellishments. I love this fold because it solves the problem of wanting something more than a standard card base without spending hours on a complicated construction. It’s the perfect balance of unique and doable.
When I first learned this fold, I was skeptical—thinking it would take too much measuring or fiddling. But after making a few, it quickly became one of my favorites. It’s especially fun for Halloween because you can tuck in surprise elements like bats, pumpkins, or even a haunted house and let the fold do the hard work of creating the wow factor.

The Magic of Layers
For the base, I used Charcoal Black Smooth Cardstock, which really makes the Halloween colors pop. Layered on top are panels of Tangerine Orange Smooth Cardstock that frame the patterned papers from the Happy Halloween 6 x 6 Pack. Those papers are packed with pumpkins, candy, and all things spooky, and the orange matting pulls it all together.
A little tip here: don’t skip the mat layers. I know it can feel like an “extra” step, but the thin border of orange cardstock makes the patterned papers look polished and intentional. It’s like putting a frame around a picture—suddenly everything looks sharper.
Embellishing with Die Cuts
Instead of piling on lots of embellishments, I kept it simple with just a few Happy Halloween Embossed Die Cuts. A haunted house anchors the left side of the card, while a black cat and pumpkin sit on the right. To finish things off, I scattered three little bats across the panels for balance.
Here’s the thing—Halloween cards can get busy fast. My pro tip is to limit yourself to just a handful of focal pieces. That way, the fold itself shines while your embellishments enhance rather than overwhelm. It’s also a great way to keep supplies streamlined. I challenged myself to stick to cardstock, patterned paper, and die cuts only, and honestly, I love the clean, cohesive look that came from that decision.

Don’t Forget the Inside
The inside of the card is often overlooked, but with a fold like this, it’s worth giving it a little love. I added a Basic White Smooth Cardstock panel for writing, plus a narrow strip of the pumpkin patterned paper and another embossed die cut from the Happy Halloween Embossed Die Cuts to the outside. It’s a small touch, but it ties everything together.
I think of it like decorating for Halloween—you might start with the front porch, but when you add little details inside the house too, that’s what makes it feel complete.
Ideas for Other Occasions
One of my favorite things about this design is how easily it can be adapted. Swap the Halloween papers for Christmas patterns and suddenly you’ve got a festive holiday card with stockings and trees. Or try it with florals in the spring for a soft, layered garden theme. Once you have the basic fold down, it’s a template you can return to again and again, no matter the season.

Final Thoughts
This Halloween spanner fun fold card was such a joy to create. With just a few key supplies—the Happy Halloween 6 x 6 Pattern Paper Pack, the Happy Halloween Embossed Die Cuts, and a mix of black, orange, and white cardstock—I was able to make a card that’s interactive, dimensional, and perfectly seasonal. Sometimes the best projects come from setting limits and seeing how creative you can get within them.
If you’d like to see the process in action, I’ve shared a full video tutorial walking through each step. And for those of you who love having measurements and supply details handy, I’ve put together a Quick Card Guide that you can grab to recreate this project or adapt it with your own favorite papers and die cuts.
Halloween Spanner Card Video Tutorial:
If you have problems watching the video here on my blog you can always watch it on my YouTube Channel by Clicking Here!
Free Quick Card Guide Printable
Grab my Quick Card Guide for the Happy Halloween Spanner Fun Fold Card featuring the Happy Halloween 6 x 6 Pattern Paper and Happy Halloween Embossed Die Cuts; which includes key supplies, measurements, and simple instructions; along with a couple different color palette suggestions for the night sky.

(Wondering what I used in this video? Everything is linked to multiple sources in the thumbnails at the end of this post, or in the text below. Compensated affiliate links used when possible). As always I appreciate your support of my videos!
Materials Used:
Here you will find the list of supplies that I used to create today's card. All supplies are linked to supply sources below. Compensated affiliate links may be used at no cost to you.
Happy Crafting,

Rick Adkins
Affiliate Disclaimer:
Just a friendly reminder, as part of my commitment to transparency, please note that some of the links provided maybe affiliate links. This means that if you make a purchase through these links, I may earn a small commission at no extra cost to you. Your support is truly appreciated!
Additionally, I kindly ask that you always accept the tracking cookie for the affiliate websites. Rest assured, this will not in any way expose your computer to viruses or compromise your information. It's simply necessary for the company to attribute the sale to the affiliate, ensuring creators like myself receive their rightful commissions.
Your trust and support enable me to continue sharing creativity through my email lists, blog, and YouTube channel. Thank you for being a valued part of our crafting community!


Comments