
Stretch One Layout into 3 Ocean-Inspired Cards
- Rick Adkins

- Jul 30, 2025
- 5 min read
Updated: Oct 5, 2025
You know that sweet spot when a card layout just works? I recently hit that magic moment while playing with the Best Fishes Stamp and Die Bundle from Simon Says Stamp, and instead of reinventing the wheel, I leaned in—and flipped, rotated, and stretched one simple layout into three unique ocean-themed cards. This approach is one of my favorite ways to get more from a single design while keeping each card fresh and fun. Whether you're short on time or just love finding new ways to use your stash, this layout trick is a game changer.

Each card in today’s post uses the same core layout as its foundation, but a quick flip or rotation made all the difference. I also brought in the Under Water Layering Stencil Set on two of the designs to build some beautiful ocean-inspired backgrounds, and I couldn’t resist pulling out a few pieces of pattern paper from my retired Beach Party Paper Pad by Carta Bella. While that pad is no longer available, I’ve linked two great substitutes that give off the same bold, summer vibes in the supply list below the video.
Let’s dive into the details and explore how one simple layout turned into three splashy, sea-worthy cards.
Stretch One Layout into 3 Ocean-Inspired Cards
One Layout, Three Ways
There’s something so satisfying about stretching a single layout across multiple cards. For me, it’s like solving a creative puzzle—what happens if I turn this on its side, or flip the orientation? You’d be surprised how many possibilities can come out of one sketch.
For the first card, I stuck with a vertical format. I stenciled in a rich underwater background using the Under Water Layering Stencil Set, then grounded the entire scene with a crisp white strip at the bottom to anchor the sentiment. That layout became my template for the next two cards—but with a twist.
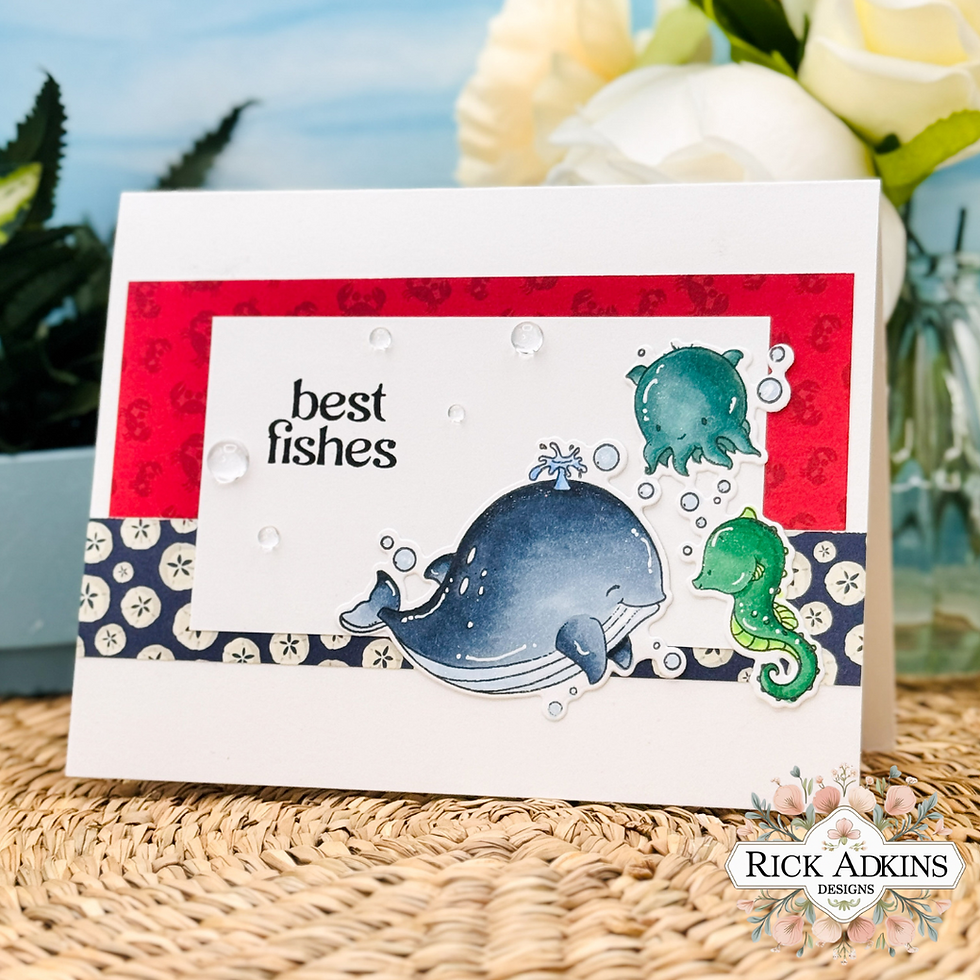
Card two flips the layout horizontally and adds in a burst of playful pattern paper from the Beach Party Paper Pad. The bright colors really brought out the personality of the sea critters, especially the orange seahorse. For card three, I rotated the layout into a landscape orientation and pulled back a little for a cleaner, more graphic look using sand dollar and navy-striped paper instead of the stenciling.
Pro Tip: When you find a layout you love, sketch it out and keep it handy. It’s an easy way to jumpstart future designs, especially if your creative mojo needs a nudge. Don’t be afraid to repeat your own work—with a few tweaks, no one will even notice.

Coloring for Depth and Character
All of the adorable sea creatures in these cards were stamped from the Best Fishes Stamp Set and cut with the coordinating dies. I colored them using my Ohuhu Brush Markers, which blended beautifully on Hammermill Smooth Cardstock. The whale especially came to life with just a little shading and some white gel pen highlights to make him sparkle.
If you're new to alcohol marker coloring or using Ohuhus, here's what helps me: work in sections and don't stress too much about blending perfection. These underwater critters are super forgiving and playful, so a bit of loose coloring actually adds to their charm.
Pro Tip: When coloring multiples, batch your steps—stamp everything at once, then color, then die cut. It keeps your process efficient and your desk (somewhat) tidy.

Stencils vs. Pattern Paper – Both Have Their Moment
I couldn’t resist the bold watery look I got from layering the Under Water Stencil Set. It gave the backgrounds such great movement—kind of like they were swirling with ocean currents. That’s one of the best things about stencils: they’re reusable, customizable, and you can change up the colors each time for something completely different.
That said, when I pulled out the Beach Party Paper Pad, I was reminded just how much personality a good patterned paper can bring to a card. Even though that collection is now retired, I’ve linked to a couple of newer options in the same spirit: think stripes, dots, and beachy color palettes.
If you’re torn between ink blending and pattern paper, you really don’t have to choose. Use both across different cards in the same set to create a coordinated but varied look. That contrast in texture and tone adds so much interest to a set of designs that technically started with the same foundation.
Stretching Your Stash and Your Skills
One of the biggest benefits of reusing a layout is how it forces you to look at your supplies differently. That same sentiment—“You’re o-fish-ally the best”—lands differently depending on which critter you pair it with or what direction the layout is facing.
This technique also gives you space to try something new without the pressure of designing from scratch. Want to experiment with new stencils or paper combos? Start with a tried-and-true layout and build from there. It takes the guesswork out and makes room for creative play.

Wrap-Up + Watch the Video
If you’re curious how these three cards came together, I walk through each one in the video tutorial linked below. You’ll see how a single design can spark three very different cards—each one fun, cheerful, and packed with personality.
I’d love to know which layout you liked best. Or even better—try this trick yourself and let me know how you stretched one of your favorite layouts in a new way. If you do, tag me so I can see your creations!
Happy crafting, friends. And remember—you don’t need a dozen new ideas to make something amazing. Sometimes, all you need is one great layout and a little imagination.

Marker Color Combos:
Card 1 - You're O-fish-ally the best Vertical Card
Octopus - YR090, YR070, BR208
Seahorse Belly - Y1, Y3, YG6
Seahorse - G190, G170, G130
Whale - G6, G4, G360
Card 2 - Best Fishes Card
Octopus - G5, BG8, BG5
Seahorse - G2, G3, G4, (Belly) G140, G130
Whale - BGII09, BGII08, BGII03, (Belly) MG030, MG020
Card 3 - Ofishally Card
Octopus - G6, G4, G360
Seahorse - Y5, YR3, YR090
Whale - PB3, B190, B180, (belly) G4, G360
Stretch One Layout into 3 Ocean-Inspired Cards Video Tutorial:
If you have problems watching the video here on my blog you can always watch it on my YouTube Channel by Clicking Here!
(Wondering what I used in this video? Everything is linked to multiple sources in the thumbnails at the end of this post, or in the text below. Compensated affiliate links used when possible). As always I appreciate your support of my videos!
Materials Used:
Here you will find the list of supplies that I used to create today's card. All supplies are linked to supply sources below. Compensated affiliate links may be used at no cost to you.
Happy Stampin'

Rick Adkins
Affiliate Disclaimer:
Just a friendly reminder, as part of my commitment to transparency, please note that some of the links provided maybe affiliate links. This means that if you make a purchase through these links, I may earn a small commission at no extra cost to you. Your support is truly appreciated!
Additionally, I kindly ask that you always accept the tracking cookie for the affiliate websites. Rest assured, this will not in any way expose your computer to viruses or compromise your information. It's simply necessary for the company to attribute the sale to the affiliate, ensuring creators like myself receive their rightful commissions.
Your trust and support enable me to continue sharing creativity through my email lists, blog, and YouTube channel. Thank you for being a valued part of our crafting community!


Comments