
Turn Pattern Paper into Simple but Beautiful Backgrounds
- Rick Adkins

- Apr 29
- 5 min read
Pattern paper is one of those supplies that many of us love to collect, but it can sometimes be tricky to know how to use it in a way that feels polished instead of overwhelming. I often find myself reaching for patterned papers when I want to create a card with lots of visual interest but still keep the design clean and balanced. That was exactly the inspiration behind today’s card.
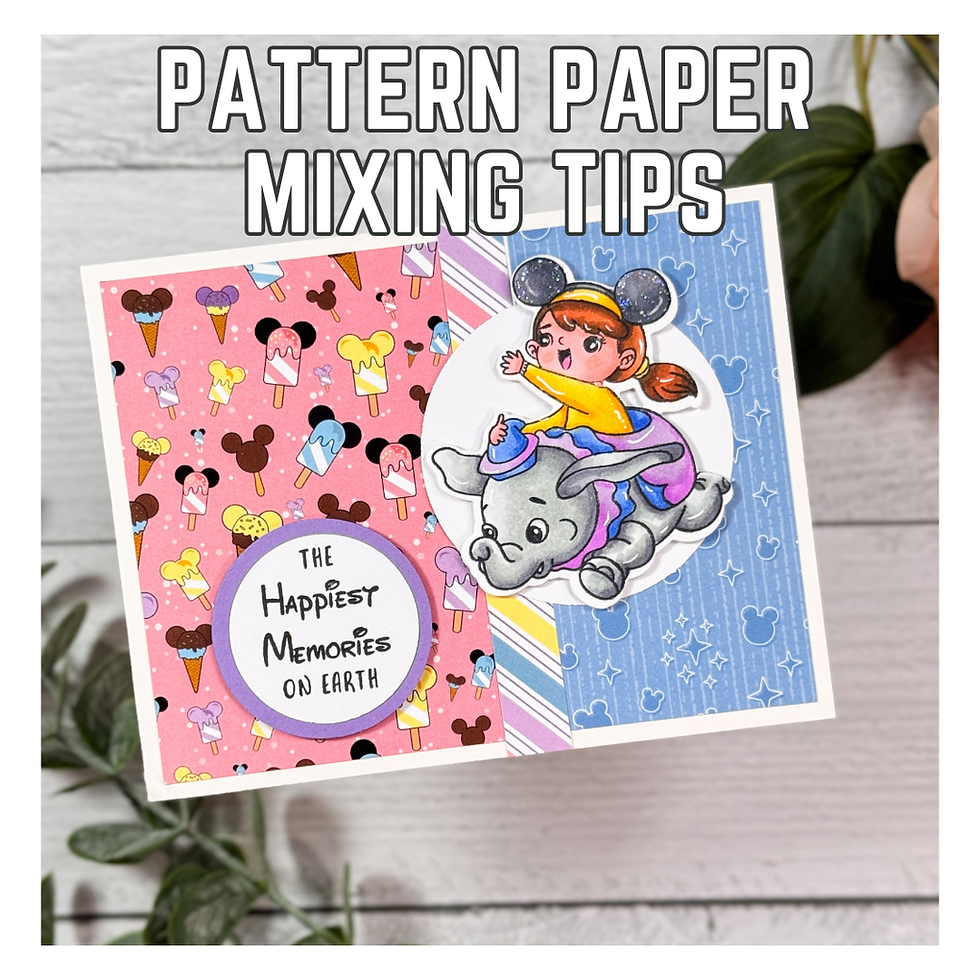
For this clean and layered theme park card, I wanted the background to feel playful and fun while still allowing the stamped focal image to shine. Using the adorable papers from the I Love Theme Parks 6x9 Pattern Paper Pack from Scrappy Boy Stamps made it easy to build a bright, cheerful design that feels detailed without adding extra bulk or complexity.
Let the Pattern Paper Do the Work
One of the easiest ways to create an eye-catching card background is to let the patterned paper become part of the design rather than treating it like a simple backdrop. On this card, I used two coordinating papers—one pink and one blue—to divide the card front into sections.
The pink paper on the left is filled with sweet theme park treats, while the blue paper on the right has a softer, whimsical pattern. Both designs work together because they share a similar playful theme, but each one serves a different purpose. The pink side brings in energy and detail, while the blue side creates a softer resting place for the focal image.
This kind of pattern paper mixing works well because it creates contrast while keeping the project cohesive. When papers share a color palette or theme, they naturally complement one another even if the prints are very different.

Use Layers to Create Separation
When working with bold patterns, layering is what keeps the design from feeling too busy. I added a narrow strip of striped pattern paper between the two larger background panels, and that simple detail helps separate the prints while tying the colors together.
This is one of my favorite ways to make multiple patterns work on one card. Instead of placing two busy prints side by side, adding a thin coordinating strip creates a visual transition that feels intentional and balanced.
It also gives the card a more finished, layered look without requiring lots of extra embellishments.

Keep the Focal Point Simple and Strong
Because the background has so much personality, I wanted the focal point to stay clean and prominent. I used the sweet elephant ride image from the Cute Kids Theme Park Stamp Set, colored it with alcohol markers, and then die cut it with the coordinating Cute Kids Theme Park Outline Dies.
Placing the image on a white circle die cut helps it stand out against the patterned background. That white circle acts almost like a spotlight—it gives the eye a place to rest and makes the image the star of the card.
This is a helpful design trick anytime you are using patterned paper behind a detailed stamped image. A simple solid layer behind the focal point prevents the background from competing with the stamped design.

Add Repetition for a Cohesive Design
Another small detail that helps pull this card together is color repetition. I used lavender behind the sentiment circle, which ties in with the lavender tones in the striped paper and the elephant saddle.
Repeating colors in different areas of the card creates unity and makes the design feel intentional. Even when you're using several patterns, repeating just one or two colors can help everything look coordinated.
This is especially useful when mixing papers from the same collection because the palette is already designed to work together. You can simply choose one accent color and repeat it in your layers, embellishments, or sentiment matting.

Adapt This Idea with Any Pattern Paper
One of the things I love most about this layout is how easy it is to customize. You can use this same design with almost any themed paper collection in your stash.
If you have floral papers, this layout would make a beautiful spring or birthday card. If you have holiday prints, it could easily become a festive Christmas or Halloween card. You can even simplify it further by using just one patterned paper panel and a single focal image.
The key is to choose papers that share a common color story, then use layering to keep the patterns feeling balanced.
That means you don’t need specialty supplies to recreate this idea—just patterned papers that coordinate and a focal image that can stand out against them.

A Fun Way to Stretch Your Supplies
This card is a great reminder that patterned paper can do so much of the design work for you. By combining a few coordinating prints, adding clean layers, and giving the focal image room to shine, you can create a card that looks detailed and thoughtful without needing complicated techniques.
That’s one of my favorite ways to craft—using simple design principles to make everyday supplies feel special.
So if you’ve been holding onto those pretty patterned papers because you weren’t sure how to use them, try dividing your card front into sections and let the papers do the heavy lifting. It’s an easy way to create a layered, professional-looking handmade card while making the most of what you already have.
And honestly, that’s one of the best parts of cardmaking—finding creative ways to turn simple supplies into something beautiful.
Thanks for dropping by today I hope that you found a little spark of creative inspiration with my project today. Wondering what I used in this project? Everything is linked to multiple sources in the thumbnails in the Materials Used section, or in the text below. Compensated affiliate links used when possible.
Materials Used:
Here you will find the list of supplies that I used to create today's card. All supplies are linked to supply sources below. Compensated affiliate links may be used at no cost to you.
Happy Crafting,

Rick Adkins
Affiliate Disclaimer:
Just a friendly reminder, as part of my commitment to transparency, please note that some of the links provided maybe affiliate links. This means that if you make a purchase through these links, I may earn a small commission at no extra cost to you. Your support is truly appreciated!
Additionally, I kindly ask that you always accept the tracking cookie for the affiliate websites. Rest assured, this will not in any way expose your computer to viruses or compromise your information. It's simply necessary for the company to attribute the sale to the affiliate, ensuring creators like myself receive their rightful commissions.
Your trust and support enable me to continue sharing creativity through my email lists, blog, and YouTube channel. Thank you for being a valued part of our crafting community!


Comments