
Winter Wishes & Snowflake Kisses Card
- Rick Adkins

- Dec 17, 2024
- 4 min read
Hello, crafty friends! Winter is one of my favorite times of the year to create cards—there’s something magical about capturing the chill of a snowy day on paper. Today, I’m sharing a card that’s all about sparkle, texture, and wintry charm. It features the Winter Wishes Stamp Set, Blue Topaz Embossing Powder, and Clear Gloss Super Fine Embossing Powder from WOW Embossing Powder. These products came together beautifully to create a card filled with frosty goodness. Let’s dive into how this card came together and some tips that might inspire your own winter creations!

Winter Wishes & Snowflake Kisses:
The Magic of Layering Stencils and Embossing
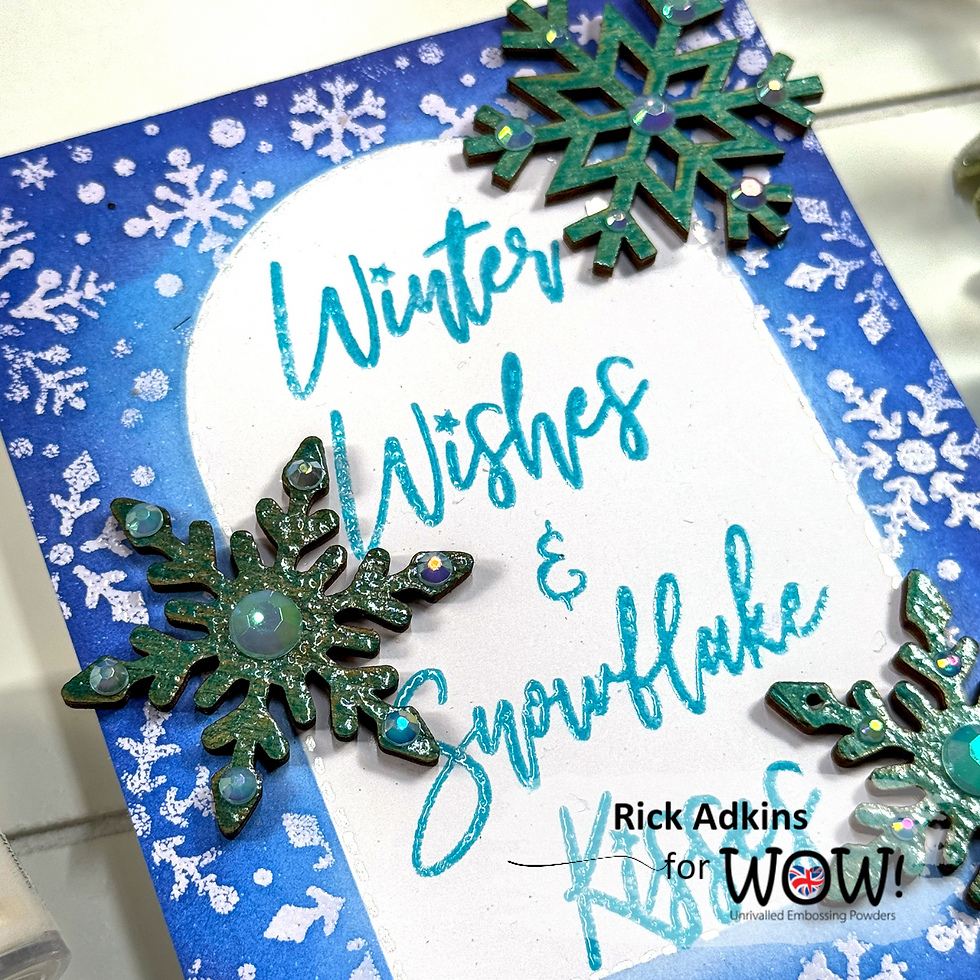
When it comes to winter-themed cards, creating dimension and shine is key. For this design, I layered two stencils—the Rounded Arch Stencil from Miss Ink Stamps (used as a mask) and the Snowfall Stencil from Newton’s Nook Designs. This combination gave me a framed snowflake effect that feels both elegant and playful.
After prepping my WOW Superior Cardstock with the Cotton Tail Powder Tool (from The Rabbit Hole Designs), I applied Ultra Slow Drying Embossing Ink through the Snowfall Stencil. Here’s a pro tip: make sure your ink pad is juicy, so you get clean, crisp impressions through the stencil. Once the ink was applied, I removed the mask and stencil, covered the cardstock with Clear Gloss Super Fine Embossing Powder, and heat set it to a smooth, glossy finish.
The result? A subtle, shimmering snowfall effect that’s perfect for any winter scene!

Sparkling Sentiments with Embossing Powder
Every card needs a standout sentiment, and for this one, I turned to the Winter Wishes sentiment from the stamp set. I used Blue Topaz Embossing Powder to make the sentiment shine—it’s a gorgeous, icy blue with just the right amount of sparkle.
One trick I always use before stamping a sentiment is to prep the cardstock with an anti-static powder tool. This ensures that embossing powder only sticks to where you want it. I’ve learned this the hard way—nothing ruins a project faster than stray embossing powder clinging to every corner of your cardstock!
Once I heat set the sentiment, I let it cool for a few seconds before handling it. Patience is key here—trust me, smudging embossed details is a mistake you only make once!

Ink Blending for a Frosty Gradient
To bring everything together, I added a soft, wintry glow using Pinkfresh Studios inks in Slumber, Blue Jay, Sapphire, and Stargazer. Starting with the lightest shade, I worked my way outward to create a gradient that framed the snowy scene.
Here’s a fun pro tip: when ink blending over embossed areas, use a light hand and build the color gradually. The embossing will resist the ink, but it’s always a good idea to buff away any excess ink with a paper towel for a clean, polished finish.
Once the mask was removed, the effect was simply stunning—a soft, frosty background that let the embossed snowfall and sentiment shine.
Finishing Touches: It’s All in the Details
I love adding little details to make a card extra special. For this design, I used my Silver Uni-ball Signo Gel Pen to draw faux stitching along the inner edge of the arch. It’s a simple detail that adds a touch of elegance and frames the design beautifully.
For embellishments, I reached for some wooden snowflakes from my stash. To tie them into the card’s color scheme, I pressed each one into my embossing ink and coated them with Blue Topaz Embossing Powder. Once melted, they became sparkly, dimensional accents that perfectly complemented the card.
And because no winter card is complete without a little extra sparkle, I added
Sea Glass Twinkle Rhinestones from Trinity Stamps to the center of each snowflake. These tiny details catch the light beautifully and bring the entire design to life.

Bringing It All Together
After assembling the card front onto an A2 top-folding card base, I couldn’t help but smile at how it turned out. This card combines so many of my favorite techniques—heat embossing, ink blending, and creative layering. It’s a reminder that with just a few key supplies and a little patience, you can create something truly magical.

Final Thoughts
Winter cards are such a joy to create because they allow us to play with sparkle, texture, and icy color palettes. I hope this card inspires you to try combining stencils, embossing powders, and ink blending to create your own snowy masterpiece.
If you decide to give this design a try, I’d love to see your take! Feel free to share your creations on social media and tag me—I love connecting with fellow crafters.
Happy crafting, and stay warm!
Materials Used:
Here you will find the list of supplies that I used to create today's card. All supplies are linked to supply sources below. Compensated affiliate links may be used at no cost to you.
Happy Stampin'

Rick Adkins
Affiliate Disclaimer:
Just a friendly reminder, as part of my commitment to transparency, please note that some of the links provided maybe affiliate links. This means that if you make a purchase through these links, I may earn a small commission at no extra cost to you. Your support is truly appreciated!
Additionally, I kindly ask that you always accept the tracking cookie for the affiliate websites. Rest assured, this will not in any way expose your computer to viruses or compromise your information. It's simply necessary for the company to attribute the sale to the affiliate, ensuring creators like myself receive their rightful commissions.
Your trust and support enable me to continue sharing creativity through my email lists, blog, and YouTube channel. Thank you for being a valued part of our crafting community!


Comments