
Watercolor Poinsettia Christmas Card | The Rabbit Hole Designs Poinsettia & Pinecones
- Rick Adkins

- Nov 6, 2025
- 5 min read
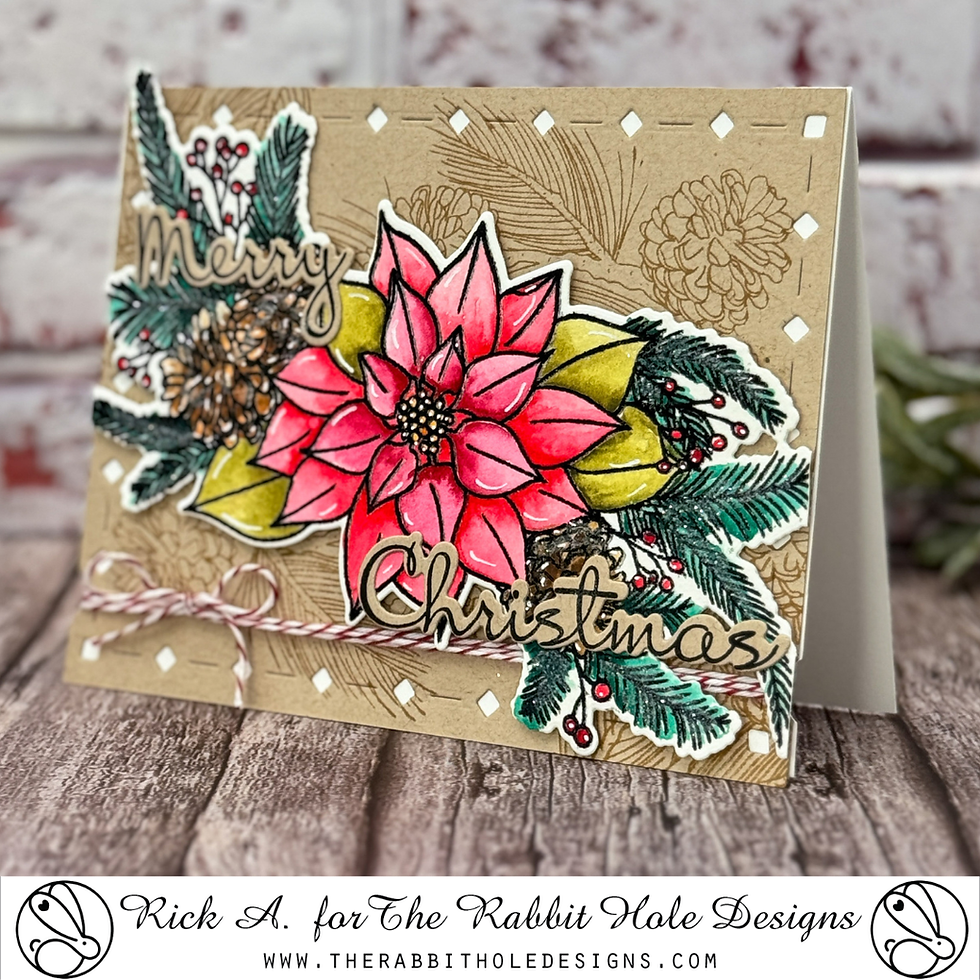
Hey there, crafty friends! Today I’m sharing one of my favorite types of holiday projects—a warm, rustic Christmas card with a watercolor twist. There’s something so timeless about pairing a bright red poinsettia with the earthy tones of kraft cardstock, and this design captures that cozy, handmade charm perfectly. I used the Poinsettia & Pinecones Stamp Set, Outline Dies, and Diamond District Layering/Nesting Dies from The Rabbit Hole Designs to create a card that looks detailed and layered but is surprisingly easy to pull together. Plus, this stamp and die combo is currently on clearance for only $21.97, which makes it a great time to grab it before it’s gone.

I’ve always loved watercoloring during the holiday season—it’s my version of slowing down with a mug of cocoa and a paintbrush. Even if you’re not super confident with watercoloring, I promise this technique will make you feel like an artist. It’s forgiving, it’s relaxing, and it turns simple stamped images into something really special.
Watercolor Poinsettia Christmas Card | The Rabbit Hole Designs Poinsettia & Pinecones
Watercoloring the Holiday Focal Point
To start, I prepped a piece of Canson XL Watercolor Paper with my Cottontail Powder Tool, then stamped the poinsettia and pinecone swag from the Poinsettia & Pinecones set using Versafine Nocturne Ink. I heat embossed it with Clear Ultra Fine Embossing Powder, which gives those raised lines that make watercoloring so much easier—like coloring inside the lines for grown-ups.
For the coloring, I used Tim Holtz Watercolor Pencils and a Tim Holtz Water Brush. I love how these pencils give you control over where the color goes—you can add pigment exactly where you want deeper shadows, then pull it out gently with the brush for a soft, blended look. I like to let each layer dry before adding the next; it helps create depth without muddying the colors.
Once everything was dry, I cut the image out with the coordinating dies. I’m a big fan of outline dies for intricate florals because they save so much time and keep the edges crisp.
Pro Tip: If your watercolor paper warps a bit after heat embossing or painting, you can run it through your die-cut machine between two clean cutting plates to flatten it back out—it works like magic.

Building the Background
To balance out the vibrant florals, I reached for Neenah Desert Storm 100 lb cardstock for my background. Kraft cardstock instantly adds warmth to a holiday card, and it pairs beautifully with watercolor textures. Using the pine bough image from the same stamp set, I stamped a tone-on-tone pattern in Caramel Ink all over the panel. This gives just enough background interest without competing with the focal point.
Then, to add a bit of structure and texture, I used the largest die from the Diamond District Layering/Nesting Dies set. I love how the diamond and dash cutouts peek through just slightly, creating a subtle frame that feels polished. I attached the finished panel to a Neenah Ultra Thick Cardstock base for a sturdy, professional finish.

Assembling the Card
For a touch of homespun charm, I wrapped red and white baker’s twine around the bottom of the panel a few times and tied it into a bow. It’s such a simple addition, but it ties the whole design together—literally.
Next came the star of the show: that beautifully watercolored poinsettia and pinecone swag. I attached it with foam adhesive to give the card some depth and dimension. Anything that extended past the edge of the card base, I trimmed off to keep things neat and balanced.
The “Merry Christmas” sentiment from the same stamp set worked perfectly here. I stamped it onto a scrap of Neenah Desert Storm cardstock, cut it out with the matching dies, and added it across the arrangement. Having coordinating sentiment dies is such a small detail, but it adds that finished, professional touch to a handmade card.

Finishing Touches That Shine
For highlights and little pops of life, I went in with my Posca Extra Fine White Paint Marker. Adding a few tiny dots or strokes on the petals and pinecones really makes the image come alive. Then, because it’s the holidays and a little sparkle is practically required, I brushed on Rock Candy Glitter over the pine boughs. It catches the light beautifully without overwhelming the natural look of the watercolor.
Pro Tip: If you’re mailing your card and worried about the glitter rubbing off, seal it lightly with a thin layer of Glossy Accents or spray fixative once it’s dry.
Wrapping It Up
This project perfectly combines two of my favorite things—the warmth of kraft cardstock and the soft vibrance of watercolor. The contrast between the two gives this card an elegant yet handmade feel that fits right in with cozy sweaters, twinkle lights, and hot chocolate season.
If you’ve been hesitant to try watercoloring, this is the project to start with. Watercolor pencils make it so much more approachable, and the embossed outlines help guide you every step of the way. And don’t forget to check out The Rabbit Hole Designs clearance section—this Poinsettia & Pinecones Stamp and Die Bundle is a steal right now at $21.97, and it’s such a versatile set for both traditional and modern holiday cards.

Thanks for dropping by today I hope that you found a little spark of creative inspiration with my project today. Wondering what I used in this project? Everything is linked to multiple sources in the thumbnails in the Materials Used section, or in the text below. Compensated affiliate links used when possible.
Materials Used:
Here you will find the list of supplies that I used to create today's card. All supplies are linked to supply sources below. Compensated affiliate links may be used at no cost to you.
Happy Crafting,

Rick Adkins
Affiliate Disclaimer:
Just a friendly reminder, as part of my commitment to transparency, please note that some of the links provided maybe affiliate links. This means that if you make a purchase through these links, I may earn a small commission at no extra cost to you. Your support is truly appreciated!
Additionally, I kindly ask that you always accept the tracking cookie for the affiliate websites. Rest assured, this will not in any way expose your computer to viruses or compromise your information. It's simply necessary for the company to attribute the sale to the affiliate, ensuring creators like myself receive their rightful commissions.
Your trust and support enable me to continue sharing creativity through my email lists, blog, and YouTube channel. Thank you for being a valued part of our crafting community!


Comments